CAUTION / NOTICE / HINT
-
Use the same procedure for the RH side and LH side.
-
The following procedure is for the LH side.
PROCEDURE
- Click here
INSTALL OUTER REAR VIEW MIRROR ASSEMBLY
-
Engage the 2 guides and claw.
-
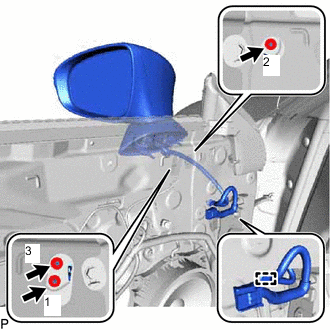
Temporarily install the outer rear view mirror assembly with the 3 nuts.
-
Tighten the 3 nuts to install the rear view mirror assembly.
Tip:Tighten the nuts in the order shown in the illustration.
5.5 N*m 56 kgf*cm 49 in.*lbf -
Engage the clamp.
-
- Click here
INSTALL OUTER MIRROR INSTALL HOLE COVER
-
Remove the release paper from a new outer mirror install hole cover.
Tip:After removing the release paper, keep the exposed adhesive free from foreign matter.
-
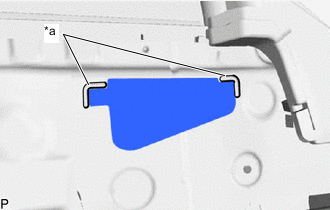
*a Reference Point Install the outer mirror install hole cover while aligning it to the reference points on the front door panel.
Note:Securely install the outer mirror install hole cover preventing wrinkles and air bubbles.
-
- Click here
INSTALL OUTER MIRROR PROTECTOR
-
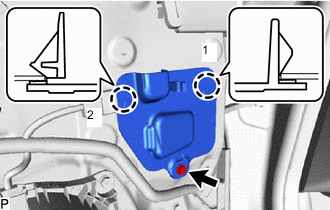
Engage the 2 claws to temporarily install the outer mirror protector.
Tip:Engage the claws in the order shown in the illustration.
-
Install the outer mirror protector with the screw.
1.75 N*m 18 kgf*cm 15 in.*lbf -
Engage the clamp.
-
Connect the connector.
-
- Click here
INSTALL FRONT DOOR TRIM BOARD SUB-ASSEMBLY
- Click here
INSTALL FRONT DOOR NO. 1 STIFFENER CUSHION
- Click here
INSTALL COURTESY LIGHT ASSEMBLY
- Click here
INSTALL DOOR TRIM COVER
- Click here
INSTALL MULTIPLEX NETWORK MASTER SWITCH ASSEMBLY WITH FRONT DOOR ARMREST BASE PANEL (for Driver Side)
- Click here
INSTALL POWER WINDOW REGULATOR SWITCH ASSEMBLY WITH FRONT DOOR ARMREST BASE PANEL (for Front Passenger Side)
- Click here
INSTALL FRONT DOOR INSIDE HANDLE BEZEL PLUG
- Click here
CONNECT CABLE TO NEGATIVE BATTERY TERMINAL
Note:When disconnecting the cable, some systems need to be initialized after the cable is reconnected.