PROCEDURE
- Click here
REMOVE REAR SEAT ASSEMBLY
- Click here
REMOVE LUGGAGE COMPARTMENT DOOR COVER
- Click here
REMOVE LUGGAGE COMPARTMENT DOOR HINGE COVER RH
- Click here
REMOVE NO. 1 LUGGAGE COMPARTMENT TRIM COVER (w/o Spare Tire)
- Click here
REMOVE NO. 1 LUGGAGE COMPARTMENT TRIM COVER (w/ Spare Tire)
- Click here
REMOVE SPARE WHEEL COVER TRAY (w/o Spare Tire)
- Click here
REMOVE REAR LUGGAGE COMPARTMENT TRIM COVER
- Click here
REMOVE NO. 1 LUGGAGE COMPARTMENT LIGHT ASSEMBLY
- Click here
REMOVE FRONT UPPER LUGGAGE COMPARTMENT TRIM COVER
- Click here
REMOVE FRONT LUGGAGE COMPARTMENT TRIM COVER
- Click here
REMOVE ROPE HOOK ASSEMBLY
- Click here
REMOVE DECK SIDE TRIM BOX RH
- Click here
REMOVE LUGGAGE COMPARTMENT TRIM COVER RH
- Click here
REMOVE STEREO COMPONENT AMPLIFIER ASSEMBLY WITH BRACKET
-
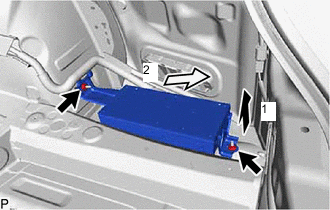
Remove the 2 nuts.
-
Pull the stereo component amplifier assembly with bracket in the direction indicated by the arrow (1) shown in the illustration.
-
Pull the stereo component amplifier assembly with bracket in the direction indicated by the arrow (2) shown in the illustration.
-

Disconnect each connector.
-
Disengage the clamp to remove the stereo component amplifier assembly with bracket.
-
- Click here
REMOVE NO. 2 AMPLIFIER BRACKET
-
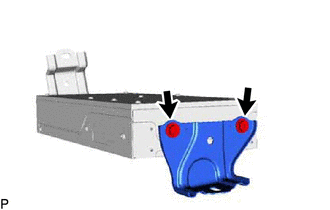
Remove the 2 screws and No. 2 amplifier bracket.
-
- Click here
REMOVE NO. 1 AMPLIFIER BRACKET
-
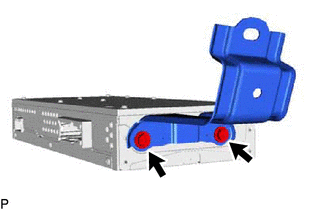
Remove the 2 screws and No. 1 amplifier bracket.
-
- Click here
REMOVE STEREO COMPONENT AMPLIFIER ASSEMBLY