TORQUE VECTORING DIFFERENTIAL ECU(for Torque Vectoring Differential) INSTALLATION
PROCEDURE
-
INSTALL TORQUE VECTORING DIFFERENTIAL ECU ASSEMBLY
-
Insert the 2 hooks to temporarily install the torque vectoring differential ECU assembly.
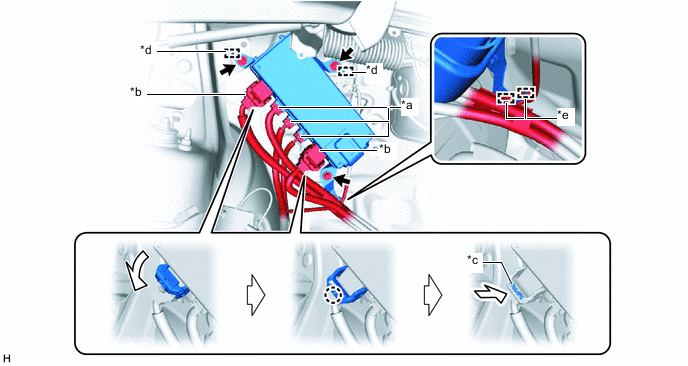
*a Connector (A) *b Connector (B) *c Lock *d Hook *e Clamp - - -
Install the torque vectoring differential ECU assembly with the 3 bolts.
- Torque:
- 8.4 N*m { 86 kgf*cm, 74 in.*lbf }
-
Connect the 2 connectors (B) as shown in the illustration.
Tech Tips
When connecting the connector with lock lever, return the lock lever to its original position to engage the claw and securely push in the lock of the lock lever to connect the connector as shown in the illustration.
-
Connect the 3 connectors (A).
-
Engage the 2 clamps.
-
-
INSTALL LUGGAGE COMPARTMENT TRIM COVER RH
-
INSTALL FRONT LUGGAGE COMPARTMENT TRIM COVER
-
INSTALL FRONT UPPER LUGGAGE COMPARTMENT TRIM COVER
-
INSTALL NO. 1 LUGGAGE COMPARTMENT LIGHT ASSEMBLY
-
INSTALL REAR LUGGAGE COMPARTMENT TRIM COVER
-
INSTALL SPARE WHEEL COVER TRAY (w/o Spare Tire)
-
INSTALL NO. 1 LUGGAGE COMPARTMENT TRIM COVER
-
CONNECT CABLE TO NEGATIVE BATTERY TERMINAL
Note
When disconnecting the cable, some systems need to be initialized after the cable is reconnected.
-
TORQUE VECTORING DIFFERENTIAL SYSTEM CALIBRATION
-
When the torque vectoring differential ECU assembly is replaced, Learning Value Initialization must be performed.
-