REAR SEAT OUTER BELT ASSEMBLY REMOVAL

CAUTION / NOTICE / HINT
The necessary procedures (adjustment, calibration, initialization, or registration) that must be performed after parts are removed and installed, or replaced during rear seat outer belt assembly removal/installation are shown below.
| Replaced Part or Performed Procedure | Necessary Procedure | Effect/Inoperative Function when Necessary Procedure not Performed | Link |
|---|---|---|---|
| Disconnect cable from negative auxiliary battery terminal | Memorize steering angle neutral point | Lane departure alert system (w/ Steering Control) | |
| Intelligent clearance sonar system*1 | |||
| Simple intelligent parking assist system*1 | |||
| Pre-crash safety system | |||
| Parking assist monitor system | |||
| Initialize back door lock | Power door lock control system |
*1: When performing learning using the GTS.
CAUTION:
-
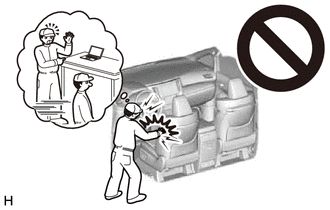
Some of these service operations affect the SRS airbag system. Read the precautionary notices concerning the SRS airbag system before servicing.
-
Wear protective gloves. Sharp areas on the parts may injure your hands.
Tech Tips
-
Use the same procedure for the RH side and LH side.
-
The following procedure is for the LH side.
PROCEDURE
-
PRECAUTION
Note
After turning the power switch off, waiting time may be required before disconnecting the cable from the negative (-) auxiliary battery terminal. Therefore, make sure to read the disconnecting the cable from the negative (-) auxiliary battery terminal notices before proceeding with work.
-
DISCONNECT CABLE FROM NEGATIVE AUXILIARY BATTERY TERMINAL
CAUTION:
-
Wait at least 90 seconds after disconnecting the cable from the negative (-) auxiliary battery terminal to disable the SRS system.
-
If an SRS part is accidentally deployed, it may cause a serious injury.
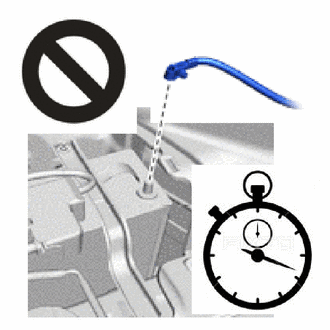
Note
When disconnecting the cable, some systems need to be initialized after the cable is reconnected.
-
-
REMOVE TONNEAU COVER ASSEMBLY
-
REMOVE REAR NO. 1 FLOOR BOARD
-
REMOVE DECK BOARD RETAINER
-
REMOVE DECK FLOOR BOX LH (w/o Spare Tire)
-
REMOVE DECK FLOOR BOX RH (w/o Spare Tire)
for RH Side:
-
REMOVE REAR DECK FLOOR BOX (w/ Compact Spare Tire)
-
REMOVE DECK FLOOR BOX LH (w/ Compact Spare Tire)
for LH Side:
-
REMOVE DECK FLOOR BOX RH (w/ Compact Spare Tire)
for RH Side:
-
REMOVE DECK FLOOR BOX RH (w/ Full Size Spare Tire)
-
REMOVE DECK FLOOR BOX LH (w/ Full Size Spare Tire)
for LH Side:
-
REMOVE DECK TRIM SERVICE HOLE COVER
-
REMOVE LUGGAGE HOLD BELT STRIKER ASSEMBLY (for Rear Side)
-
REMOVE REAR DECK TRIM COVER
-
REMOVE REAR DOOR SCUFF PLATE
-
DISCONNECT REAR DOOR OPENING TRIM WEATHERSTRIP
-
REMOVE REAR SEAT HEADREST ASSEMBLY (for RH Side)
-
REMOVE REAR SEAT HEADREST ASSEMBLY (for LH Side)
-
REMOVE REAR SEAT CENTER HEADREST ASSEMBLY (for RH Side)
-
DISCONNECT REAR CENTER SEAT OUTER BELT ASSEMBLY
-
REMOVE REAR SEATBACK ASSEMBLY RH (for RH Side)
-
REMOVE REAR SEATBACK ASSEMBLY LH (for LH Side)
-
REMOVE REAR SEAT CUSHION ASSEMBLY
-
REMOVE REAR SEAT CUSHION LOCK HOOK
-
REMOVE REAR UNDER SIDE COVER
-
REMOVE REAR SEATBACK HINGE SUB-ASSEMBLY
-
REMOVE REAR SEAT SIDE GARNISH
-
REMOVE LUGGAGE HOLD BELT STRIKER ASSEMBLY (for Side)
-
REMOVE NO. 1 TONNEAU COVER HOLDER CAP
-
REMOVE TONNEAU COVER HOOK A
-
REMOVE NO. 1 LUGGAGE COMPARTMENT LIGHT ASSEMBLY (for LH Side)
-
REMOVE DECK TRIM SIDE PANEL ASSEMBLY
-
REMOVE ROOF SIDE INNER GARNISH ASSEMBLY
-
REMOVE REAR 3 POINT TYPE SEAT OUTER BELT ASSEMBLY LH (for LH Side)
-
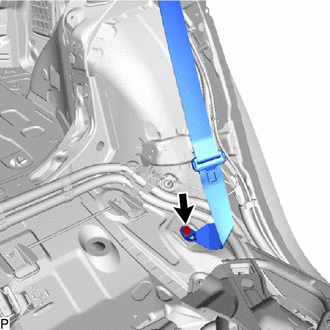
Remove the bolt to disconnect the floor anchor of the rear 3 point type seat outer belt assembly LH.
-
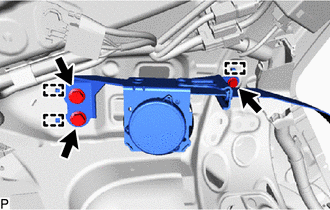
w/o Pretensioner:
-
Remove the 3 bolts.
-
Disengage the 3 guides to remove the rear 3 point type seat outer belt assembly LH.
-
-
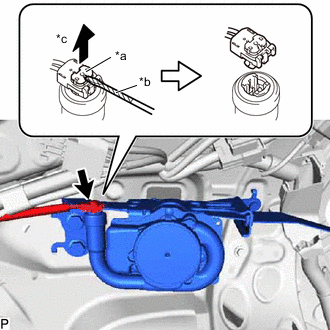
*a Locking Button *b Protective Tape *c Release w/ Pretensioner:
-
Using a screwdriver, pull out the locking button as shown in the illustration to release the lock and disconnect the pretensioner connector.
Tech Tips
Tape the screwdriver tip before use.
-
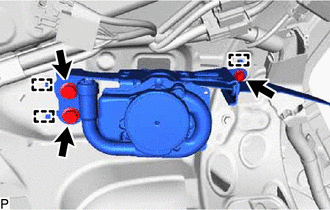
Remove the 3 bolts.
-
Disengage the 3 guides to remove the rear 3 point type seat outer belt assembly LH.
-
-
-
REMOVE REAR 3 POINT TYPE SEAT OUTER BELT ASSEMBLY RH (for RH Side)
-
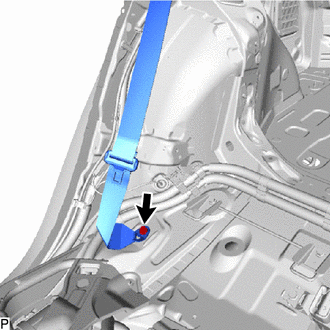
Remove the bolt to disconnect the floor anchor of the rear 3 point type seat outer belt assembly RH.
-
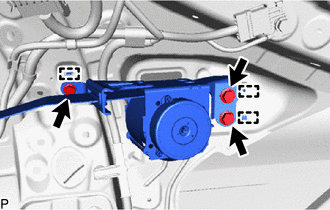
w/o Pretensioner:
-
Remove the 3 bolts.
-
Disengage the 3 guides to remove the rear 3 point type seat outer belt assembly RH.
-
-
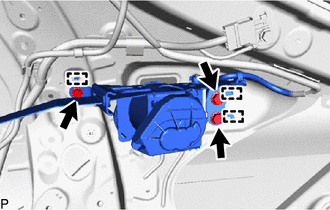
w/ Pretensioner:
-
Remove the 3 bolts.
-
Disengage the 3 guides.
-
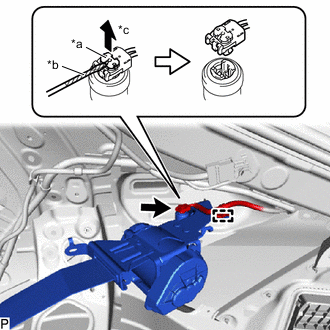
*a Locking Button *b Protective Tape *c Release Disengage the clamp.
-
Using a screwdriver, pull out the locking button as shown in the illustration to release the lock and disconnect the pretensioner connector.
Tech Tips
Tape the screwdriver tip before use.
-
Remove the rear 3 point type seat outer belt assembly RH.
-
-