FRONT SEAT ASSEMBLY(for Manual Seat) REMOVAL
CAUTION / NOTICE / HINT
The necessary procedures (adjustment, calibration, initialization, or registration) that must be performed after parts are removed, installed, or replaced during the front seat assembly removal/installation are shown below.
| Replacement Part or Procedure | Necessary Procedures | Effects / Inoperative when not performed | Link |
|---|---|---|---|
| Disconnect cable from negative auxiliary battery terminal | Memorize steering angle neutral point | Lane departure alert system (w/ Steering Control) | |
| Intelligent clearance sonar system | |||
| Simple intelligent parking assist system | |||
| Pre-crash safety system | |||
| Parking assist monitor system | |||
| Initialize back door lock | Power door lock control system | ||
|
Zero point calibration (Occupant classification system) |
|
CAUTION:
-
Be sure to read Precaution thoroughly before servicing.
-
Wear protective gloves. Sharp areas on the parts may injure your hands.
Note
-
If the front seat airbag assembly has been deployed, replace the front seat airbag assembly, front seatback frame sub-assembly, separate type front seatback pad and separate type front seatback cover with the necessary parts in accordance with the extent of the collision damage.
-
If the front seat cushion airbag assembly RH has been deployed, replace the front seat cushion airbag assembly RH, front seat adjuster assembly, separate type front seat cushion pad and separate type front seat cushion cover with the necessary parts in accordance with the extent of the collision damage.
Tech Tips
-
Use the same procedure for RHD and LHD vehicles.
-
The following procedure is for LHD vehicles.
-
Use the same procedure for the RH side and LH side.
-
The following procedure is for the LH side.
PROCEDURE
-
PRECAUTION
Note
After turning the power switch off, waiting time may be required before disconnecting the cable from the negative (-) auxiliary battery terminal. Therefore, make sure to read the disconnecting the cable from the negative (-) auxiliary battery terminal notices before proceeding with work.
-
DISCONNECT CABLE FROM NEGATIVE AUXILIARY BATTERY TERMINAL
-
REMOVE FRONT SEAT HEADREST ASSEMBLY
-
Remove the front seat headrest assembly from the front seat assembly.
-
-
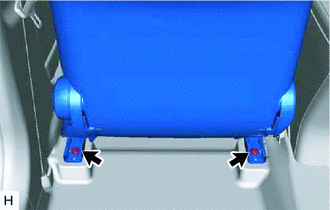
REMOVE FRONT OUTER SEAT TRACK BRACKET COVER
-
Operate the seat track adjusting handle and move the front seat assembly to the rearmost position.
-
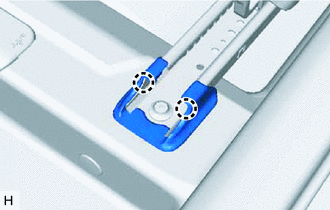
Disengage the 2 claws to remove the front outer seat track bracket cover.
-
-
REMOVE FRONT INNER SEAT TRACK BRACKET COVER
-
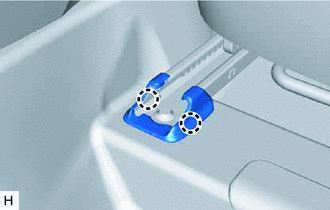
Disengage the 2 claws to remove the front inner seat track bracket cover.
-
-
REMOVE OUTER SEAT TRACK COVER
-
Operate the seat track adjusting handle and move the front seat assembly to the foremost position.
-
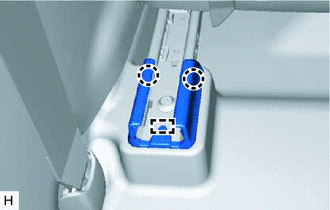
Disengage the 2 claws and guide to remove the outer seat track cover.
-
-
REMOVE INNER SEAT TRACK BRACKET COVER
-
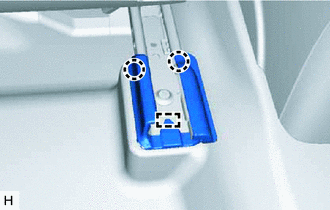
Disengage the 2 claws and guide to remove the inner seat track bracket cover.
-
-
REMOVE FRONT SEAT ASSEMBLY
-
Using a T50 "TORX" socket wrench, remove the 2 bolts on the rear side of the front seat assembly.
-
Operate the seat track adjusting handle and move the front seat assembly to the rearmost position.
-
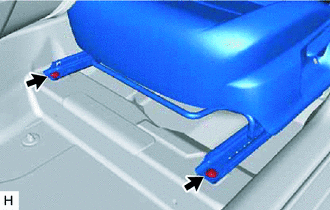
Using a T50 "TORX" socket wrench, remove the 2 bolts on the front side of the front seat assembly.
-
for Driver Side:
-
Operate the vertical adjusting handle and move the front seat assembly to the uppermost position.
-
-
Operate the seat track adjusting handle and move the front seat assembly to the center position.
-
Operate the reclining adjuster release handle and move the seatback to the upright position.
-
Disconnect the front seat airbag assembly connector under the front seat assembly.
Note
When disconnecting any airbag connector, take care not to damage the airbag wire harness.
-
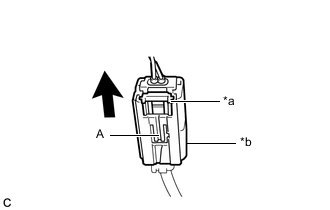
*a White Housing Lock *b Yellow CPA 
Slide Push down the white housing lock and slide the yellow CPA. (At this time, the connector cannot be disconnected yet.)
-
Push down the white housing lock again and disconnect the connector.
Note
Do not push down the part (A) shown in the illustration when disconnecting the connector.
-
-
Disconnect each connector and disengage each clamp under the front seat assembly.
-

Remove the front seat assembly.
Note
Be careful not to damage the vehicle body.
-