BACK DOOR OUTSIDE GARNISH INSTALLATION
PROCEDURE
-
INSTALL BACK DOOR GARNISH COVER (w/o Rear View Monitor System)
-
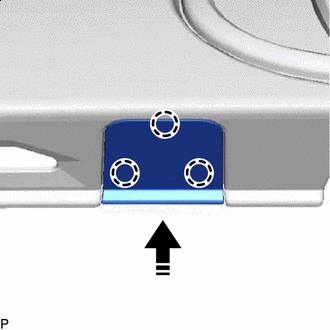

Install in this Direction Engage the 3 claws as shown in the illustration to install the back door garnish cover.
-
-
INSTALL BACK DOOR OUTSIDE GARNISH SUB-ASSEMBLY
-
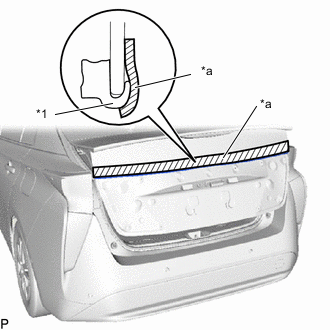
*1 Lower No. 2 Back Window Moulding *a Tape Pull back the lower No. 2 back window moulding and secure it with tape as shown in the illustration.
Note
Be careful not to damage the lower No. 2 back window moulding.
Tech Tips
-
Use wide tape to ensure strong enough adhesion.
-
Use non-residue tape.
-
If necessary, clean the lower No. 2 back window moulding before securing it with tape.
-
-
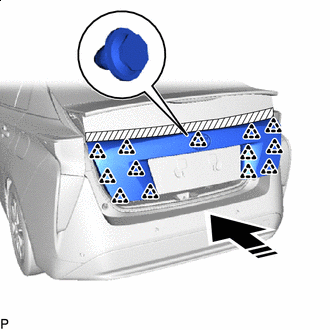
Install in this Direction Engage the 13 clips as shown in the illustration.
Tech Tips
Check that the lower No. 2 back window moulding is not caught under the back door outside garnish sub-assembly.
-
Install the back door outside garnish sub-assembly with the 6 bolts.
- Torque:
- 4.9 N*m { 50 kgf*cm, 43 in.*lbf }
-
Remove the tape.
Note
Be careful not to damage the lower No. 2 back window moulding.
-
-
INSTALL BACK DOOR TRIM BOARD
-
INSTALL BACK DOOR TRIM BOARD ASSEMBLY
-
INSTALL DOOR PULL HANDLE
-
INSTALL BACK DOOR SIDE GARNISH LH
-
INSTALL BACK DOOR SIDE GARNISH RH
Tech Tips
Use the same procedure as for the LH side.
-
INSTALL BACK DOOR UPPER TRIM PANEL ASSEMBLY