REAR DOOR WINDOW FRAME MOULDING REMOVAL
CAUTION / NOTICE / HINT
The necessary procedures (adjustment, calibration, initialization, or registration) that must be performed after parts are removed and installed, or replaced during rear door window frame moulding removal/installation are shown below.
| Replaced Part or Performed Procedure | Necessary Procedure | Effect/Inoperative Function when Necessary Procedure not Performed | Link |
|---|---|---|---|
| Disconnect cable from negative auxiliary battery terminal | Memorize steering angle neutral point | Lane departure alert system (w/ Steering Control) | |
| Intelligent clearance sonar system*1 | |||
| Simple intelligent parking assist system*1 | |||
| Pre-crash safety system | |||
| Parking assist monitor system | |||
| Initialize back door lock | Power door lock control system | ||
|
Initialize Power Window Control System |
|
*1: When performing learning using the GTS.
Tech Tips
-
Use the same procedure for the RH side and LH side.
-
The following procedure is for the LH side.
PROCEDURE
-
REMOVE REAR DOOR BELT MOULDING ASSEMBLY
-
DISCONNECT REAR DOOR WEATHERSTRIP
-
Disengage the clip and disconnect the rear door weatherstrip.
-
-
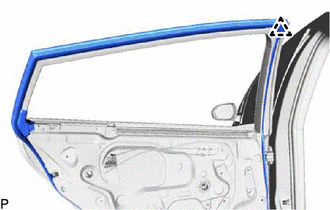
REMOVE REAR DOOR FRONT WINDOW FRAME MOULDING
Tech Tips
When removing the rear door front window frame moulding, heat the vehicle body and rear door front window frame moulding using a heat light.
Heating Temperature Item Temperature Vehicle Body 40 to 60°C (104 to 140°F) Rear Door Front Window Frame Moulding 20 to 30°C (68 to 86°F) Note
Do not heat the vehicle body or rear door front window frame moulding excessively.
-
Using a heat light, heat the rear door front window frame moulding.
-
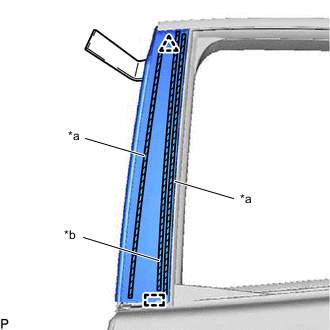
*a Double-sided Tape *b Caulking Sponge Using a moulding remover, disengage the clip and guide, and separate the double-sided tape and caulking sponge to remove the rear door front window frame moulding.
-
-
REMOVE REAR DOOR UPPER WINDOW FRAME MOULDING
-
Insert a 4.0 mm (0.157 in.) drill bit into a drill.
-
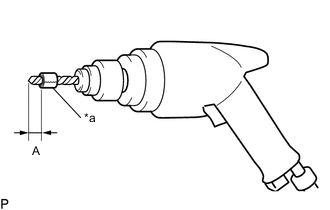
*a Tape Tape the 4.0 mm (0.157 in.) drill bit 5.0 mm (0.197 in.) from the tip as shown in the illustration.
Standard Measurement Area Measurement A 5.0 mm (0.197 in.) Note
Tape the 4.0 mm (0.157 in.) drill bit to prevent the drill bit from going too deep.
-
Lightly press the drill bit against the rivets to drill off the rivet flanges, and remove the 4 rivets.
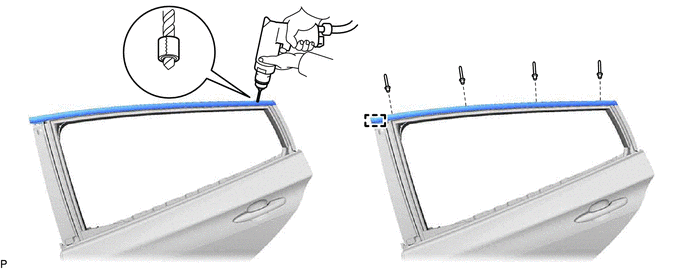
CAUTION:
Be careful of the drilled rivets, as they may be hot.
Note
-
Pressing the drill too firmly will cause the rivet to turn and result in the rivet not being drilled through.
-
Prying the rivets with the drill may damage the rivet installation holes or drill bit.
-
-
Using a vacuum cleaner, remove the rivet fragments and shavings from the drilled areas.
-
Disengage the guide to remove the rear door upper window frame moulding.
-
-
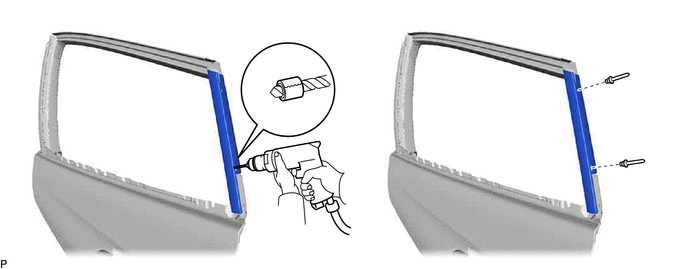
REMOVE REAR DOOR REAR WINDOW FRAME MOULDING
-
Insert a 4.0 mm (0.157 in.) drill bit into a drill.
-
*a Tape Tape the 4.0 mm (0.157 in.) drill bit 5.0 mm (0.197 in.) from the tip as shown in the illustration.
Standard Measurement Area Measurement A 5.0 mm (0.197 in.) Note
Tape the 4.0 mm (0.157 in.) drill bit to prevent the drill bit from going too deep.
-
Lightly press the drill bit against the rivets to drill off the rivet flanges, and remove the 2 rivets and rear door rear window frame moulding.
CAUTION:
Be careful of the drilled rivets, as they may be hot.
Note
-
Pressing the drill too firmly will cause the rivet to turn and result in the rivet not being drilled through.
-
Prying the rivets with the drill may damage the rivet installation holes or drill bit.
-
-
Using a vacuum cleaner, remove the rivet fragments and shavings from the drilled areas.
-