HV BATTERY THERMISTOR INSTALLATION
PROCEDURE
-
INSTALL HYBRID BATTERY THERMISTOR
CAUTION:
Be sure to wear insulated gloves and protective goggles.
-
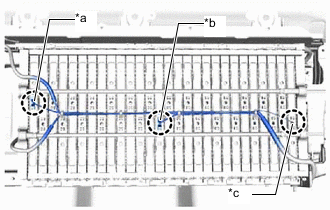
*a 1st Module from the HV Battery Junction Block Assembly Side
(Wire harness color: Blue)
*b 14th Module from the HV Battery Junction Block Assembly Side
(Wire harness color: White)
*c 28th Module from the HV Battery Junction Block Assembly Side
(Wire harness color: Red)
Engage the 3 claws of the hybrid battery thermistor (sensor portions) to install the hybrid battery thermistor to the HV battery.
Tech Tips
Install each hybrid battery thermistor (sensor portion) to the appropriate location shown in the illustration.
-
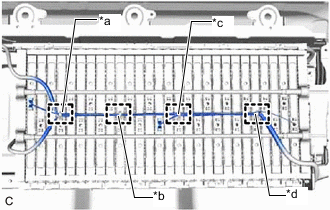
*a 4th Module from the HV Battery Junction Block Assembly Side *b 10th Module from the HV Battery Junction Block Assembly Side *c 16th Module from the HV Battery Junction Block Assembly Side *d 24th Module from the HV Battery Junction Block Assembly Side Engage the 4 clamps in the locations shown in the illustration.
-
Connect the battery voltage sensor connector.
-
Engage the clamp.
-
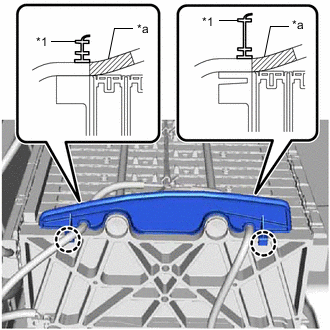
*1 No. 1 Hybrid Battery Packing *a Tape Engage the 2 claws to install the No. 1 hybrid battery packing to the HV battery.
Note
Align each tape on the hybrid battery thermistor with the edge of the No. 1 hybrid battery packing as shown in the illustration and then engage the 2 claws to install the No. 1 hybrid battery packing to the HV battery.
-
Engage the clamp.
-
-
INSTALL NO. 1 HYBRID BATTERY INTAKE DUCT
CAUTION:
Be sure to wear insulated gloves and protective goggles.
-
Engage the claw to install the No. 1 hybrid battery intake duct to the HV battery.
-
Engage the claw of hybrid battery thermistor (sensor portion) to connect the hybrid battery thermistor to the No. 1 hybrid battery intake duct.
-
-
INSTALL NO. 1 HYBRID BATTERY SHIELD SUB-ASSEMBLY
CAUTION:
Wear insulated gloves.
-
Pull back the No. 2 hybrid battery shield sub-assembly to install the No. 1 hybrid battery shield sub-assembly to the HV battery.
Tech Tips
Pull back the No. 2 hybrid battery shield sub-assembly until there is sufficient clearance for the stud bolt of the No. 1 hybrid battery shield sub-assembly.
-
Install the 4 nuts.
- Torque:
- 7.5 N*m { 76 kgf*cm, 66 in.*lbf }
-
-
INSTALL HV BATTERY JUNCTION BLOCK ASSEMBLY