HV BATTERY INSTALLATION

PROCEDURE
-
INSTALL NO. 1 HYBRID BATTERY INTAKE DUCT
-
INSTALL NO. 1 HYBRID BATTERY SHIELD SUB-ASSEMBLY
-
INSTALL HV BATTERY JUNCTION BLOCK ASSEMBLY
-
INSTALL HYBRID BATTERY TERMINAL BLOCK
-
INSTALL BATTERY VOLTAGE SENSOR
-
INSTALL NO. 1 HV BATTERY SHIELD PANEL
-
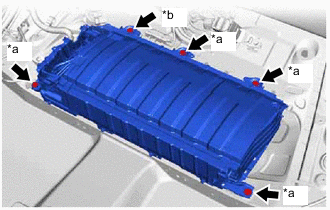
INSTALL UPPER NO. 1 HYBRID BATTERY COVER SUB-ASSEMBLY
CAUTION:
Be sure to wear insulated gloves and protective goggles.
-

*a Bolt *b Nut Install the upper No. 1 hybrid battery cover sub-assembly to the HV battery with the 6 bolts and 5 nuts.
- Torque:
- 7.5 N*m { 76 kgf*cm, 66 in.*lbf }
-
-
INSTALL HV BATTERY
CAUTION:
Wear insulated gloves.
-
*a Bolt (A)
(Bolt Length: 25 mm (0.984 in.))
*b Bolt (B)
(Bolt Length: 24 mm (0.945 in.))
Install the HV battery to the vehicle with the 4 bolts (A) and bolt (B).
- Torque:
- 19 N*m { 194 kgf*cm, 14 ft.*lbf }
Note
-
Do not allow foreign matter, such as grease or oil, to adhere to the bolts of the HV battery.
-
To prevent the wire harness from being caught, make sure to bundle the wire harness using insulating tape or equivalent.
-
Use cardboard or another similar material to protect the HV battery and vehicle body from damage.
-
Since the HV battery is very heavy, 2 people are needed to install it. When installing the HV battery, be careful not to damage the parts around it.
-
When removing/installing/moving the HV battery, make sure not to tilt it more than 80°.
-
While lowering the HV battery into the vehicle, do not allow it to contact the vehicle.
-
As bolts with 2 different lengths are used, make sure to install each bolt to the correct position.
-
If the HV battery has been struck or dropped, replace it.
-
-
CONNECT FLOOR WIRE
CAUTION:
Wear insulated gloves.
-
Connect the battery voltage sensor connector.
-
Engage the clamp.
-
-
INSTALL NO. 1 HYBRID BATTERY EXHAUST DUCT
-
Engage the claw to install the No. 1 hybrid battery exhaust duct to the HV battery.
-
Install the clip.
-
-
CONNECT FLOOR WIRE
CAUTION:
Wear insulated gloves.
-
Connect the HV battery junction block assembly connector.
-
Connect the electric vehicle battery plug assembly connector.
-
Engage the clamp.
-
-
CONNECT HV FLOOR UNDER WIRE
CAUTION:
Wear insulated gloves.
-
Connect the shield ground to the HV battery.
-
Connect the 2 HV battery junction block assembly connectors.
Note
Make sure that the connectors are connected securely.
-
-
INSTALL NO. 1 HV BATTERY COVER PANEL RH
CAUTION:
Wear insulated gloves.
-
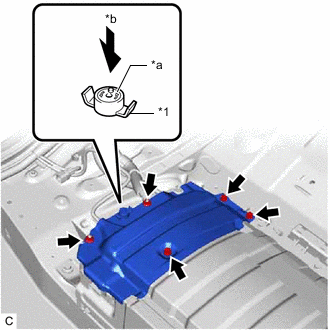
*1 Battery Cover Lock Striker *a Button *b Push Install the No. 1 HV battery cover panel RH to the HV battery with the 3 bolts and 2 nuts.
- Torque:
- 7.5 N*m { 76 kgf*cm, 66 in.*lbf }
-
Install the battery cover lock striker, then push the button to lock it.
-
-
INSTALL BATTERY COOLING BLOWER ASSEMBLY
-
INSTALL REAR SEAT CUSHION LEG SUB-ASSEMBLY
-
Install the rear seat cushion leg sub-assembly with the 6 bolts.
- Torque:
- 16 N*m { 163 kgf*cm, 12 ft.*lbf }
-
-
INSTALL REAR UNDER COVER
-
Engage the 2 guides to install the rear under cover to the rear seat cushion leg sub-assembly.
-
Engage the 2 clips.
-
-
INSTALL REAR UNDER SIDE COVER LH
-
INSTALL REAR DOOR SCUFF PLATE LH
-
INSTALL REAR UNDER SIDE COVER RH
-
INSTALL REAR DOOR SCUFF PLATE RH
-
INSTALL REAR SEAT CUSHION LOCK HOOK
-
INSTALL REAR SEAT CUSHION ASSEMBLY
-
INSTALL SERVICE PLUG GRIP
-
PERFORM BATTERY STATUS INFO UPDATE