BATTERY VOLTAGE SENSOR INSTALLATION
PROCEDURE
-
INSTALL BATTERY VOLTAGE SENSOR
CAUTION:
Be sure to wear insulated gloves and protective goggles.
-
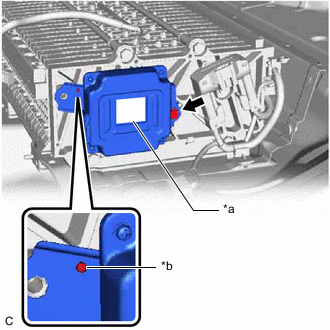
*a Black Label *b Pin Install the battery voltage sensor to the HV battery with the bolt.
- Torque:
- 7.5 N*m { 76 kgf*cm, 66 in.*lbf }
Note
-
Check color of the label.
-
If the battery voltage sensor has been struck or dropped, replace it.
-
Make sure to align the hole of the battery voltage sensor with the pin.
-
Connect the battery voltage sensor connector.
Note
Make sure that the connector is connected securely.
-
-
INSTALL NO. 1 HV BATTERY SHIELD PANEL
CAUTION:
Be sure to wear insulated gloves and protective goggles.
-
Pull back the No. 2 hybrid battery shield sub-assembly to install the No. 1 HV battery shield panel to the HV battery.
Tech Tips
Pull back the No. 2 hybrid battery shield sub-assembly until there is sufficient clearance for the 2 stud bolts of the No. 1 HV battery shield panel.
-
Install the bolt and 2 nuts.
- Torque:
- 7.5 N*m { 76 kgf*cm, 66 in.*lbf }
-
Connect the battery voltage sensor connector.
-
Engage the clamp.
-
-
INSTALL UPPER NO. 1 HYBRID BATTERY COVER SUB-ASSEMBLY
CAUTION:
Be sure to wear insulated gloves and protective goggles.
-
Install the upper No. 1 hybrid battery cover sub-assembly to the HV battery with the 6 bolts and 5 nuts.
- Torque:
- 7.5 N*m { 76 kgf*cm, 66 in.*lbf }
-
Move the HV battery to the installation position.
-
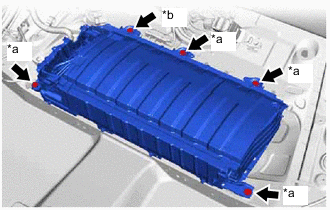
*a Bolt (A)
(Bolt Length: 25 mm (0.984 in.))
*b Bolt (B)
(Bolt Length: 24 mm (0.945 in.))
Install the 4 bolts (A) and bolt (B).
- Torque:
- 19 N*m { 194 kgf*cm, 14 ft.*lbf }
Note
-
Do not allow foreign matter, such as grease or oil, to adhere to the bolts of the HV battery.
-
To prevent the wire harness from being caught, make sure to bundle the wire harness using insulating tape or equivalent.
-
As bolts with 2 different lengths are used, make sure to install each bolt to the correct position.
-
If the HV battery has been struck or dropped, replace it.
-
-
CONNECT FLOOR WIRE
-
INSTALL NO. 1 HYBRID BATTERY EXHAUST DUCT
-
CONNECT FLOOR WIRE
-
CONNECT HV FLOOR UNDER WIRE
-
INSTALL NO. 1 HV BATTERY COVER PANEL RH
-
INSTALL BATTERY COOLING BLOWER ASSEMBLY
-
INSTALL REAR SEAT CUSHION LEG SUB-ASSEMBLY
-
INSTALL REAR UNDER COVER
-
INSTALL REAR UNDER SIDE COVER LH
-
INSTALL REAR DOOR SCUFF PLATE LH
-
INSTALL REAR UNDER SIDE COVER RH
-
INSTALL REAR DOOR SCUFF PLATE RH
-
INSTALL REAR SEAT CUSHION LOCK HOOK
-
INSTALL REAR SEAT CUSHION ASSEMBLY
-
INSTALL SERVICE PLUG GRIP