CLEARANCE LIGHT ASSEMBLY(for LED Type Turn Signal Light) DISASSEMBLY

CAUTION / NOTICE / HINT
Tech Tips
-
Use the same procedure for the RH and LH sides.
-
The procedure listed below is for the LH side.
PROCEDURE
-
REMOVE PARKING AND CLEARANCE LIGHT LENS LH
Note
Perform work using rubber gloves.
-
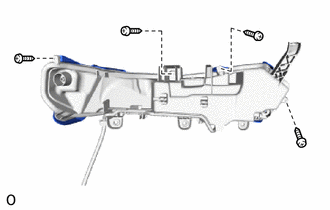
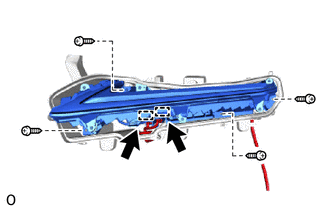
Remove the 4 screws.
-
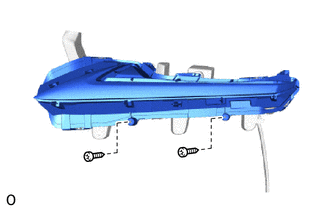
Using a T20H "TORX" screwdriver, remove the 2 screws.
-
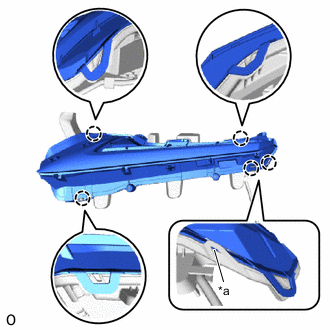
*a Base Point Detach the 4 claws.
Tech Tips
It is not necessary to detach the claw at the base point as the claw is detached in the later step.
-
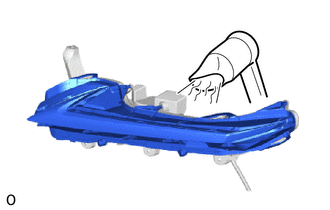
Using a dryer, heat the backside of the clearance light assembly LH.
Note
If the clearance light assembly LH is heated unevenly, it will deform or melt.
Tech Tips
The clearance light gasket expands when warmed, pushing up the parking and clearance light lens LH and making the lens easy to remove.
-
Detach the claw at the base point to remove the parking and clearance light lens LH.
Note
-
Do not touch the parking and clearance light lens LH with bare hands.
-
If dirty, lightly wipe with a soft cloth.
Tech Tips
-
If the parking and clearance light lens LH cannot be removed even after heating, using a screwdriver, lift the parking and clearance light lens LH.
-
Tape the screwdriver tip before use.
-
The clearance light gasket may stick to the lens and become detached at the same time.
-
-
-
REMOVE CLEARANCE LIGHT GASKET
-
Remove the clearance light gasket.
Note
The clearance light gasket must not be reused.
-
-
REMOVE CLEARANCE LIGHT LED UNIT ASSEMBLY LH
Note
-
Perform work using rubber gloves.
-
Do not touch the parking and clearance light LED unit assembly LH with bare hands.
-
If dirty, lightly wipe with a soft cloth.
-
Disconnect the 2 connectors.
-
Remove the 4 screws and clearance light LED unit assembly LH.
-