AUTOMATIC HEADLIGHT BEAM LEVEL CONTROL SYSTEM, Diagnostic DTC:B2424, B2425, B2440, B2441
| DTC Code | DTC Name |
|---|---|
| B2424 | Headlight Leveling Motor LH Communication Malfunction |
| B2425 | Headlight Leveling Motor RH Communication Malfunction |
| B2440 | Lost Communication with AHS EDU LH Module |
| B2441 | Lost Communication with AHS EDU RH Module |
DESCRIPTION
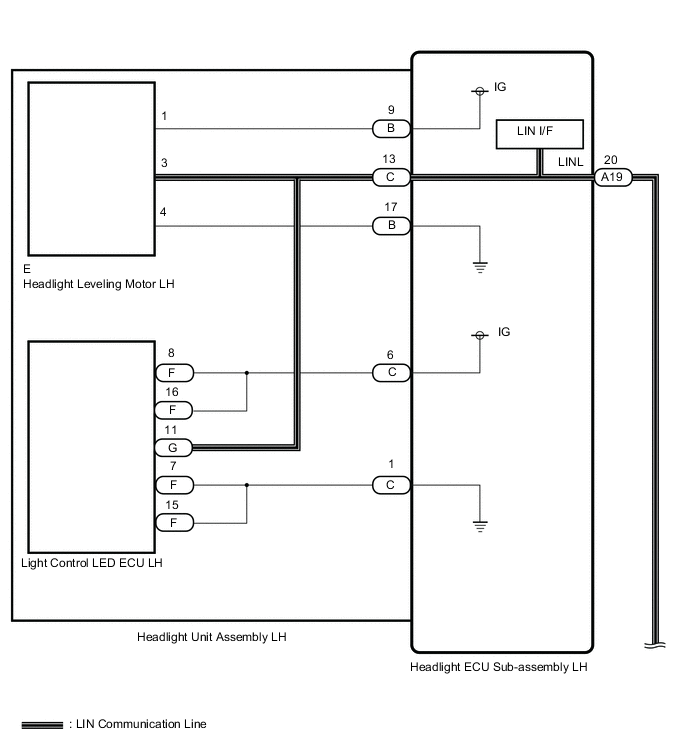
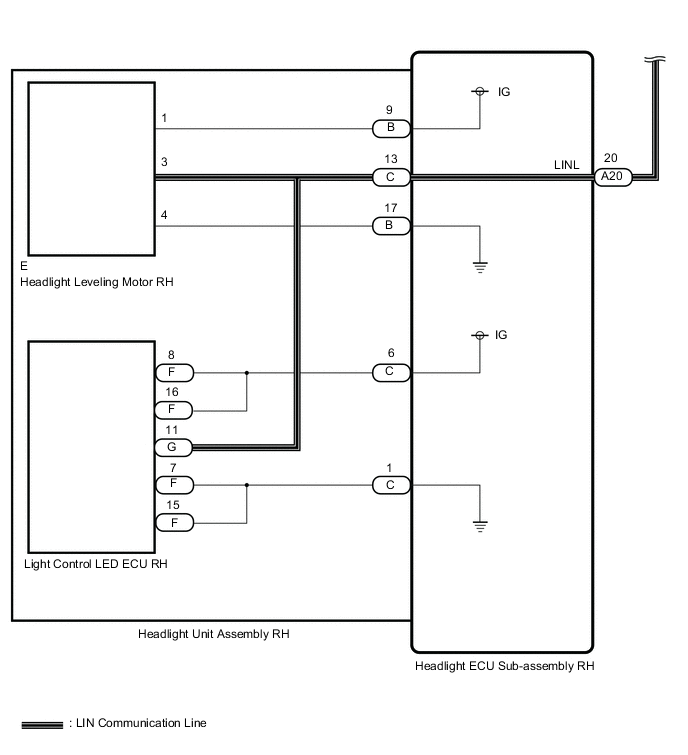
The headlight ECU sub-assembly sends auto leveling control signals to the headlight leveling motor via LIN communication.
The headlight leveling motor operates according to the power supply and control signals from the headlight ECU sub-assembly and sends its operation status to the headlight ECU sub-assembly via LIN communication.
The headlight ECU sub-assembly sends AHS control signals to the light control LED ECU via LIN communication.
The light control LED ECU receives power and control signals from the headlight ECU sub-assembly, controls the additional LEDs and additional fans, and sends its operation status to the headlight ECU sub-assembly via LIN communication.
| DTC No. | Detection Item | DTC Detection Condition | Trouble Area | Note |
|---|---|---|---|---|
| B2424 | Headlight Leveling Motor LH Communication Malfunction |
Detection condition:
Malfunction status:
Malfunction duration: |
|
for Triple Beam Headlight |
| B2425 | Headlight Leveling Motor RH Communication Malfunction |
Detection condition:
Malfunction status:
Malfunction duration: |
|
for Triple Beam Headlight |
| B2440 | Lost Communication with AHS EDU LH Module |
Detection condition:
Malfunction status:
Malfunction duration: |
|
w/ Adaptive High Beam System |
| B2441 | Lost Communication with AHS EDU RH Module |
Detection condition:
Malfunction status:
Malfunction duration: |
|
w/ Adaptive High Beam System |
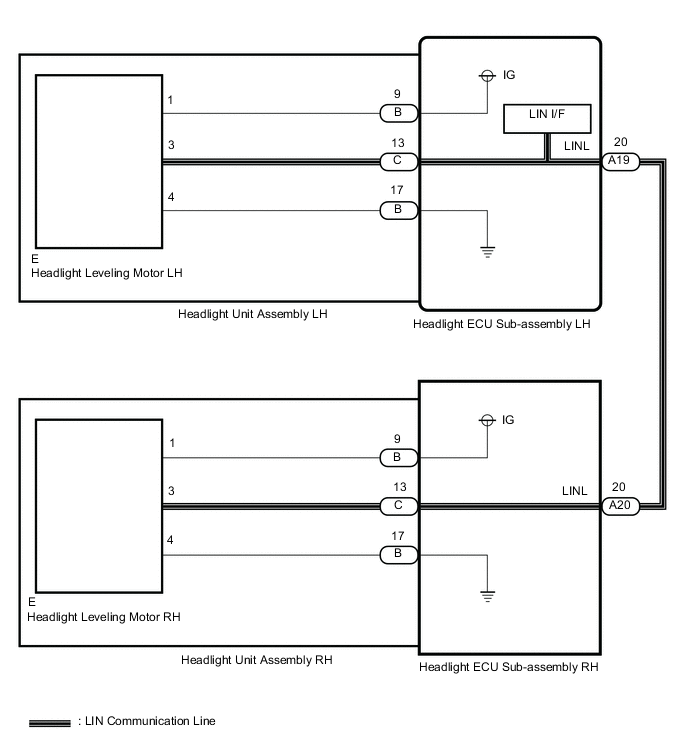
WIRING DIAGRAM
-
w/ Adaptive High Beam System
-
w/o Adaptive High Beam System
CAUTION / NOTICE / HINT
Note
After the headlight ECU sub-assembly LH is replaced, vehicle information registration and initialization are necessary.
PROCEDURE
-
CHECK VEHICLE TYPE
-
Check vehicle type.
Result Result Proceed to w/ Adaptive High Beam System A w/o Adaptive High Beam System B
B 
CHECK FOR DTC Click here
A 
-
-
CHECK FOR DTC
-
Clear the DTCs.
Body Electrical > AFS > Clear DTCs -
Turn the power switch on (IG) and wait for at least 10 seconds.
-
Check for DTCs.
Body Electrical > AFS > Trouble CodesOK DTC B2424, B2425, B2440 and B2441 are not output. Result Result Proceed to OK A NG (DTC B2424, B2425, B2440 and B2441 are output) B NG (DTC B2424 and B2440 are output) C NG (DTC B2425 and B2441 are output) D NG (DTC B2424 is output) E NG (DTC B2425 is output) F NG (DTC B2440 is output) G NG (DTC B2441 is output)
A 
USE SIMULATION METHOD TO CHECK Click here
C
INSPECT HEADLIGHT UNIT ASSEMBLY LH Click here
D
CHECK HARNESS AND CONNECTOR (HEADLIGHT ECU SUB-ASSEMBLY LH - HEADLIGHT ECU SUB-ASSEMBLY RH) Click here
E
INSPECT HEADLIGHT UNIT ASSEMBLY LH Click here
F
INSPECT HEADLIGHT UNIT ASSEMBLY RH Click here
G
GO TO ADAPTIVE HIGH BEAM SYSTEM Click here
B
-
-
CHECK HEADLIGHT ASSEMBLY RH
-
Disconnect the A20 headlight ECU sub-assembly RH connector.
-
Clear the DTCs.
Body Electrical > AFS > Clear DTCs -
Turn the power switch on (IG) and wait for at least 10 seconds.
-
Check for DTCs.
Body Electrical > AFS > Trouble CodesResult Result Proceed to DTC B2424, B2425, B2440 and B2441 are output A DTC B2425 and B2441 are output B
B
CHECK HEADLIGHT ECU SUB-ASSEMBLY RH Click here
A
-
-
CHECK HARNESS AND CONNECTOR (HEADLIGHT ECU SUB-ASSEMBLY LH - HEADLIGHT ECU SUB-ASSEMBLY RH)
-
Disconnect the A19 headlight ECU sub-assembly LH connector.
-
Disconnect the A20 headlight ECU sub-assembly RH connector.
-
Measure the resistance according to the value(s) in the table below.
Standard Resistance Tester Connection Condition Specified Condition A19-20 (LINL) or A20-20 (LINL) - Body ground Always 10 kΩ or higher Result Proceed to OK NG
NG
REPAIR OR REPLACE HARNESS OR CONNECTOR
OK
-
-
CHECK HEADLIGHT ECU SUB-ASSEMBLY LH
-
Remove the headlight ECU sub-assembly LH.
-
Reconnect the A19 headlight ECU sub-assembly LH connector.
-
Clear the DTCs.
Body Electrical > AFS > Clear DTCs -
Turn the power switch on (IG) and wait for at least 10 seconds.
-
Check for DTCs.
Body Electrical > AFS > Trouble CodesResult Result Proceed to DTC B2424, B2425, B2440 and B2441 are output A DTC B2424 and B2440 are output B
A
REPLACE HEADLIGHT ECU SUB-ASSEMBLY LH Click here
B
-
-
CHECK HEADLIGHT LEVELING MOTOR LH
-
Disconnect the headlight leveling motor LH connector.
-
Reconnect the headlight ECU sub-assembly LH connectors.
-
Clear the DTCs.
Body Electrical > AFS > Clear DTCs -
Turn the power switch on (IG) and wait for at least 10 seconds.
-
Check for DTCs.
Body Electrical > AFS > Trouble CodesResult Result Proceed to DTC B2424, B2425, B2440 and B2441 are output A DTC B2424 is output B
B
REPLACE HEADLIGHT LEVELING MOTOR LH Click here
A
-
-
CHECK LIGHT CONTROL LED ECU LH
-
Disconnect the light control LED ECU LH connector.
-
Reconnect the headlight ECU sub-assembly LH connectors.
-
Clear the DTCs.
Body Electrical > AFS > Clear DTCs -
Turn the power switch on (IG) and wait for at least 10 seconds.
-
Check for DTCs.
Body Electrical > AFS > Trouble CodesResult Result Proceed to DTC B2424, B2425, B2440 and B2441 are output A DTC B2440 is output B
A
REPLACE HEADLIGHT UNIT ASSEMBLY LH Click here
B
REPLACE LIGHT CONTROL LED ECU LH Click here
-
-
CHECK HEADLIGHT ECU SUB-ASSEMBLY RH
-
Remove the headlight ECU sub-assembly RH.
-
Reconnect the A20 headlight ECU sub-assembly RH connector.
-
Clear the DTCs.
Body Electrical > AFS > Clear DTCs -
Turn the power switch on (IG) and wait for at least 10 seconds.
-
Check for DTCs.
Body Electrical > AFS > Trouble CodesResult Result Proceed to DTC B2424, B2425, B2440 and B2441 are output A DTC B2425 and B2441 are output B
A
REPLACE HEADLIGHT ECU SUB-ASSEMBLY RH Click here
B
-
-
CHECK HEADLIGHT LEVELING MOTOR RH
-
Disconnect the headlight leveling motor RH connector.
-
Reconnect the headlight ECU sub-assembly RH connectors.
-
Clear the DTCs.
Body Electrical > AFS > Clear DTCs -
Turn the power switch on (IG) and wait for at least 10 seconds.
-
Check for DTCs.
Body Electrical > AFS > Trouble CodesResult Result Proceed to DTC B2424, B2425, B2440 and B2441 are output A DTC B2425 is output B
B
REPLACE HEADLIGHT LEVELING MOTOR RH Click here
A
-
-
CHECK LIGHT CONTROL LED ECU RH
-
Disconnect the light control LED ECU RH connector.
-
Reconnect the headlight ECU sub-assembly RH connectors.
-
Clear the DTCs.
Body Electrical > AFS > Clear DTCs -
Turn the power switch on (IG) and wait for at least 10 seconds or more.
-
Check for DTCs.
Body Electrical > AFS > Trouble CodesResult Result Proceed to DTC B2424, B2425, B2440 and B2441 are output A DTC B2441 is output B
A
REPLACE HEADLIGHT UNIT ASSEMBLY RH Click here
B
REPLACE LIGHT CONTROL LED ECU RH Click here
-
-
INSPECT HEADLIGHT UNIT ASSEMBLY LH
-

*a Component without harness connected
(Headlight ECU Sub-assembly LH)
*b Component without harness connected
(Headlight Leveling Motor LH)
Disconnect the headlight leveling motor LH connector.
-
Measure the resistance according to the value(s) in the table below.
Standard Resistance Tester Connection Condition Specified Condition C-13 - E-3 Always Below 1 Ω Result Proceed to OK NG
OK
REPLACE HEADLIGHT ECU SUB-ASSEMBLY LH Click here
NG
REPLACE HEADLIGHT UNIT ASSEMBLY LH Click here
-
-
CHECK HARNESS AND CONNECTOR (HEADLIGHT ECU SUB-ASSEMBLY LH - HEADLIGHT ECU SUB-ASSEMBLY RH)
-
Disconnect the A19 headlight ECU sub-assembly LH connector.
-
Disconnect the A20 headlight ECU sub-assembly RH connector.
-
Measure the resistance according to the value(s) in the table below.
Standard Resistance Tester Connection Condition Specified Condition A19-20 (LINL) - A20-20 (LINL) Always Below 1 Ω Result Proceed to OK NG
NG
REPAIR OR REPLACE HARNESS OR CONNECTOR
OK
-
-
INSPECT HEADLIGHT UNIT ASSEMBLY RH
-
*a Component without harness connected
(Headlight ECU Sub-assembly RH)
*b Component without harness connected
(Headlight Leveling Motor RH)
Disconnect the headlight leveling motor RH connector.
-
Measure the resistance according to the value(s) in the table below.
Standard Resistance Tester Connection Condition Specified Condition C-13 - E-3 Always Below 1 Ω Result Proceed to OK NG
NG
REPLACE HEADLIGHT UNIT ASSEMBLY RH Click here
OK
-
-
CHECK HEADLIGHT ECU SUB-ASSEMBLY RH
-
Remove the headlight ECU sub-assembly RH as a unit with the connectors still connected.
-
Disconnect the A19 headlight ECU sub-assembly LH connector.
-
Measure the resistance according to the value(s) in the table below.
Standard Resistance Tester Connection Condition Specified Condition C-13 - A19-20 (LINL) Always Below 1 Ω Result Proceed to OK NG
OK
REPLACE HEADLIGHT ECU SUB-ASSEMBLY LH Click here
NG
REPLACE HEADLIGHT ECU SUB-ASSEMBLY RH Click here
-
-
INSPECT HEADLIGHT UNIT ASSEMBLY LH
-
Disconnect the headlight leveling motor LH connector.
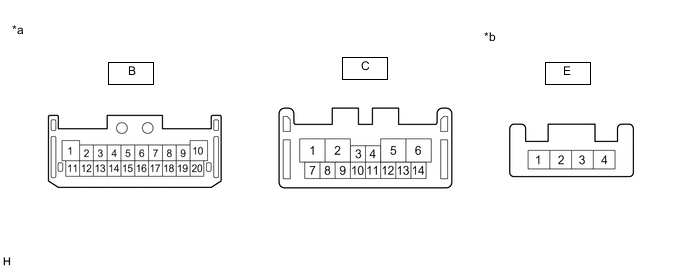
*a Component without harness connected
(Headlight ECU Sub-assembly LH)
*b Component without harness connected
(Headlight Leveling Motor LH)
-
Measure the resistance according to the value(s) in the table below.
Standard Resistance Tester Connection Condition Specified Condition B-9 - E-1 Always Below 1 Ω B-17 - E-4 Always Below 1 Ω C-13 - E-3 Always Below 1 Ω Result Proceed to OK NG
NG
REPLACE HEADLIGHT UNIT ASSEMBLY LH Click here
OK
-
-
CHECK HEADLIGHT ECU SUB-ASSEMBLY LH
-
*a Component without harness connected
(Headlight Leveling Motor LH)
Disconnect the headlight leveling motor LH connector.
-
Reconnect the headlight ECU sub-assembly LH connectors.
-
Measure the voltage according to the value(s) in the table below.
Standard Voltage Tester Connection Switch Condition Specified Condition E-1 - E-4 Power switch on (IG) 11 to 14 V Result Proceed to OK NG
OK
REPLACE HEADLIGHT LEVELING MOTOR LH Click here
NG
REPLACE HEADLIGHT ECU SUB-ASSEMBLY LH Click here
-
-
INSPECT HEADLIGHT UNIT ASSEMBLY RH
-
Disconnect the headlight leveling motor RH connector.
*a Component without harness connected
(Headlight ECU Sub-assembly RH)
*b Component without harness connected
(Headlight Leveling Motor RH)
-
Measure the resistance according to the value(s) in the table below.
Standard Resistance Tester Connection Condition Specified Condition B-9 - E-1 Always Below 1 Ω B-17 - E-4 Always Below 1 Ω C-13 - E-3 Always Below 1 Ω Result Proceed to OK NG
NG
REPLACE HEADLIGHT UNIT ASSEMBLY RH Click here
OK
-
-
CHECK HEADLIGHT ECU SUB-ASSEMBLY RH
-
*a Component without harness connected
(Headlight Leveling Motor RH)
Disconnect the headlight leveling motor RH connector.
-
Reconnect the headlight ECU sub-assembly RH connectors.
-
Measure the voltage according to the value(s) in the table below.
Standard Voltage Tester Connection Switch Condition Specified Condition E-1 - E-4 Power switch on (IG) 11 to 14 V Result Proceed to OK NG
OK
REPLACE HEADLIGHT LEVELING MOTOR RH Click here
NG
REPLACE HEADLIGHT ECU SUB-ASSEMBLY RH Click here
-
-
CHECK FOR DTC
-
Clear the DTCs.
Body Electrical > AFS > Clear DTCs -
Turn the power switch on (IG) and wait for at least 10 seconds or more.
-
Check for DTCs.
Body Electrical > AFS > Trouble CodesOK DTC B2424 and B2425 are not output. Result Result Proceed to OK A NG (DTC B2424 and B2425 are output) B NG (DTC B2424 is output) C NG (DTC B2425 is output) D
A
USE SIMULATION METHOD TO CHECK Click here
C
INSPECT HEADLIGHT UNIT ASSEMBLY RH Click here
D
CHECK HARNESS AND CONNECTOR (HEADLIGHT ECU SUB-ASSEMBLY LH - HEADLIGHT ECU SUB-ASSEMBLY RH) Click here
B
-
-
CHECK HEADLIGHT ASSEMBLY RH
-
Disconnect the A20 headlight ECU sub-assembly RH connector.
-
Clear the DTCs.
Body Electrical > AFS > Clear DTCs -
Turn the power switch on (IG) and wait for at least 10 seconds.
-
Check for DTCs.
Body Electrical > AFS > Trouble CodesResult Result Proceed to DTC B2424 and B2425 are output A DTC B2425 is output B
B
CHECK HEADLIGHT UNIT ASSEMBLY RH Click here
A
-
-
CHECK HARNESS AND CONNECTOR (HEADLIGHT ECU SUB-ASSEMBLY LH - HEADLIGHT ECU SUB-ASSEMBLY RH)
-
Disconnect the A19 headlight ECU sub-assembly LH connector.
-
Disconnect the A20 headlight ECU sub-assembly RH connector.
-
Measure the resistance according to the value(s) in the table below.
Standard Resistance Tester Connection Condition Specified Condition A19-20 (LINL) or A20-20 (LINL) - Body ground Always 10 kΩ or higher Result Proceed to OK NG
NG
REPAIR OR REPLACE HARNESS OR CONNECTOR
OK
-
-
CHECK HEADLIGHT ECU SUB-ASSEMBLY LH
-
Remove the headlight ECU sub-assembly LH.
-
Reconnect the A19 headlight ECU sub-assembly LH connector.
-
Clear the DTCs.
Body Electrical > AFS > Clear DTCs -
Turn the power switch on (IG) and wait for at least 10 seconds.
-
Check for DTCs.
Body Electrical > AFS > Trouble CodesResult Result Proceed to DTC B2424 and B2425 are output A DTC B2424 is output B
A
REPLACE HEADLIGHT ECU SUB-ASSEMBLY LH Click here
B
-
-
CHECK HEADLIGHT LEVELING MOTOR LH
-
Disconnect the headlight leveling motor LH connector.
-
Reconnect the headlight ECU sub-assembly LH connectors.
-
Clear the DTCs.
Body Electrical > AFS > Clear DTCs -
Turn the power switch on (IG) and wait for at least 10 seconds.
-
Check for DTCs.
Body Electrical > AFS > Trouble CodesResult Result Proceed to DTC B2424 and B2425 are output A DTC B2424 is output B
A
REPLACE HEADLIGHT UNIT ASSEMBLY LH Click here
B
REPLACE HEADLIGHT LEVELING MOTOR LH Click here
-
-
CHECK HEADLIGHT UNIT ASSEMBLY RH
-
Remove the headlight ECU sub-assembly RH.
-
Reconnect the A20 headlight ECU sub-assembly RH connector.
-
Clear the DTCs.
Body Electrical > AFS > Clear DTCs -
Turn the power switch on (IG) and wait for at least 10 seconds.
-
Check for DTCs.
Body Electrical > AFS > Trouble CodesResult Result Proceed to DTC B2424 and B2425 are output A DTC B2425 is output B
A
REPLACE HEADLIGHT ECU SUB-ASSEMBLY RH Click here
B
-
-
CHECK HEADLIGHT LEVELING MOTOR RH
-
Disconnect the headlight leveling motor RH connector.
-
Reconnect the headlight ECU sub-assembly RH connectors.
-
Clear the DTCs.
Body Electrical > AFS > Clear DTCs -
Turn the power switch on (IG) and wait for at least 10 seconds or more.
-
Check for DTCs.
Body Electrical > AFS > Trouble CodesResult Result Proceed to DTC B2424 and B2425 are output A DTC B2425 is output B
A
REPLACE HEADLIGHT UNIT ASSEMBLY RH Click here
B
REPLACE HEADLIGHT LEVELING MOTOR RH Click here
-
-
INSPECT HEADLIGHT UNIT ASSEMBLY RH
-
Disconnect the headlight leveling motor LH connector.
*a Component without harness connected
(Headlight ECU Sub-assembly LH)
*b Component without harness connected
(Headlight Leveling Motor LH)
-
Measure the resistance according to the value(s) in the table below.
Standard Resistance Tester Connection Condition Specified Condition B-9 - E-1 Always Below 1 Ω B-17 - E-4 Always Below 1 Ω C-13 - E-3 Always Below 1 Ω Result Proceed to OK NG
NG
REPLACE HEADLIGHT UNIT ASSEMBLY RH Click here
OK
-
-
CHECK HEADLIGHT ECU SUB-ASSEMBLY LH
-
*a Component without harness connected
(Headlight Leveling Motor LH)
Disconnect the headlight leveling motor LH connector.
-
Reconnect the headlight ECU sub-assembly LH connectors.
-
Measure the voltage according to the value(s) in the table below.
Standard Voltage Tester Connection Switch Condition Specified Condition E-1 - E-4 Power switch on (IG) 11 to 14 V Result Proceed to OK NG
NG
REPLACE HEADLIGHT ECU SUB-ASSEMBLY LH Click here
OK
-
-
CHECK HEADLIGHT ECU SUB-ASSEMBLY LH
-
Remove the headlight ECU sub-assembly LH as a unit with the connectors still connected.
-
Disconnect the A20 headlight ECU sub-assembly RH connector.
-
Measure the resistance according to the value(s) in the table below.
Standard Resistance Tester Connection Condition Specified Condition C-13 - A20-20 (LINL) Always Below 1 Ω Result Proceed to OK NG
OK
REPLACE HEADLIGHT LEVELING MOTOR LH Click here
NG
REPLACE HEADLIGHT ECU SUB-ASSEMBLY LH Click here
-
-
CHECK HARNESS AND CONNECTOR (HEADLIGHT ECU SUB-ASSEMBLY LH - HEADLIGHT ECU SUB-ASSEMBLY RH)
-
Disconnect the A19 headlight ECU sub-assembly LH connector.
-
Disconnect the A20 headlight ECU sub-assembly RH connector.
-
Measure the resistance according to the value(s) in the table below.
Standard Resistance Tester Connection Condition Specified Condition A19-20 (LINL) - A20-20 (LINL) Always Below 1 Ω Result Proceed to OK NG
NG
REPAIR OR REPLACE HARNESS OR CONNECTOR
OK
-
-
INSPECT HEADLIGHT UNIT ASSEMBLY RH
-
Disconnect the headlight leveling motor RH connector.
*a Component without harness connected
(Headlight ECU Sub-assembly RH)
*b Component without harness connected
(Headlight Leveling Motor RH)
-
Measure the resistance according to the value(s) in the table below.
Standard Resistance Tester Connection Condition Specified Condition B-9 - E-1 Always Below 1 Ω B-17 - E-4 Always Below 1 Ω C-13 - E-3 Always Below 1 Ω Result Proceed to OK NG
NG
REPLACE HEADLIGHT UNIT ASSEMBLY RH Click here
OK
-
-
CHECK HEADLIGHT ECU SUB-ASSEMBLY RH
-
*a Component without harness connected
(Headlight Leveling Motor RH)
Disconnect the headlight leveling motor RH connector.
-
Reconnect the headlight ECU sub-assembly RH connectors.
-
Measure the voltage according to the value(s) in the table below.
Standard Voltage Tester Connection Switch Condition Specified Condition E-1 - E-4 Power switch on (IG) 11 to 14 V Result Proceed to OK NG
NG
REPLACE HEADLIGHT ECU SUB-ASSEMBLY RH Click here
OK
-
-
CHECK HEADLIGHT ECU SUB-ASSEMBLY RH
-
Remove the headlight ECU sub-assembly RH as a unit with the connectors still connected.
-
Disconnect the A19 headlight ECU sub-assembly LH connector.
-
Measure the resistance according to the value(s) in the table below.
Standard Resistance Tester Connection Condition Specified Condition C-13 - A19-20 (LINL) Always Below 1 Ω Result Proceed to OK NG
OK
REPLACE HEADLIGHT LEVELING MOTOR RH Click here
NG
REPLACE HEADLIGHT ECU SUB-ASSEMBLY RH Click here
-