AUTOMATIC HEADLIGHT BEAM LEVEL CONTROL SYSTEM INITIALIZATION
Note
-
If any of the work in the table below has been performed, vehicle information registration and initialization of the headlight light control ECU sub-assembly LH is necessary.
Performed Work or System Condition Necessary Procedures Replacement of the headlight light control ECU sub-assembly LH Vehicle information registration for the headlight light control ECU sub-assembly LH Initialization of the headlight light control ECU sub-assembly LH Work that changes the vehicle height such as replacement or removal/installation of the rear height control sensor sub-assembly LH or replacement of suspension components Initialization of the headlight light control ECU sub-assembly LH -
A new headlight light control ECU sub-assembly LH cannot operate until the vehicle information is registered.
-
After replacing the headlight light control ECU sub-assembly LH, it is necessary to register the vehicle information and then perform initialization.
-
Even if the headlight light control ECU sub-assembly RH is replaced with a new one, vehicle information registration and initialization are not necessary.
-
Vehicle information registration must be performed with the main body ECU (multiplex network body ECU) and hybrid vehicle control ECU connected via CAN communication.
-
Note
-
Register the vehicle information before performing initialization.
-
Perform this procedure with the main body ECU (multiplex network body ECU) and hybrid vehicle control ECU connected via CAN communication.
-
In order to perform vehicle information registration again, turn the power switch off and then on (IG) again.
-
Perform this procedure after replacing the headlight light control ECU sub-assembly LH with a new one.
VEHICLE INFORMATION REGISTRATION FOR HEADLIGHT LIGHT CONTROL ECU SUB-ASSEMBLY LH (When using GTS)
-
Turn the power switch off.
-
Connect the GTS to the DLC3.
-
Enter the following menus: Body Electrical / HL AutoLeveling / Utility / Height Sensor Initialization
Body Electrical > HL AutoLeveling > UtilityTester Display Height Sensor Initialization -
Check what is displayed on the screen of the GTS and press "Next".
-
Press the "Exit" button.
-
Check that the warning message "Headlight System Malfunction Visit Your Dealer" is displayed on the combination meter assembly.
Note
After registering the vehicle information, initialize the headlight light control ECU sub-assembly LH.
Tech Tips
-
If the warning message "Headlight System Malfunction Visit Your Dealer" displayed on the combination meter assembly does not change, perform this procedure from the beginning again.
-
If the warning message "Headlight System Malfunction Visit Your Dealer" displayed on the combination meter assembly stops flashing and remains illuminated (and GTS operation is normal), the rear height control sensor sub-assembly LH may be malfunctioning.
-
If the warning message "Headlight System Malfunction Visit Your Dealer" displayed on the combination meter assembly stops flashing and remains illuminated (and GTS communication is abnormal), the headlight light control ECU sub-assembly LH may be malfunctioning.
-
-
-
VEHICLE INFORMATION REGISTRATION FOR HEADLIGHT LIGHT CONTROL ECU SUB-ASSEMBLY LH (When not using GTS)
Note
-
Register the vehicle information before performing initialization.
-
Perform this procedure with the main body ECU (multiplex network body ECU) and hybrid vehicle control ECU connected via CAN communication.
-
In order to perform vehicle information registration again, turn the power switch off and then on (IG) again.
-
Perform this procedure after replacing the headlight light control ECU sub-assembly LH with a new one.
-
Turn the power switch on (IG) with the dimmer switch in the off position, and then check that the warning message "Headlight System Malfunction Visit Your Dealer" is displayed on the combination meter assembly.
-
After turning the power switch on (IG), perform the following 8 times within 20 seconds: Turn the dimmer switch off → on → off.
-
Check that the warning message "Headlight System Malfunction Visit Your Dealer" is displayed on the combination meter assembly.
Tech Tips
-
If the warning message "Headlight System Malfunction Visit Your Dealer" displayed on the combination meter assembly does not change, perform this procedure from the beginning again.
-
If the warning message "Headlight System Malfunction Visit Your Dealer" displayed on the combination meter assembly stops flashing and illuminates, turn the power switch off and then on (IG) again. At this time, if the warning message "Headlight System Malfunction Visit Your Dealer" displayed on the combination meter assembly does not flash and illuminates, the headlight light control ECU sub-assembly LH may be malfunctioning.
-
If the warning message "Headlight System Malfunction Visit Your Dealer" displayed on the combination meter assembly stops flashing and illuminates, turn the power switch off and then on (IG) again. At this time, if the headlight leveling warning light illuminates after 5 seconds or more elapse, the rear height control sensor sub-assembly LH may be malfunctioning.
-
-
-
INITIALIZATION OF HEADLIGHT LIGHT CONTROL ECU SUB-ASSEMBLY LH (When using GTS)
Note
Perform initialization after registering the vehicle information.
Tech Tips
-
When work that changes the vehicle height such as replacement or removal/installation of the rear height control sensor sub-assembly LH or replacement of suspension components is performed, perform headlight beam axis adjustment after performing initialization.
-
Initialization for the headlight light control ECU sub-assembly LH is performed based on the fuel level, which is divided into 5 levels, indicated by the needle of the fuel receiver gauge.
-
Check vehicle status*1
-
Prepare the vehicle as follows.
-
Vehicle is unloaded (except spare tire and vehicle tools).
-
No occupants other than the driver are in the vehicle.
-
Headlights are turned off.
-
Do not change the vehicle height while the vehicle is stopped. (The vehicle condition is stable on a level surface.)
Tech Tips
When the above conditions are not met, initialization cannot be performed normally.
-
-
-
Check warning display
-
Turn the power switch on (IG), wait 3 seconds, and then check that the warning message "Headlight System Malfunction Visit Your Dealer" is displayed on the combination meter assembly.
Tech Tips
If the warning is different than above, the headlight light control ECU sub-assembly LH or combination meter assembly may be malfunctioning.
-
-
Initialization
-
Turn the power switch off.
-
Connect the GTS to the DLC3.
-
Turn the power switch on (IG).
-
Enter the following menus: Body Electrical / HL AutoLeveling / Utility / Height Sensor Initialization.
Body Electrical > HL AutoLeveling > UtilityTester Display Height Sensor Initialization -
Check what is displayed on the screen of the GTS and press "Next".
-
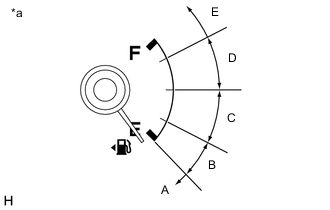
*a Fuel Receiver Gauge Check the proper "Position ID" by the fuel level according to the table below.
Tech Tips
It is necessary to know the number of times the warning message "Headlight System Malfunction Visit Your Dealer" flashes on the combination meter assembly for a later procedure.
Fuel Level Position ID Number of Times Headlight Leveling Warning Light Blinks Fuel level is within A range. EMPTY 1 Fuel level is within B range. 1/4 to over EMPTY 2 Fuel level is within C range. 1/2 to over 1/4 3 Fuel level is within D range. 3/4 to over 1/2 4 Fuel level is within E range. FULL to over 3/4 5 -
Check what is displayed on the GTS, select the proper "Position ID" and press "Next".
-
Press "Exit".
-
Check that the warning message "Headlight System Malfunction Visit Your Dealer" is displayed on the combination meter assembly.
Tech Tips
-
*2: "N" is the number of times the warning message "Headlight System Malfunction Visit Your Dealer" flashes on the combination meter assembly when the position ID was selected.
-
If the number of times the warning message "Headlight System Malfunction Visit Your Dealer" is displayed on the combination meter assembly differs from the number of times it was displayed when the position ID was selected, initialization did not complete normally.
-
If initialization did not finish normally (initialization malfunction), perform the procedures again from*1.
-
If the warning message "Headlight System Malfunction Visit Your Dealer" displayed on the combination meter assembly stops flashing and illuminates, the headlight light control ECU sub-assembly LH may be malfunctioning.
-
-
Check that initialization has completed normally, and then turn the power switch off.
Tech Tips
The warning flashing that indicates that initialization has completed normally continues until the power switch is turned off.
-
-
-
INITIALIZATION OF HEADLIGHT LIGHT CONTROL ECU SUB-ASSEMBLY LH (When not using GTS) [When vehicle has the dimmer switch off position]
Note
Perform initialization after registering the vehicle information.
Tech Tips
-
When work that changes the vehicle height such as replacement or removal/installation of the rear height control sensor sub-assembly LH or replacement of suspension components is performed, perform headlight beam axis adjustment after performing initialization.
-
Initialization for the headlight light control ECU sub-assembly LH is performed based on the fuel level, which is divided into 5 levels, indicated by the needle of the fuel receiver gauge.
-
Check vehicle status*1
-
Prepare the vehicle as follows.
-
Vehicle is unloaded (except spare tire and vehicle tools).
-
No occupants other than the driver are in the vehicle.
-
Headlights are turned off.
-
Do not change the vehicle height while the vehicle is stopped. (The vehicle condition is stable on a level surface.)
-
The low beams are off with the headlight dimmer assembly in the AUTO position. (If the low beams are illuminated, shine a light on the automatic light control sensor to change the system to daytime mode)
Tech Tips
When the above conditions are not met, initialization cannot be performed normally.
-
-
-
Check warning display
-
Turn the power switch on (IG), and then check that the warning message "Headlight System Malfunction Visit Your Dealer" is displayed on the combination meter assembly.
Tech Tips
If the warning is different than above, the headlight light control ECU sub-assembly LH or combination meter assembly may be malfunctioning.
-
-
Initialization
-
Turn the power switch on (IG).
-
*a Fuel Receiver Gauge Using the table below, determine the number of times the corresponding headlight dimmer switch operates from the fuel level indicated by the needle of the fuel receiver gauge.
Tech Tips
The number of times the dimmer switch will be operated is necessary for the following procedures.
-
Turn the power switch off.
-
Pull the dimmer switch, and then operate the light control switch as follows a total of 3 times: off → HEAD → off.
Note
Be sure to perform all operations for the dimmer switch within 5 seconds.
Tech Tips
When the operations are performed successfully, the warning message "Headlight System Malfunction Visit Your Dealer" displayed on the combination meter assembly flashes at 1Hz.
-
Operate the dimmer switch as follows N*2 times: off → HEAD → off.
Note
Perform this procedure within 20 seconds after the warning message "Headlight System Malfunction Visit Your Dealer" flashes on the combination meter assembly at 1 Hz.
Tech Tips
-
*2: "N" is the number of times the headlight dimmer switch should be operated based on the fuel level indicated by the needle of the fuel receiver gauge.
-
Be sure each dimmer switch operation is performed within 3 seconds.
-
-
After the dimmer switch is operated and 3 seconds elapse, check that the warning message "Headlight System Malfunction Visit Your Dealer" is displayed on the combination meter assembly.
Tech Tips
-
*2: "N" is the number of times the dimmer switch is operated.
-
If the number of times the warning message "Headlight System Malfunction Visit Your Dealer" flashes on the combination meter assembly differs from the number of times the dimmer switch is operated, initialization did not complete normally.
-
If initialization did not finish normally (initialization malfunction), perform the procedures again from*1.
-
If the warning message "Headlight System Malfunction Visit Your Dealer" displayed on the combination meter assembly stops flashing and remains illuminated, the headlight light control ECU sub-assembly LH may be malfunctioning.
-
-
Check that initialization has completed normally, and then turn the power switch off.
Tech Tips
The warning flashing that indicates that initialization has completed normally continues until the power switch is turned off.
-
-
-
INITIALIZATION OF HEADLIGHT LIGHT CONTROL ECU SUB-ASSEMBLY LH (When not using GTS) [When vehicle does not have the dimmer switch off position]
Note
Perform initialization after registering the vehicle information.
Tech Tips
-
When work that changes the vehicle height such as replacement or removal/installation of the rear height control sensor sub-assembly LH or replacement of suspension components is performed, perform headlight beam axis adjustment after performing initialization.
-
Initialization for the headlight light control ECU sub-assembly LH is performed based on the fuel level, which is divided into 5 levels, indicated by the needle of the fuel receiver gauge.
-
Check vehicle status*1
-
Prepare the vehicle as follows.
-
Vehicle is unloaded (except spare tire and vehicle tools).
-
No occupants other than the driver are in the vehicle.
-
Headlights are turned off.
-
Do not change the vehicle height while the vehicle is stopped. (The vehicle condition is stable on a level surface.)
-
The low beams are off with the headlight dimmer assembly in the AUTO position. (If the low beams are illuminated, shine a light on the automatic light control sensor to change the system to daytime mode)
Tech Tips
When the above conditions are not met, initialization cannot be performed normally.
-
-
-
Check warning display
-
Turn the power switch on (IG), and then check that the warning message "Headlight System Malfunction Visit Your Dealer" is displayed on the combination meter assembly.
Tech Tips
If the warning is different than above, the headlight light control ECU sub-assembly LH or combination meter assembly may be malfunctioning.
-
-
Initialization
-
Turn the power switch on (IG).
-
*a Fuel Receiver Gauge Using the table below, determine the number of times the corresponding headlight dimmer switch operates from the fuel level indicated by the needle of the fuel receiver gauge.
Tech Tips
The number of times the dimmer switch will be operated is necessary for the following procedures.
-
Turn the power switch off.
-
Pull the dimmer switch, and then operate the dimmer switch as follows a total of 3 times: Turn the low beams off → on → off.
Note
Be sure to perform all operations for the dimmer switch within 5 seconds.
Tech Tips
When the operations are performed successfully, the warning message "Headlight System Malfunction Visit Your Dealer" displayed on the combination meter assembly flashes at 1Hz.
-
Operate the dimmer switch as follows N*2 times: Turn the low beams off → on → off.
Note
Perform this procedure within 20 seconds after the warning message "Headlight System Malfunction Visit Your Dealer" flashes on the combination meter assembly at 1 Hz.
Tech Tips
-
*2: "N" is the number of times the headlight dimmer switch should be operated based on the fuel level indicated by the needle of the fuel receiver gauge.
-
Be sure each dimmer switch operation is performed within 3 seconds.
-
-
After the dimmer switch is operated and 3 seconds elapse, check that the warning message "Headlight System Malfunction Visit Your Dealer" is displayed on the combination meter assembly.
Tech Tips
-
*2: "N" is the number of times the dimmer switch is operated.
-
If the number of times the warning message "Headlight System Malfunction Visit Your Dealer" flashes on the combination meter assembly differs from the number of times the dimmer switch is operated, initialization did not complete normally.
-
If initialization did not finish normally (initialization malfunction), perform the procedures again from*1.
-
If the warning message "Headlight System Malfunction Visit Your Dealer" displayed on the combination meter assembly stops flashing and remains illuminated, the headlight light control ECU sub-assembly LH may be malfunctioning.
-
-
Check that initialization has completed normally, and then turn the power switch off.
Tech Tips
The warning flashing that indicates that initialization has completed normally continues until the power switch is turned off.
-
-