WASHER MOTOR INSTALLATION
PROCEDURE
-
INSTALL WINDSHIELD WASHER JAR ASSEMBLY (w/ Headlight Cleaner System)
-
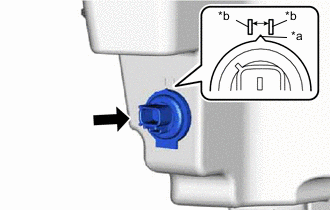
*a Protrusion *b Marking Install the level warning switch assembly as shown in the illustration.
Note
Make sure that the protrusion of the level warning switch assembly is between the 2 markings.
-
Install the headlight cleaner motor and pump.
-
Attach the guide to install the windshield washer jar assembly with the 3 bolts.
- Torque:
- 5.5 N*m { 56 kgf*cm, 49 in.*lbf }
-
Attach the 7 clamps and connect the 2 connectors.
-
-
INSTALL WINDSHIELD WASHER JAR ASSEMBLY (w/o Headlight Cleaner System)
-
for 4.8 L Windshield Washer Jar Assembly:
-
*a Protrusion *b Marking Install the level warning switch assembly as shown in the illustration.
Note
Make sure that the protrusion of the level warning switch assembly is between the 2 markings.
-
Attach the guide to install the windshield washer jar assembly with the 3 bolts.
- Torque:
- 5.5 N*m { 56 kgf*cm, 49 in.*lbf }
-
Attach the 7 clamps and connect the connector.
-
-
for 2.5 L Windshield Washer Jar Assembly:
-
Attach the guide to install the windshield washer jar assembly with the 3 bolts.
- Torque:
- 5.5 N*m { 56 kgf*cm, 49 in.*lbf }
-
Attach the 7 clamps.
-
-
-
INSTALL WASHER INLET SUB-ASSEMBLY
-
Install the washer inlet sub-assembly to the windshield washer jar assembly.
-
Install the bolt.
- Torque:
- 5.5 N*m { 56 kgf*cm, 49 in.*lbf }
-
-
INSTALL FRONT BUMPER COVER
-
for Sport Package:
-
except Sport Package:
-
-
INSTALL FRONT FENDER FRONT SPLASH SHIELD LH
-
INSTALL NO. 1 MOULDING TAPE
-
INSTALL NO. 2 MOULDING TAPE
-
INSTALL FRONT FENDER MOULDING SUB-ASSEMBLY LH
-
INSTALL RADIATOR GRILLE PROTECTOR
-
INSTALL RADIATOR SUPPORT OPENING COVER
-
INSTALL WINDSHIELD WASHER MOTOR AND PUMP ASSEMBLY
-
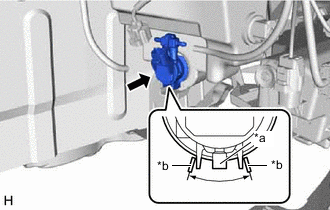
*a Protrusion *b Marking Install the windshield washer motor and pump assembly as shown in the illustration.
Note
Make sure that the protrusion of the level warning switch assembly is between the 2 markings.
-
Connect the connector.
-
Connect the rear washer hose.
-
-
FILL UP WINDSHIELD WASHER JAR AND PUMP ASSEMBLY WITH WASHER FLUID
-
Connect the washer hose to the windshield washer motor and pump, and fill the washer jar with washer fluid.
-
-
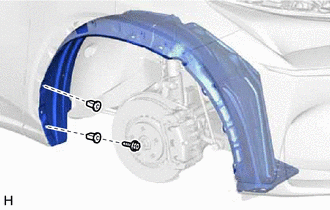
INSTALL FRONT FENDER LINER RH
-
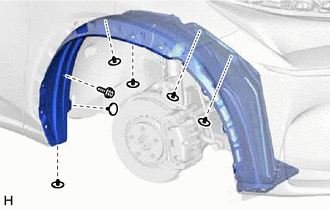
Install the front fender liner RH with the 6 clips and screw.
-
Install the 2 new grommets.
-
Using a 4 mm hexagon wrench, install the hexagon screw.
-
-
INSTALL FRONT FENDER FRONT SPLASH SHIELD RH
-
INSTALL NO. 1 MOULDING TAPE
-
INSTALL NO. 2 MOULDING TAPE
-
INSTALL FRONT FENDER MOULDING SUB-ASSEMBLY RH
-
INSTALL FRONT WHEEL RH