SEAT BELT WARNING LIGHT(for Rear Side) REMOVAL
CAUTION / NOTICE / HINT
Tech Tips
-
Use the same procedure for RHD and LHD vehicles.
-
The procedure listed below is for LHD vehicles.
PROCEDURE
-
REMOVE MULTI-DISPLAY ASSEMBLY
-
REMOVE DOOR SCUFF PLATE ASSEMBLY LH
-
REMOVE COWL SIDE TRIM BOARD LH
-
REMOVE REAR CONSOLE ARMREST ASSEMBLY
-
REMOVE UPPER REAR CONSOLE PANEL
-
REMOVE UPPER NO. 1 CONSOLE PANEL GARNISH
-
REMOVE UPPER NO. 2 CONSOLE PANEL GARNISH
-
REMOVE INSTRUMENT SIDE PANEL LH
-
REMOVE NO. 1 INSTRUMENT PANEL SAFETY PAD SUB-ASSEMBLY
-
REMOVE NO. 1 INSTRUMENT PANEL UNDER COVER SUB-ASSEMBLY
-
REMOVE LOWER NO. 1 INSTRUMENT PANEL FINISH PANEL
-
REMOVE NO. 1 SWITCH HOLE BASE
-
REMOVE INSTRUMENT SIDE PANEL RH
-
REMOVE NO. 2 INSTRUMENT PANEL SAFETY PAD SUB-ASSEMBLY
-
REMOVE CENTER INSTRUMENT CLUSTER FINISH PANEL ASSEMBLY
-
REMOVE AIR CONDITIONING CONTROL ASSEMBLY
-
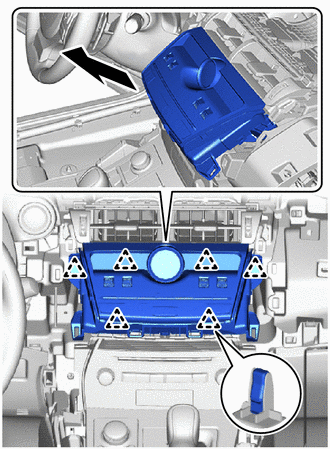
Pull the air conditioning control assembly (seat belt warning light) to detach the 6 clips in the direction indicated by the arrow.
Note
Do not touch the switch, display or clock parts.
-
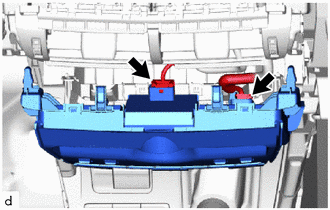
Disconnect the 2 connectors and remove the air conditioning control assembly (seat belt warning light).
-