FRONT SEAT ASSEMBLY(for Manual Seat) REMOVAL
CAUTION / NOTICE / HINT
CAUTION:
Wear protective gloves. Sharp areas on the parts may injure your hands.
Tech Tips
-
Use the same procedure for RHD and LHD vehicles.
-
The procedures listed below are for LHD vehicles.
-
Use the same procedure for the RH and LH sides.
-
The procedure listed below is for the LH side.
PROCEDURE
-
PRECAUTION
Note
-
After turning the power switch off, waiting time may be required before disconnecting the cable from the auxiliary battery negative (-) terminal. Therefore, make sure to read the disconnecting the cable from the auxiliary battery negative (-) terminal notices before proceeding with work.
-
If the front seat airbag assembly LH has deployed, replace the front seat airbag assembly LH, separate type front seatback spring assembly, separate type front seatback pad and separate type front seatback cover with the necessary parts in accordance with the extent of the collision damage.
-
If the front seat cushion airbag assembly RH has deployed, replace the front seat airbag sub-assembly RH, front seat adjuster assembly, separate type front seat cushion pad and separate type front seat cushion cover with the necessary parts in accordance with the extent of the collision damage.
-
-
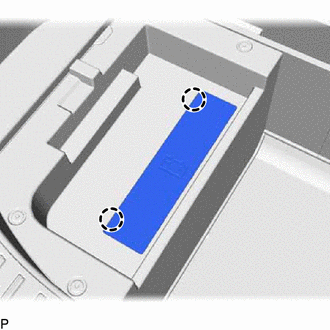
REMOVE NO. 3 DECK BOARD SUB-ASSEMBLY (w/ Spare Tire)
-
REMOVE REAR DECK FLOOR BOX (w/ Spare Tire)
-
REMOVE DECK FLOOR BOX LH (w/ Spare Tire)
-
DISCONNECT CABLE FROM NEGATIVE AUXILIARY BATTERY TERMINAL
CAUTION:
Wait at least 90 seconds after disconnecting the cable from the auxiliary battery negative (-) terminal to disable the SRS system.
Note
When disconnecting the cable, some systems need to be initialized after the cable is reconnected.
-
w/o Spare Tire:
Detach the 2 claws and remove the battery service cover.
-
Loosen the nut and disconnect the cable from the auxiliary battery negative (-) terminal.
-
-
REMOVE FRONT SEAT HEADREST ASSEMBLY
-
Remove the front seat headrest assembly.
-
-
REMOVE FRONT SEAT OUTER TRACK BRACKET COVER LH
-
Operate the seat track adjusting handle to move the seat to the rearmost position.
-
Detach the 2 claws to remove the front seat outer track bracket cover LH.
-
-
REMOVE FRONT SEAT INNER TRACK BRACKET COVER LH
-
Detach the 2 claws to remove the front seat inner track bracket cover LH.
-
-
REMOVE FRONT SEAT REAR OUTER TRACK COVER LH
-
Operate the seat track adjusting handle to move the seat to the foremost position.
-

Detach the 2 claws to remove the front seat rear outer track cover LH.
-
-
REMOVE FRONT SEAT REAR INNER TRACK COVER LH
-
Detach the 2 claws to remove the front seat rear inner track cover LH.
-
-
REMOVE FRONT SEAT ASSEMBLY LH
-
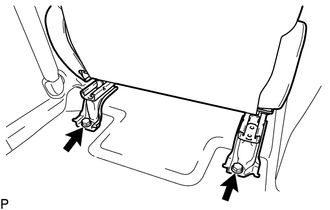
Remove the 2 bolts.
-
Operate the seat track adjusting handle to move the seat to the rearmost position.
-
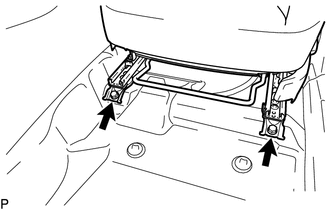
Remove the 2 bolts.
-
Operate the seat track adjusting handle to move the seat to the center position.
-
Operate the reclining adjuster release handle to move the seatback to the upright position.
-
Operate the vertical adjusting handle to move the seat to the highest position.
-
Tilt the front seat assembly LH toward the rear of the vehicle.
Note
Be careful not to damage the vehicle body.
-
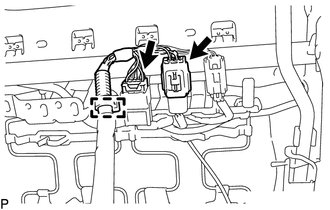
for Driver Side:
-
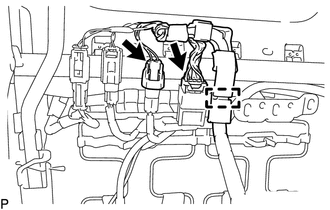
Disconnect the 2 connectors.
-
Detach the clamp to disconnect the wire harness.
-
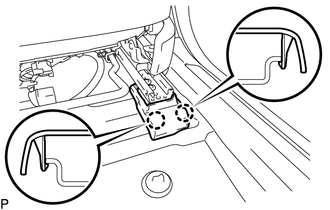
Disconnect the connector of the front seat airbag assembly LH.
-
Push down the white housing lock and slide the yellow CPA. (At this time, the connector cannot be disconnected yet.)
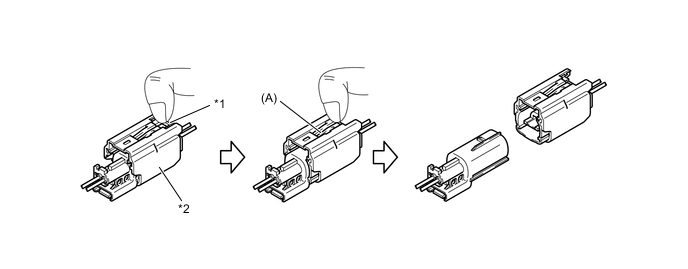
*1 White Housing Lock *2 Yellow CPA -
Push down the white housing lock again and disconnect the connector.
Note
Do not push down the part (A) shown in the illustration when disconnecting the connector.
-
-
-
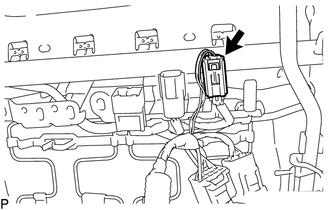
for Passenger Side:
-
Disconnect the 2 connectors.
-
Detach the clamp to disconnect the wire harness.
-
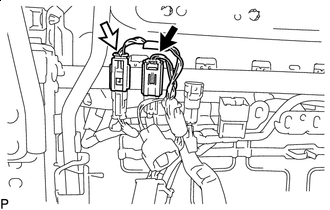

Front Seat Airbag Assembly RH Connector 
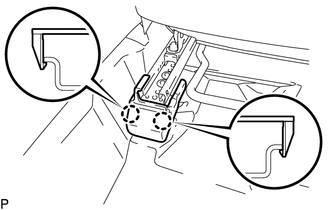
Front Seat Cushion Airbag Assembly RH Connector Disconnect the connector of the front seat airbag assembly RH.
-
Push down the white housing lock and slide the yellow CPA. (At this time, the connector cannot be disconnected yet.)
*1 White Housing Lock *2 Yellow CPA -
Push down the white housing lock again and disconnect the connector.
Note
Do not push down the part (A) shown in the illustration when disconnecting the connector.
-
-
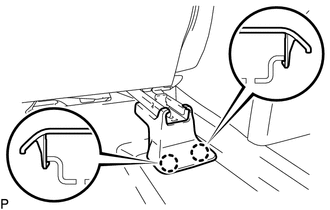
Disconnect the connector of the front seat cushion airbag assembly RH.
Place a finger on the slider, slide the slider to release the lock, and then disconnect the front seat side airbag connector.

*1 Slider - -
-
-
Remove the front seat assembly LH from the vehicle.
Note
-
2 or more people are required when carrying the front seat assembly out of the vehicle.
-
Be careful not to damage the vehicle body.
Tech Tips
for Driver Side:
When removing the front seat assembly from the vehicle, pass it through under the steering wheel.
-
-