REAR SEAT ASSEMBLY(for Manual Seat) INSTALLATION
CAUTION / NOTICE / HINT
CAUTION:
Wear protective gloves. Sharp areas on the parts may injure your hands.
PROCEDURE
-
INSTALL NO. 1 SEAT LEG ASSEMBLY
-
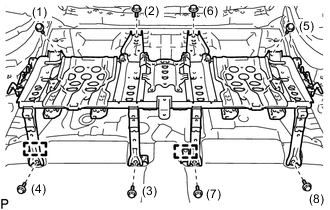
Attach the 2 guides to temporarily install the No. 1 seat leg assembly.
-
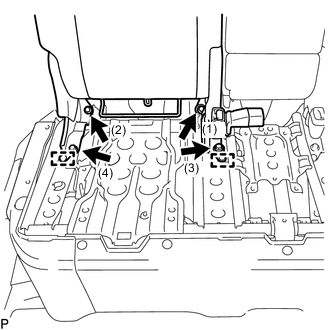
Tighten the 8 bolts in the order indicated in the illustration to install the No. 1 seat leg assembly.
- Torque:
- 42 N*m { 428 kgf*cm, 31 ft.*lbf }
-
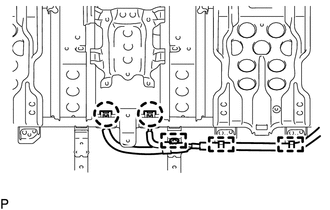
w/ Rear Seat Belt Warning System:
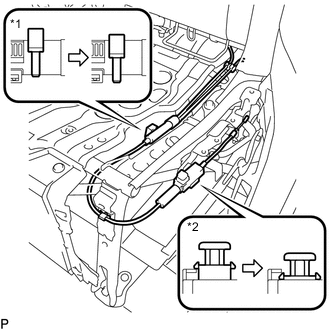
Attach the 2 claws and 3 clamps to connect the wire harness.
-
-
INSTALL NO. 2 TOOL BOX SUB-ASSEMBLY (w/ Spare Tire)
-
INSTALL NO. 2 TOOL BOX SUB-ASSEMBLY (w/o Spare Tire)
-
INSTALL NO. 1 TOOL BOX SUB-ASSEMBLY (w/ Spare Tire)
-
INSTALL NO. 1 TOOL BOX SUB-ASSEMBLY (w/o Spare Tire)
-
INSTALL DECK FLOOR BOX LH (w/ Spare Tire)
-
INSTALL DECK FLOOR BOX LH (w/o Spare Tire)
-
INSTALL DECK FLOOR BOX RH (w/ Spare Tire)
-
INSTALL DECK FLOOR BOX RH (w/o Spare Tire)
-
INSTALL SPARE TIRE (w/ Spare Tire)
-
INSTALL REAR DECK FLOOR BOX (w/ Spare Tire)
-
INSTALL NO. 3 DECK BOARD SUB-ASSEMBLY
-
INSTALL NO. 2 DECK BOARD SUB-ASSEMBLY
-
INSTALL BATTERY SERVICE COVER BOARD
-

Attach the 2 guides to install the battery service cover board.
-
Install the 5 clips.
-
-
INSTALL BATTERY SERVICE HOLE COVER
-
Attach the 2 guides and 2 claws to install the battery service hole cover.
-
-
INSTALL REAR SEATBACK ASSEMBLY RH
-
Attach the 2 guides and temporarily install the rear seatback assembly RH with the 4 bolts.
-
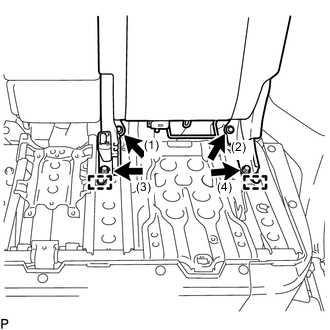
Tighten the 4 bolts in the order indicated in the illustration.
- Torque:
- 42 N*m { 428 kgf*cm, 31 ft.*lbf }
-
w/ Rear Seat Belt Warning System:
-
Attach the 2 clamps to connect the wire harness.
-
Connect the connector.
-
-
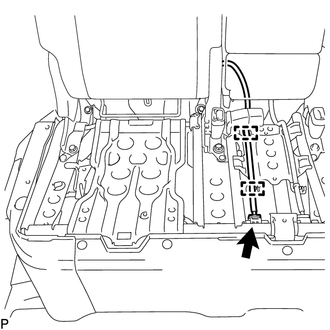
Attach the 6 clamps to connect the rear seat reclining control cable.
-
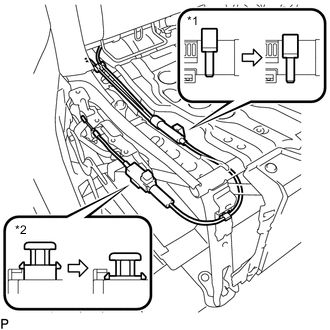
*1 Lock Pin *2 Lock Piece When replacing the rear seat reclining control cable:
-
Push in the lock pin and lock piece after connecting the cable.
-
-
Operate the reclining adjuster release handle to fold down the rear seatback assembly RH.
-
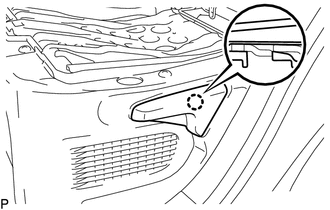
Attach the 3 clips.
-
Return the rear seatback assembly RH to the upright position.
-
-
INSTALL REAR SEATBACK ASSEMBLY LH
-
Attach the 2 guides and temporarily install the rear seatback assembly LH with the 4 bolts.
-
Tighten the 4 bolts in the order indicated in the illustration.
- Torque:
- 42 N*m { 428 kgf*cm, 31 ft.*lbf }
-
w/ Rear Seat Belt Warning System:
-
Attach the 2 clamps to connect the wire harness.
-
Connect the connector.
-
-
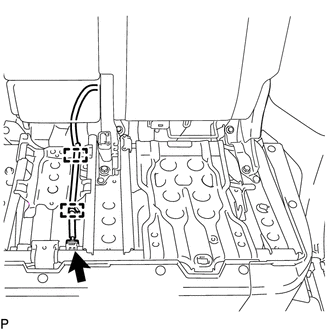
Attach the 6 clamps to connect the rear seat reclining control cable.
-
*1 Lock Pin *2 Lock Piece When replacing the rear seat reclining control cable:
-
Push in the lock pin and lock piece after connecting the cable.
-
-
Operate the reclining adjuster release handle to fold down the rear seatback assembly LH.
-
Attach the 4 clips.
-
Return the rear seatback assembly LH to the upright position.
-
-
INSTALL NO. 3 BATTERY SERVICE COVER BOARD
-
Attach the guide and 2 clips to install the No. 3 battery service cover board.
-
Install the 2 clips.
-
-
INSTALL NO. 2 BATTERY SERVICE COVER BOARD
Tech Tips
Use the same procedure described for the No. 3 battery service cover board.
-
INSTALL REAR DOOR SCUFF PLATE LH
-
INSTALL REAR DOOR SCUFF PLATE RH
-
INSTALL RECLINING ADJUSTER RELEASE HANDLE LH
-
Attach the claw to install the reclining adjuster release handle LH.
-
-
INSTALL RECLINING ADJUSTER RELEASE HANDLE RH
Tech Tips
Use the same procedure described for the LH side.
-
INSTALL BENCH TYPE REAR SEAT CUSHION ASSEMBLY
-
Pass the rear seat inner with center belt assembly RH through the rubber band of the rear seat cushion assembly.
-
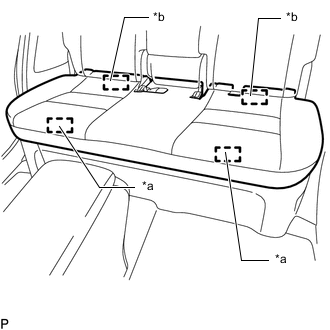
*a Rear seat cushion lock hook section *b Hook section at rear of rear seat cushion frame Attach the 2 hooks on the rear of the rear seat cushion frame.
-
Attach the 2 rear seat cushion lock hooks to install the rear seat cushion assembly.
Note
Check that the rear seat cushion lock hook and the rear seat cushion frame are securely inserted.
-
-
INSTALL DECK BOARD ASSEMBLY
-
INSTALL TONNEAU COVER ASSEMBLY