MOTOR WATER JACKET COVER ASSEMBLY INSTALLATION
PROCEDURE
-
INSTALL NO. 3 MOTOR WATER JACKET COVER ASSEMBLY
-
Remove any remaining seal packing from the transaxle housing installation surface and bolt holes.
Note
-
Clean and degrease the installation surface and bolt holes.
-
Do not allow any remaining seal packing to enter the coolant path when cleaning.
-
-
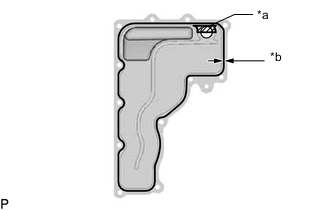
*a Area where seal packing 1282B application prohibited *b 1.5 mm (0.0591 in.) or more Apply seal packing in a continuous line as shown in the illustration.
Seal Packing Toyota Genuine Seal Packing 1282B, Three Bond 1282B or equivalent Standard Seal Diameter 1.5 mm (0.0591 in.) or more. Note
Remove any oil from the contact surface.
-
Install a new No. 3 motor water jacket cover assembly to the hybrid vehicle transaxle with 12 new bolts.
- Torque:
- 10 N*m { 102 kgf*cm, 7 ft.*lbf }
Note
-
Install the No. 3 motor water jacket cover assembly within 3 minutes and tighten the bolts within 10 minutes after applying seal packing.
-
Do not add coolant within 2 hours after installing the No. 3 motor water jacket cover assembly.
-
Do not start the engine for at least 2 hours after installing the No. 3 motor water jacket cover assembly.
-
-
INSTALL NO. 1 MOTOR WATER JACKET COVER ASSEMBLY
-
Remove any remaining seal packing from the transaxle housing installation surface and bolt holes.
Note
-
Clean and degrease the installation surface and bolt holes.
-
Do not allow any remaining seal packing to enter the coolant path when cleaning.
-
-

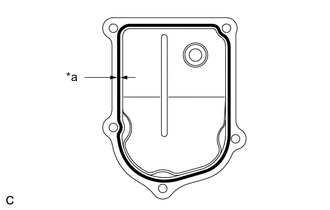
*a 1.5 mm (0.0591 in.) or more Apply seal packing in a continuous line as shown in the illustration.
Seal Packing Toyota Genuine Seal Packing 1282B, Three Bond 1282B or equivalent Standard Seal Diameter 1.5 mm (0.0591 in.) or more. Note
Remove any oil from the contact surface.
-
Install a new No. 1 motor water jacket cover assembly to the hybrid vehicle transaxle with 8 new bolts.
- Torque:
- 10 N*m { 102 kgf*cm, 7 ft.*lbf }
Note
-
Install the No. 1 motor water jacket cover assembly within 3 minutes and tighten the bolts within 10 minutes after applying seal packing.
-
Do not add coolant within 2 hours after installing the No. 1 motor water jacket cover assembly.
-
Do not start the engine for at least 2 hours after installing the No. 1 motor water jacket cover assembly.
-
-
INSTALL NO. 2 AUTOMATIC TRANSMISSION CASE COVER
-
INSTALL OIL COOLER TUBE CLAMP
-
INSTALL NO. 1 TRANSMISSION CONTROL CABLE BRACKET
-
INSTALL FRONT ENGINE MOUNTING BRACKET
-
INSTALL HYBRID VEHICLE TRANSAXLE ASSEMBLY
-
INSTALL NO. 2 MOTOR WATER JACKET COVER ASSEMBLY
-
Remove any remaining seal packing from the transaxle housing installation surface and bolt holes.
Note
-
Clean and degrease the installation surface and bolt holes.
-
Do not allow any remaining seal packing to enter the coolant path when cleaning.
-
-
*a 1.5 mm (0.0591 in.) or more Apply seal packing in a continuous line as shown in the illustration.
Seal Packing Toyota Genuine Seal Packing 1282B, Three Bond 1282B or equivalent Standard Seal Diameter 1.5 mm (0.0591 in.) or more. Note
Remove any oil from the contact surface.
-
Install a new No. 2 motor water jacket cover assembly to the hybrid vehicle transaxle with 5 new bolts.
- Torque:
- 10 N*m { 102 kgf*cm, 7 ft.*lbf }
Note
-
Install the No. 2 motor water jacket cover assembly within 3 minutes and tighten the bolts within 10 minutes after applying seal packing.
-
Do not add coolant within 2 hours after installing the No. 2 motor water jacket cover assembly.
-
Do not start the engine for at least 2 hours after installing the No. 2 motor water jacket cover assembly.
-
-
ADD COOLANT (for Inverter Coolant)
-
INSPECT FOR COOLANT LEAK (for Inverter Coolant)
-
INSTALL NO. 1 ENGINE UNDER COVER ASSEMBLY