HYBRID VEHICLE TRANSAXLE REMOVAL
CAUTION / NOTICE / HINT
CAUTION:
The engine assembly with hybrid vehicle transaxle assembly is very heavy. Be sure to follow the procedure described in the repair manual, or the engine lifter may suddenly drop.
PROCEDURE
-
REMOVE ENGINE ASSEMBLY WITH TRANSAXLE
-
REMOVE TRANSMISSION OIL COOLER ASSEMBLY
-
REMOVE HYBRID VEHICLE TRANSAXLE ASSEMBLY
-
Using a transmission jack attachment, set the hybrid vehicle transaxle assembly on a transmission jack.
Note
-
Secure the hybrid vehicle transaxle assembly to the transmission jack using a suitable adapter, such as a rope or attachment.
-
To prevent the No. 2 motor water jacket cover assembly from deforming, do not place any attachments under the No. 2 motor water jacket cover assembly of the hybrid vehicle transaxle assembly.
-
Hold the engine assembly with a suitable adapter, such as a rope, during the operation.
-
-
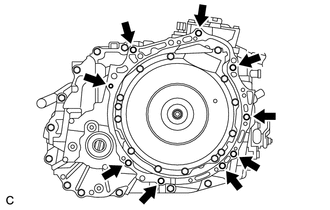
Remove the 9 bolts and hybrid vehicle transaxle assembly.
Note
-
To avoid damage to the 2 knock pins, do not pry between the hybrid vehicle transaxle assembly and the engine assembly.
-
To prevent the splines of the transmission input damper assembly from becoming misaligned, do not allow the hybrid vehicle transaxle assembly to hit the transmission input damper assembly during hybrid vehicle transaxle assembly removal and installation.
-
-
-
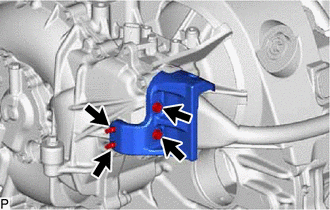
REMOVE FRONT ENGINE MOUNTING BRACKET
-
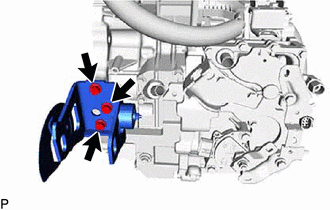
Remove the 3 bolts and front engine mounting bracket from the hybrid vehicle transaxle assembly.
-
-
REMOVE NO. 3 OIL COOLER TUBE CLAMP
-
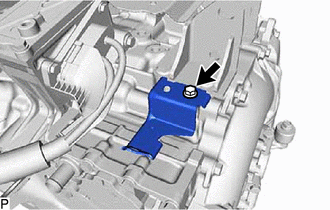
Remove the bolt and No. 3 oil cooler tube clamp from the hybrid vehicle transaxle assembly.
-
-
REMOVE ENGINE MOUNTING BRACKET LH
-
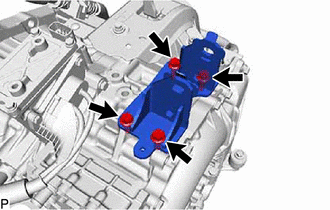
Remove the 4 bolts and engine mounting bracket LH from the hybrid vehicle transaxle assembly.
-
-
REMOVE REAR ENGINE MOUNTING BRACKET
-
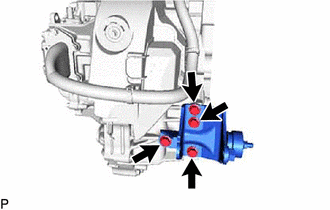
Remove the 4 bolts and rear engine mounting bracket from the hybrid vehicle transaxle assembly.
-
-
REMOVE TRANSMISSION OIL COOLER BRACKET
-
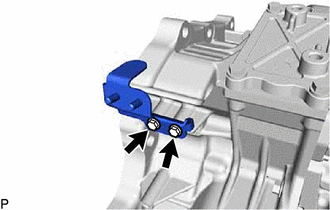
Remove the 2 bolts and transmission oil cooler bracket from the hybrid vehicle transaxle assembly.
-
-
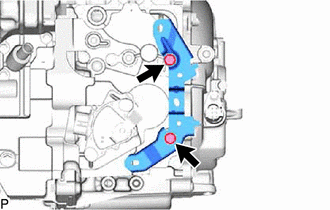
REMOVE NO. 1 TRANSMISSION CONTROL CABLE BRACKET
-
Remove the 2 bolts and No. 1 transmission control cable bracket from the hybrid vehicle transaxle assembly.
-
-
REMOVE SHIFT LEVER POSITION SENSOR
-
REMOVE OIL COOLER TUBE CLAMP
-
Remove the 2 bolts and oil cooler tube clamp from the hybrid vehicle transaxle assembly.
-
-
REMOVE NO. 2 AUTOMATIC TRANSMISSION CASE COVER
-
Remove the bolt, detach the clip and No. 2 automatic transmission case cover from the hybrid vehicle transaxle assembly.
-
-
REMOVE AUTOMATIC TRANSMISSION CASE COVER
-
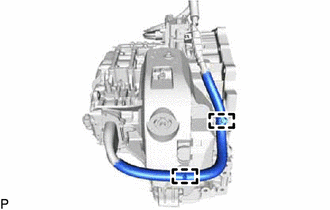
Detach the 2 clamps and motor cable.
-

Detach the 2 guides and remove the automatic transmission case cover from the No. 3 automatic transmission case cover.
-
-
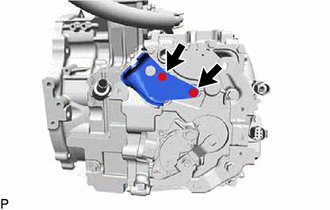
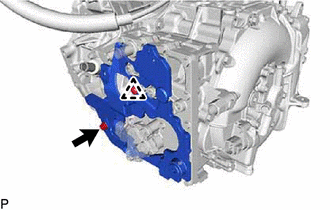
REMOVE NO. 3 AUTOMATIC TRANSMISSION CASE COVER
-
Remove the 2 bolts, detach the clip and No. 3 automatic transmission case cover from the hybrid vehicle transaxle assembly.
-
-
REMOVE HV TRANSMISSION MASS DAMPER
-
Remove the hybrid transmission mass damper and gasket from the hybrid vehicle transaxle assembly.
-
-
REMOVE TRANSAXLE BREATHER PLUG
-
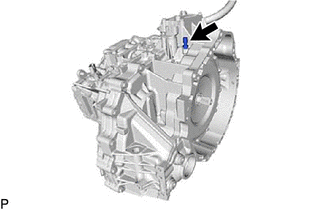
Remove the transaxle breather plug from the hybrid vehicle transaxle assembly.
-
-
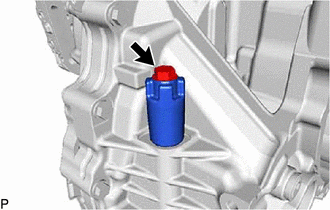
REMOVE UNION
-
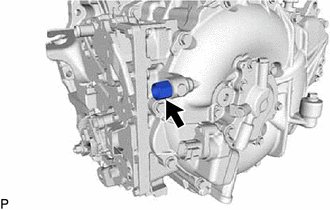
Remove the union and O-ring from the hybrid vehicle transaxle assembly.
-
-
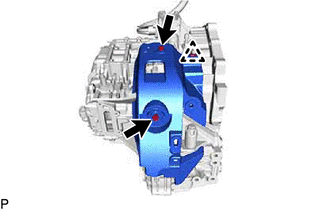
REMOVE MOTOR CONNECTOR PROTECTOR (w/ Cover)
-
Remove the 2 bolts and motor connector protector from the hybrid vehicle transaxle assembly.
-
Using a E7 "TORX" socket wrench, remove the 2 stud bolts.
-
-
REMOVE NO. 2 MOTOR WATER JACKET COVER ASSEMBLY
-
REMOVE NO. 1 MOTOR WATER JACKET COVER ASSEMBLY
-
REMOVE NO. 3 MOTOR WATER JACKET COVER ASSEMBLY