BATTERY VOLTAGE SENSOR INSTALLATION
CAUTION / NOTICE / HINT
Note
-
The type of battery voltage sensor to be used varies depending on the vehicle model.
-
If the wrong type of battery voltage sensor is installed, the power switch cannot be turned on (READY).
-
After installing the battery voltage sensor, perform the following to check that the power switch can be turned on (READY).
-
Turn the power switch on (READY).
-
Turn the power switch off and wait for 30 seconds or more.
-
Turn the power switch on (READY) again.
PROCEDURE
-
INSTALL BATTERY VOLTAGE SENSOR
CAUTION:
Wear insulated gloves and use insulated tools.
-
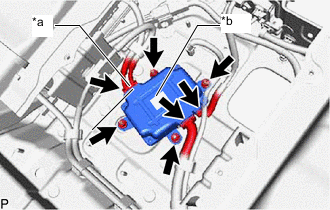
*a High Voltage Connector *b Blue Label Install the battery voltage sensor with the 4 nuts.
- Torque:
- 7.5 N*m { 76 kgf*cm, 66 in.*lbf }
Tech Tips
Check the color of the label.
-
Connect the 3 battery voltage sensor connectors.
Note
The connectors should be connected securely.
-
-
INSTALL LOWER NO. 2 HYBRID BATTERY CARRIER PATCH
CAUTION:
Wear insulated gloves and use insulated tools.
-
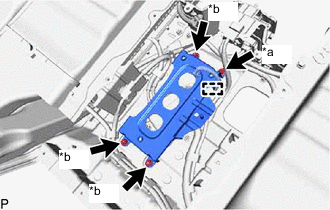
*a Bolt *b Nut Install the lower No. 2 hybrid battery carrier patch with the 3 nuts and bolt.
- Torque:
- 7.5 N*m { 76 kgf*cm, 66 in.*lbf }
-
Connect the wire harness clamp.
-
-
INSTALL HYBRID BATTERY JUNCTION BLOCK ASSEMBLY