HV BATTERY INSTALLATION

PROCEDURE
-
INSTALL NO. 2 HYBRID BATTERY EXHAUST DUCT
CAUTION:
Wear insulated gloves and use insulated tools.
-
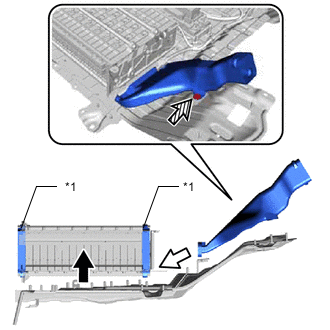
*1 Hybrid Battery End Plate 
Raise Hybrid Battery Stack 
Install No. 2 Hybrid Battery Exhaust Duct 
Secure Clip Raise the hybrid battery stack vertically.
Note
-
Make sure to hold the hybrid battery stack by the hybrid battery end plates shown in the illustration.
-
Make sure to raise the hybrid battery stack as much as necessary for the removal of the No. 2 hybrid battery exhaust duct.
-
Make sure to raise the hybrid battery stack vertically.
-
-
Install the No. 2 hybrid battery exhaust duct to the HV battery, and secure it with the clip.
-
Install the hybrid battery stack with the 3 nuts.
- Torque:
- 7.5 N*m { 76 kgf*cm, 66 in.*lbf }
-
-
INSTALL NO. 1 HYBRID BATTERY EXHAUST DUCT
CAUTION:
Wear insulated gloves and use insulated tools.
-
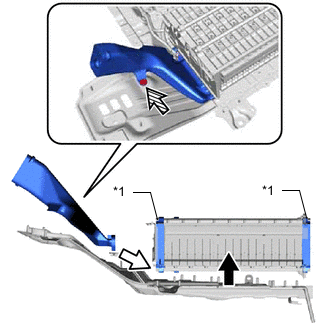
*1 Hybrid Battery End Plate Raise Hybrid Battery Stack Install No. 2 Hybrid Battery Exhaust Duct Secure Clip Raise the hybrid battery stack vertically.
Note
-
Make sure to hold the hybrid battery stack by the hybrid battery end plates shown in the illustration.
-
Make sure to raise the hybrid battery stack as much as necessary for the removal of the No. 1 hybrid battery exhaust duct.
-
Make sure to raise the hybrid battery stack vertically.
-
-
Install the No. 1 hybrid battery exhaust duct to the HV battery, and secure it with the clip.
-
Install the hybrid battery stack with the 3 nuts.
- Torque:
- 7.5 N*m { 76 kgf*cm, 66 in.*lbf }
-
-
INSTALL NO. 2 HYBRID BATTERY COVER INTAKE DUCT
CAUTION:
Wear insulated gloves and use insulated tools.
-
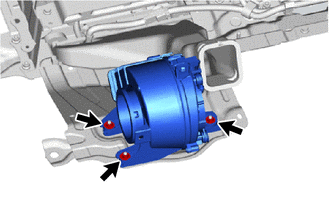
Install the battery cooling blower assembly LH with the 3 nuts.
- Torque:
- 7.5 N*m { 76 kgf*cm, 66 in.*lbf }
-
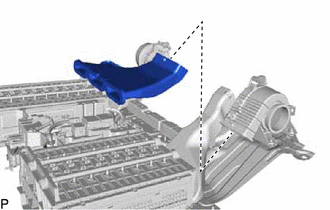
Install the No. 2 hybrid battery cover intake duct.
-
-
INSTALL NO. 1 HYBRID BATTERY COVER INTAKE DUCT
CAUTION:
Wear insulated gloves and use insulated tools.
-
Install the battery cooling blower assembly RH with the 3 nuts.
- Torque:
- 7.5 N*m { 76 kgf*cm, 66 in.*lbf }
-
Install the No. 1 hybrid battery cover intake duct.
-

Connect the intake temperature sensor and wire harness clamp.
-
-
INSTALL NO. 1 HYBRID BATTERY SHIELD SUB-ASSEMBLY
CAUTION:
Wear insulated gloves and use insulated tools.
-
Install the No. 1 hybrid battery shield sub-assembly with the 2 nuts.
- Torque:
- 7.5 N*m { 76 kgf*cm, 66 in.*lbf }
-
Connect the 4 wire harness clamps.
-
-
INSTALL NO. 1 HYBRID VEHICLE BATTERY CARRIER BRACKET SUB-ASSEMBLY
CAUTION:
Wear insulated gloves and use insulated tools.
-
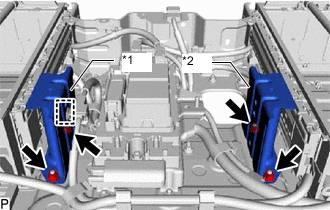
*1 No. 1 Hybrid Vehicle Battery Carrier Bracket Sub-assembly LH Side *2 No. 1 Hybrid Vehicle Battery Carrier Bracket Sub-assembly RH Side Install the No. 1 hybrid vehicle battery carrier bracket sub-assembly LH side with the 2 nuts.
- Torque:
- 7.5 N*m { 76 kgf*cm, 66 in.*lbf }
-
Install the No. 1 hybrid vehicle battery carrier bracket sub-assembly RH side with the 2 nuts.
- Torque:
- 7.5 N*m { 76 kgf*cm, 66 in.*lbf }
-
Connect the wire harness clamp to the No. 1 hybrid vehicle carrier bracket sub-assembly LH side.
-
-
INSTALL HYBRID BATTERY COVER SUB-ASSEMBLY LH
CAUTION:
Wear insulated gloves and use insulated tools.
-
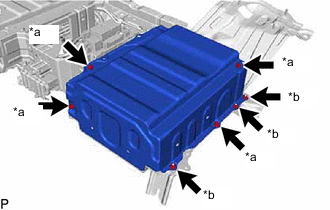
*a Bolt *b Nut Install the hybrid battery cover sub-assembly LH with the 4 bolts and 3 nuts.
- Torque:
- 7.5 N*m { 76 kgf*cm, 66 in.*lbf }
-
-
INSTALL HYBRID BATTERY COVER SUB-ASSEMBLY RH
CAUTION:
Wear insulated gloves and use insulated tools.
-
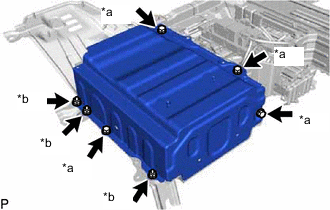
*a Bolt *b Nut Install the hybrid battery cover sub-assembly RH with the 4 bolts and 3 nuts.
- Torque:
- 7.5 N*m { 76 kgf*cm, 66 in.*lbf }
-
-
INSTALL NO. 2 HYBRID BATTERY PACK WIRE
CAUTION:
Wear insulated gloves.
-
Connect the 2 wire harness clamps and install the No. 2 hybrid battery pack wire.
-
-
INSTALL BATTERY VOLTAGE SENSOR
-
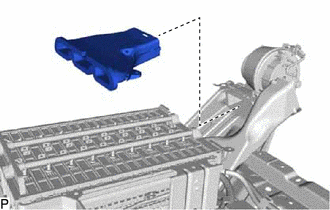
INSTALL LOWER NO. 2 HYBRID BATTERY CARRIER PATCH
-
INSTALL HV BATTERY JUNCTION BLOCK ASSEMBLY
CAUTION:
Wear insulated gloves and use insulated tools.
-
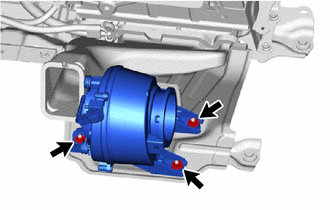
Install the hybrid battery junction block assembly with the 3 nuts.
- Torque:
- 7.5 N*m { 76 kgf*cm, 66 in.*lbf }
-
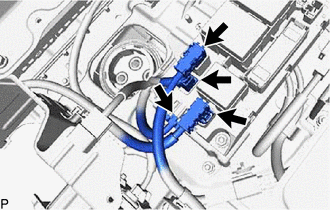
Connect the 4 connectors.
Note
Make sure that the connectors are securely attached.
-
-
INSTALL NO. 4 HYBRID BATTERY EXHAUST DUCT
-
Install the No. 4 hybrid battery exhaust duct to the No. 2 hybrid battery exhaust duct.
-
-
INSTALL NO. 3 HYBRID BATTERY EXHAUST DUCT
-
Install the No. 3 hybrid battery exhaust duct to the No. 1 hybrid battery exhaust duct.
-
-
INSTALL HV BATTERY ASSEMBLY
CAUTION:
Wear insulated gloves and protective goggles.
-
Use cardboard or other similar material to protect the HV battery assembly and vehicle body from damage.
-
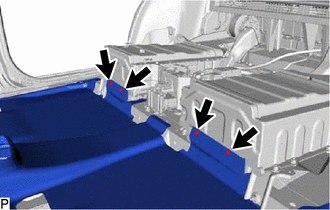
Install the HV battery assembly from the rear of the vehicle.
Note
-
Hold the areas shown in the illustration and lift up the HV battery assembly.
-
Since the HV battery assembly is very heavy, 4 people are needed to install the HV battery assembly. When removing the HV battery assembly, do not damage the parts around it.
-
To prevent the wire harness from being caught, make sure to bundle the wire harness using insulating tape or equivalent.
-
When removing/installing/moving the HV battery assembly, make sure not to tilt it more than 80°.
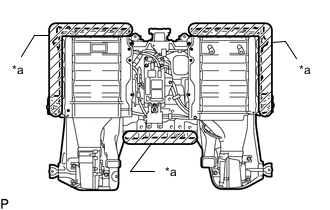
*a Areas to be Held Tech Tips
When removing and installing the HV battery, do so from the back door opening.
-
-
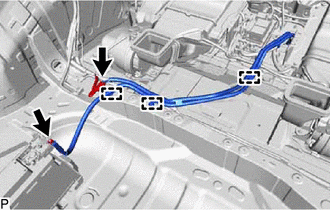
Lift up the HV battery assembly, and pull out the 4 cables from the HV battery assembly towards the lower side.
Note
-
To prevent the wire harness from being caught, make sure to bundle the wire harness using insulating tape or equivalent.
-
Since the HV battery assembly is very heavy, 4 people are needed to install the HV battery assembly. When removing the HV battery assembly, do not damage the parts around it.
-
-
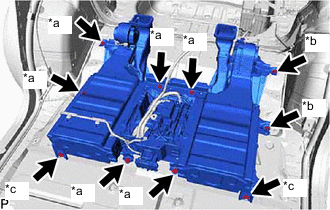
*a Bolt *b Ground Bolt *c Nut Install the HV battery assembly with the 6 bolts, 2 nuts and 2 ground bolts.
- Torque:
- 19 N*m { 194 kgf*cm, 14 ft.*lbf }
-
Connect the floor carpet mat assembly with the 4 clips.
-
-
CONNECT WIRE HARNESS
CAUTION:
Wear insulated gloves and use insulated tools.
-
Connect the connector and wire harness clamp to the battery cooling blower assembly LH.
-
Connect the connector and wire harness clamp to the battery cooling blower assembly RH.
-
Connect the 6 wire harness clamps and 2 connectors to the HV battery assembly.
-
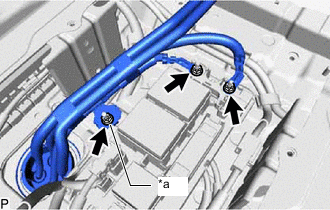
*a Ground Terminal Using an insulated tool wrapped with electrical tape, connect the 2 No. 2 frame wires (high-voltage cables) and ground terminal with the 3 nuts.
- Torque:
- 9.0 N*m { 92 kgf*cm, 80 in.*lbf }
-
for Power Seat:
Connect the 3 clamps and No. 2 floor wire.
-
-
INSTALL AUXILIARY BATTERY
-
CONNECT CABLE TO POSITIVE AUXILIARY BATTERY TERMINAL
CAUTION:
Wear insulated gloves.
-
Connect the 3 wire harness clamps and connector.
-
Connect the positive (+) auxiliary battery terminal.
- Torque:
- 6.0 N*m { 61 kgf*cm, 53 in.*lbf }
-
-
HIGH VOLTAGE CABLE CONNECTION CONDITION
-
INSTALL NO. 2 HYBRID VEHICLE BATTERY SHIELD REINFORCEMENT
-
INSTALL NO. 1 HYBRID BATTERY INTAKE DUCT
-
Install the No. 1 hybrid battery intake duct with the 2 clips.
-
-
INSTALL NO. 2 HYBRID BATTERY INTAKE DUCT
-
Install the No. 2 hybrid battery intake duct with the 2 clips.
-
-
INSTALL REAR SEAT ASSEMBLY
for Manual Seat: Click here
for Power Seat: Click here
-
INSTALL NO. 1 INVERTER RESERVE TANK BRACKET (for 2WD)
-
CONNECT INVERTER RESERVE TANK ASSEMBLY
-
CONNECT WIRE HARNESS
-
INSTALL SERVICE PLUG GRIP
-
CONNECT CABLE TO NEGATIVE AUXILIARY BATTERY TERMINAL
Note
When disconnecting the cable, some systems need to be initialized after the cable is reconnected.