EGR VALVE INSTALLATION
CAUTION / NOTICE / HINT
Tech Tips
Perform "Inspection After Repair" after replacing the EGR valve assembly.
-
w/ EGR System:
-
w/ Canister Pump Module:
PROCEDURE
-
INSTALL EGR VALVE ASSEMBLY
Tech Tips
Perform "Inspection After Repair" after replacing the EGR valve assembly.
-
w/ EGR System:
-
w/ Canister Pump Module:
-
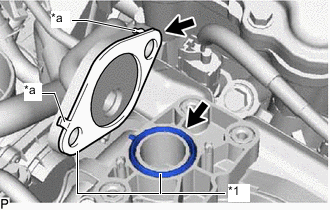
*1 Gasket *a Claws Install 2 new gaskets to the No. 1 EGR pipe and intake manifold.
Note
Make sure that the gasket is installed in the correct direction.
-
Temporarily install the EGR valve assembly to the intake manifold with the 3 bolts.
-
Connect the No. 1 EGR pipe to the EGR valve assembly and temporarily install the 2 nuts.
-
Tighten the 3 bolts.
- Torque:
- 10 N*m { 102 kgf*cm, 7 ft.*lbf }
-
Using a 12 mm deep socket wrench, tighten the 2 nuts.
- Torque:
- 21 N*m { 214 kgf*cm, 15 ft.*lbf }
-
Using a 10 mm deep socket wrench, install the engine cover joint to the EGR valve assembly.
- Torque:
- 10 N*m { 102 kgf*cm, 7 ft.*lbf }
-
Connect the No. 1 water by-pass hose and No. 2 water by-pass hose to the EGR valve assembly, and slide the 2 clamps to secure the hose.
-
Connect the connector to the EGR valve assembly.
-
-
INSTALL AIR CLEANER AND HOSE
-
INSTALL NO. 1 ENGINE COVER SUB-ASSEMBLY
-
ADD ENGINE COOLANT
-
INSPECT FOR COOLANT LEAK