EMISSION CONTROL SYSTEM(w/o Canister Pump Module) ON-VEHICLE INSPECTION
PROCEDURE
-
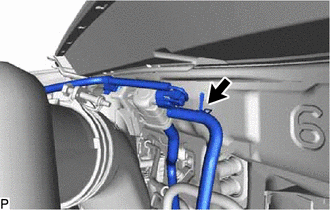
VISUALLY INSPECT HOSES, CONNECTIONS AND GASKETS
-
Visually check that the hoses, connections and gaskets have no cracks, leaks or damage.
Note
-
Detachment or other problems with the engine oil dipstick, oil filler cap sub-assembly, PCV hose and other components may cause the engine to run improperly.
-
Disconnection, looseness or cracks in the parts of the air induction system between the throttle with motor body assembly and cylinder head sub-assembly will allow air suction and cause an engine failure or engine malfunctions.
If the result is not as specified, replace parts as necessary.
-
-
-
INSPECT EVAPORATIVE EMISSION CONTROL SYSTEM
-
Connect the GTS to the DLC3.
-
Put the engine in inspection mode (maintenance mode)
-
Slide the clamp and disconnect the fuel vapor feed hose from the purge VSV.
-
Start the engine.
-
Enter the following menus: Powertrain / Engine and ECT / Active Test / Activate the VSV for Evap Control.
Powertrain > Engine and ECT > Active TestTester Display Activate the VSV for Evap Control -
Check that vacuum occurs at the purge VSV port.
If vacuum does not occur, check the following items.
-
Purge VSV
-
Clogging in the fuel vapor feed hose connecting the intake manifold and purge VSV
-
Voltage from the ECM PRG terminal
-
-
Exit Active Test mode and reconnect the fuel vapor feed hose to the purge VSV and slide the clamp to secure the hose.
-
Enter the following menus: Powertrain / Engine and ECT / Data List / EVAP Purge VSV.
Powertrain > Engine and ECT > Data ListTester Display EVAP Purge VSV -
Warm up the engine and drive the vehicle.
-
Confirm that the purge valve opens.
If the result is not as specified, replace the purge VSV, wire harness or ECM.
-