ROOF DRIP SIDE FINISH MOULDING INSTALLATION
CAUTION / NOTICE / HINT
Tech Tips
-
Use the same procedure for the RH side and LH side.
-
The following procedure is for the LH side.
PROCEDURE
-
INSTALL ROOF DRIP SIDE FINISH MOULDING CLIP
Note
When installing new roof drip side finish moulding clips, remove any double-sided tape remaining where the roof drip side finish moulding clips will be installed on the vehicle body and clean the vehicle body with a non-residue solvent.
-
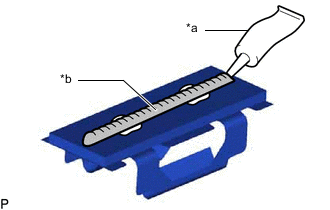
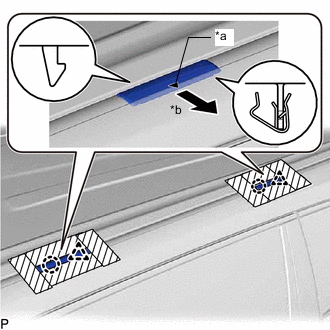
*a Adhesive *b 2 to 3 mm Bead of Adhesive Apply a 2 to 3 mm (0.0787 to 0.118 in.) bead of adhesive (3M DP-105 or equivalent) to each new roof drip side finish moulding clip.
Tech Tips
Adhesive strength (tensile strength): 13.7 MPa (140.0 kgf/cm2, 1987 psi) or more (when the temperature is 23°C (73°F).)
-
Install the roof drip side finish moulding clips to the positions on the roof panel shown in the illustration. Determine the locations and firmly press and install the roof drip side finish moulding clips after lightly applying adhesive.
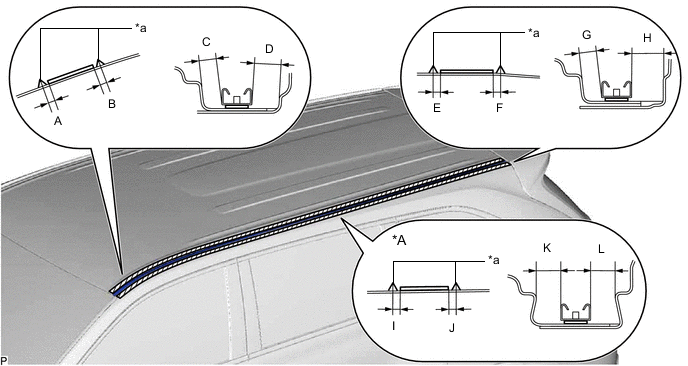
*A w/o Roof Rack - - *a Protruding Part - - Standard Measurement Area Measurement Area Measurement A 2.5 to 3.5 mm (0.0985 to 0.138 in.) B 2.5 to 3.5 mm (0.0985 to 0.138 in.) C 5.3 to 6.3 mm (0.209 to 0.248 in.) D 8.6 mm (0.339 in.) E 2.5 to 3.5 mm (0.0985 to 0.138 in.) F 2.5 to 3.5 mm (0.0985 to 0.138 in.) G 5.2 to 6.2 mm (0.205 to 0.244 in.) H 10.2 mm (0.402 in.) I 2.5 to 3.5 mm (0.0985 to 0.138 in.) J 2.5 to 3.5 mm (0.0985 to 0.138 in.) K 6.6 to 7.6 mm (0.260 to 0.299 in.) L 7.1 mm (0.280 in.) -
Install the roof drip side finish moulding when 20 minutes or more have elapsed after pressing and installing the roof drip side finish moulding clips.
Tech Tips
-
Initial hardening time: 20 minutes
-
Complete hardening time: 48 hours
-
-
-
INSTALL REAR ROOF DRIP SIDE FINISH MOULDING (w/o Roof Rack)
-
Engage the roof drip side finish moulding clip and install the rear roof drip side finish moulding.
-
-
INSTALL REAR ROOF DRIP SIDE FINISH MOULDING (w/ Roof Rack)
-
Engage the roof drip side finish moulding clip and install the rear roof drip side finish moulding.
-
-
INSTALL CENTER ROOF DRIP SIDE FINISH MOULDING (w/o Roof Rack)
-
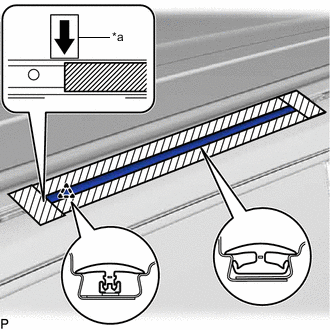
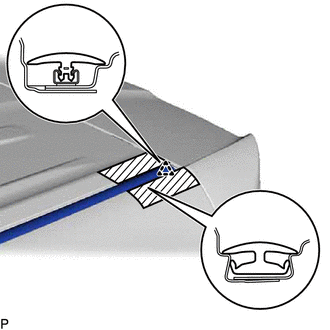
*a Matchmark Position the center roof drip side finish moulding by aligning it with the matchmark on the vehicle body as shown in the illustration.
-
Engage the roof drip side finish moulding clip and install the center roof drip side finish moulding as shown in the illustration.
-
-
INSTALL FRONT ROOF DRIP SIDE FINISH MOULDING (w/o Roof Rack)
-

Engage the roof drip side finish moulding clip and install the front roof drip side finish moulding.
-
-
INSTALL FRONT ROOF DRIP SIDE FINISH MOULDING (w/ Roof Rack)
-
Engage the roof drip side finish moulding clip and install the front roof drip side finish moulding.
-
-
INSTALL ROOF DRIP SIDE FINISH MOULDING JOINT COVER (w/o Roof Rack)
-
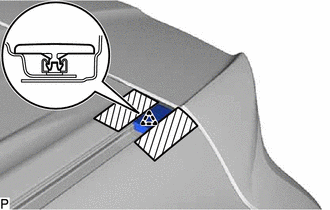
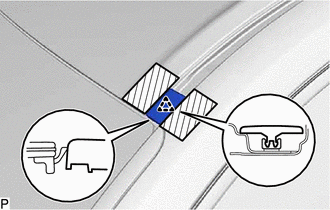
*a Mark *b Outside of the Vehicle Engage the 2 claws and 2 clips to install the 2 roof drip side finish moulding joint covers as shown in the illustration.
-
-
INSTALL ROOF RACK ASSEMBLY (w/ Roof Rack)