ROOF RACK INSTALLATION
CAUTION / NOTICE / HINT
Tech Tips
-
Use the same procedure for the RH side and LH side.
-
The following procedure is for the LH side.
PROCEDURE
-
INSTALL REAR ROOF RACK LEG CUSHION
-
Clean the roof rack.
-
Remove any double-sided tape from the roof rack.
-
Wipe off any tape adhesive residue with cleaner.
-
-
Install a new rear roof rack leg cushion.
-
Remove the release paper from the new rear roof rack leg cushion.
Tech Tips
After removing the release paper, keep the exposed adhesive free from foreign matter.
-
Engage the 2 guides and attach the double-sided tape to install the rear roof rack leg cushion.
-
-
-
INSTALL FRONT ROOF RACK LEG CUSHION
-
Clean the roof rack.
-
Remove any double-sided tape from the roof rack.
-
Wipe off any tape adhesive residue with cleaner.
-
-
Install a new front roof rack leg cushion.
-
Remove the release paper from the new front roof rack leg cushion.
Tech Tips
After removing the release paper, keep the exposed adhesive free from foreign matter.
-
Engage the 2 guides and attach the double-sided tape to install the front roof rack leg cushion.
-
-
-
INSTALL NO. 3 ROOF CARRIER PROTECTOR
-
Clean the roof rack.
-
Remove any double-sided tape from the roof rack.
-
Wipe off any tape adhesive residue with cleaner.
-
-
Install a new No. 3 roof carrier protector.
-
Remove the release paper from the new No. 3 roof carrier protector.
Tech Tips
After removing the release paper, keep the exposed adhesive free from foreign matter.
-
Install the No. 3 roof carrier protector as shown in the illustration.
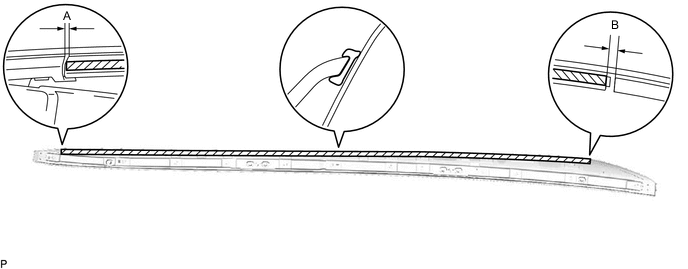
Standard Measurement Area Measurement Area Measurement A 0 to 1.0 mm (0 to 0.0393 in.) B 0 to 1.0 mm (0 to 0.0393 in.)
-
-
-
INSTALL NO. 1 ROOF CARRIER PROTECTOR
-
Clean the roof rack.
-
Remove any double-sided tape from the roof rack.
-
Wipe off any tape adhesive residue with cleaner.
-
-
Install a new No. 1 roof carrier protector.
-
Remove the release paper from the new No. 1 roof carrier protector.
Tech Tips
After removing the release paper, keep the exposed adhesive free from foreign matter.
-
Install the No. 1 roof carrier protector as shown in the illustration.
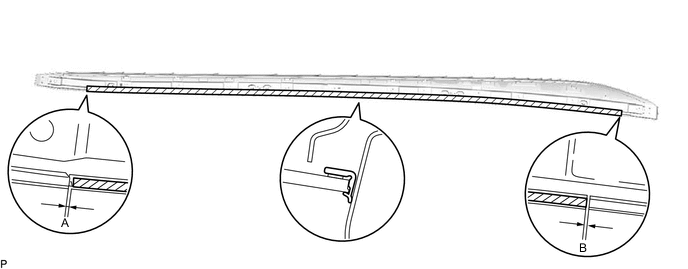
Standard Measurement Area Measurement Area Measurement A 0 to 1.0 mm (0 to 0.0393 in.) B 0 to 1.0 mm (0 to 0.0393 in.)
-
-
-
INSTALL ROOF RACK ASSEMBLY
-
Install 6 new No. 2 roof carrier seals.
-
Install the roof rack assembly with 6 new bolts.
-
-
INSTALL NO. 2 ROOF SIDE GARNISH LID
Tech Tips
Use the same procedure for all the No. 2 roof side garnish lids.
-
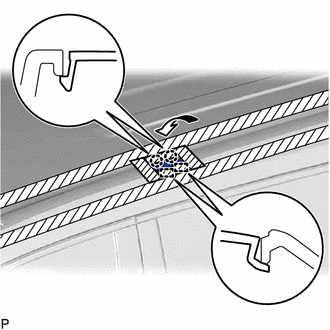
Engage the 2 guides.
-
Engage the 2 claws to install the No. 2 roof side garnish lid as shown in the illustration.
-
-
INSTALL NO. 1 ROOF SIDE GARNISH LID
Tech Tips
Use the same procedure for all the No. 1 roof side garnish lids.
-
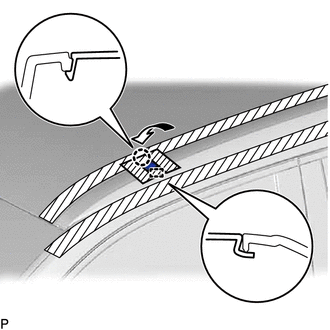
Engage the guide.
-
Engage the claw to install the No. 1 roof side garnish lid as shown in the illustration.
-