FRONT BUMPER INSTALLATION
PROCEDURE
-
INSTALL FRONT BUMPER ASSEMBLY
-
Move the front bumper assembly into position.
-
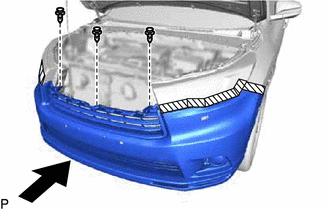
Temporarily install the front bumper assembly with the 3 clips as shown in the illustration.
-
w/ Headlight Cleaner System:
-
Pull back the side of the front bumper assembly and connect the headlight cleaner hose.
Note
Do not apply excessive force when pulling back the front bumper assembly.
-
-
Pull back the side of the front bumper assembly, connect the 2 connectors and engage the clamp.
Note
Do not apply excessive force when pulling back the front bumper assembly.
-
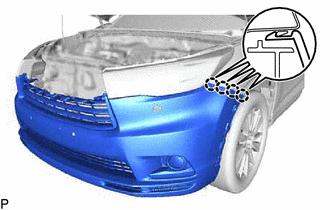
Engage the 4 claws.
Tech Tips
Use the same procedure for the RH side and LH side.
-
Install the front bumper assembly with the 8 screws.
-
-
CONNECT FRONT FENDER WHEEL OPENING MOULDING SUB-ASSEMBLY LH
-
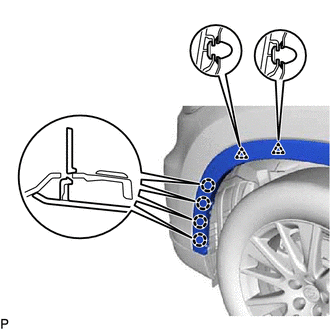
Engage the 2 clips and 4 claws.
-
Install the clip.
-
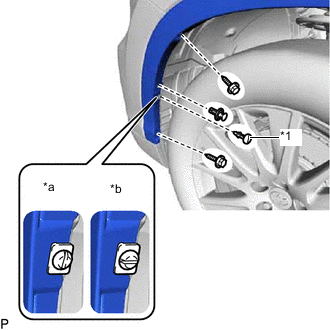
*1 Pin Hold Clip *a Correct *b Incorrect Install the clip.
-
Connect the front fender wheel opening moulding sub-assembly LH with the 2 screws.
-
Install the pin hold clip as shown in the illustration.
Note
Insert the pin hold clip with the slot aligned vertically. Do not rotate the clip after inserting it. After installation, confirm that the slot is aligned vertically.
-
-
CONNECT FRONT FENDER WHEEL OPENING MOULDING SUB-ASSEMBLY RH
Tech Tips
Use the same procedure as for the LH side.
-
INSTALL RADIATOR GRILLE
-
ADJUST FOG LIGHT ASSEMBLY
-
ADD WINDSHIELD WASHER FLUID (w/ Headlight Cleaner System)