BACK DOOR DISASSEMBLY
PROCEDURE
-
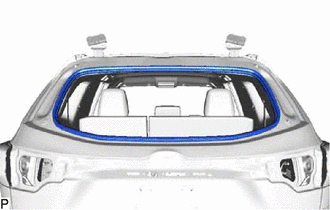
REMOVE BACK WINDOW UPPER TRIM PANEL
-
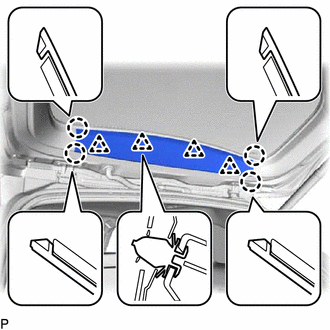
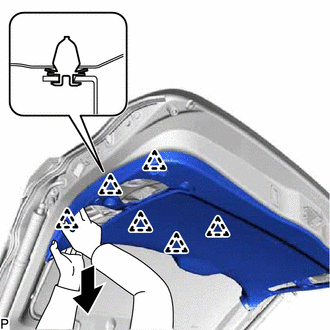
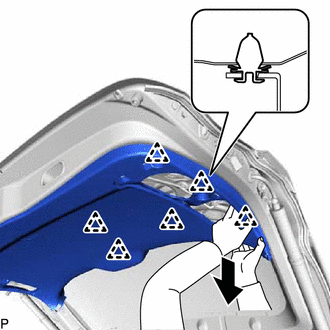
Disengage the 4 claws and 4 clips, and remove the back window upper trim panel.
-
-
REMOVE BACK DOOR TRIM COVER LH
-
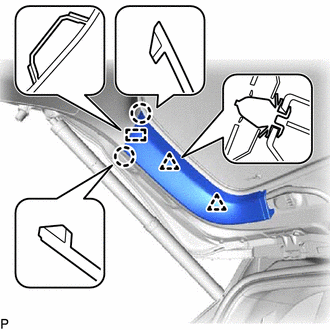
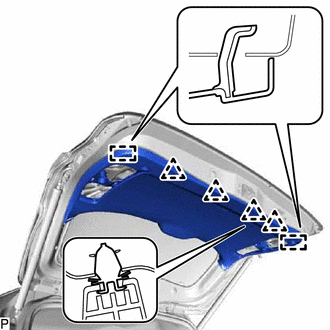
Disengage the 2 clips, 2 claws and guide, and remove the back door trim cover LH.
-
-
REMOVE BACK DOOR TRIM COVER RH
Tech Tips
Use the same procedure as for the LH side.
-
REMOVE BACK DOOR LOCK COVER (for Glass Hatch Type)
-

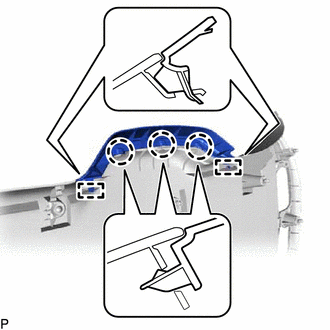
Disengage the 3 claws and 2 guides, and remove the back door lock cover.
-
-
REMOVE NO. 2 BACK DOOR SERVICE HOLE COVER
-
Using a moulding remover, disengage the 4 clips and 2 guides, and remove No. 2 back door service hole cover.
-
-
REMOVE NO. 1 BACK DOOR SERVICE HOLE COVER
-
Using a moulding remover, disengage the 4 clips and 2 guides, and remove No. 1 back door service hole cover.
-
-
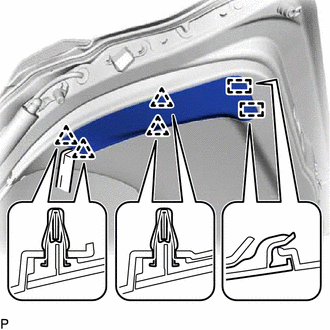
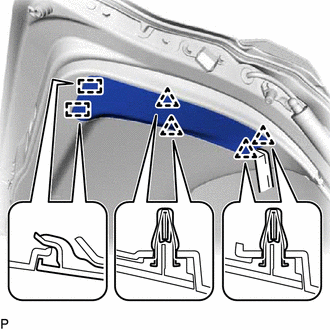
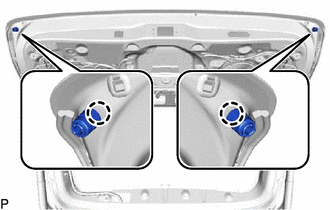
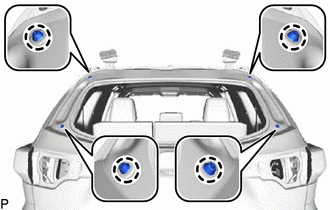
REMOVE BACK DOOR TRIM PANEL ASSEMBLY
-
Disengage the 6 clips as shown in the illustration.
-
Disengage the 6 clips as shown in the illustration.
-
Disengage the 4 clips and 2 guides, and remove the back door trim panel assembly.
-
-
REMOVE BACK DOOR LOCK COVER (for Fixed Glass Type)
-
Disengage the 3 claws and 2 guides, and remove the back door lock cover.
-
-
REMOVE DOOR PULL HANDLE
-

Using a moulding remover, disengage the 4 claws and remove the door pull handle as shown in the illustration.
-
-
REMOVE BACK DOOR LOCK ASSEMBLY (w/o Power Back Door)
-
REMOVE BACK DOOR LOCK ASSEMBLY (w/ Power Back Door)
-
REMOVE BACK DOOR CONTROL SWITCH (w/ Power Back Door)
-
REMOVE REAR NO. 2 SPEAKER ASSEMBLY (w/ Back Door Speaker)
-
REMOVE REAR NO. 3 SPEAKER ASSEMBLY (w/ Back Door Speaker)
-
REMOVE POWER BACK DOOR SENSOR ASSEMBLY LH (w/ Power Back Door)
-
REMOVE POWER BACK DOOR SENSOR ASSEMBLY RH (w/ Power Back Door)
Tech Tips
Use the same procedure as for the LH side.
-
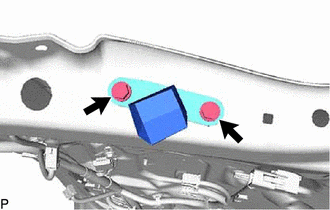
REMOVE BACK DOOR WEIGHT (w/ Weight)
-
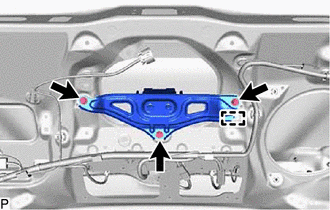
Remove the 3 bolts.
-
Disengage the guide to remove the back door weight.
-
-
REMOVE MULTIPLEX NETWORK DOOR ECU (w/ Power Back Door)
-
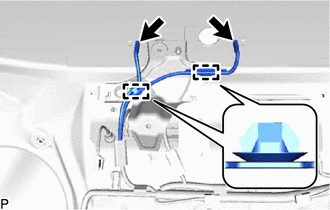
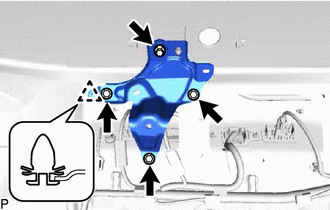
REMOVE BACK DOOR LOWER STOPPER LH
-
Remove the 2 bolts and back door lower stopper LH.
-
-
REMOVE BACK DOOR LOWER STOPPER RH
Tech Tips
Use the same procedure as for the LH side.
-
REMOVE REAR WIPER SHAFT COVER (for Glass Hatch Type)
-
REMOVE REAR WIPER ARM HEAD CAP
-
REMOVE REAR WIPER ARM AND BLADE ASSEMBLY
-
REMOVE REAR WIPER MOTOR GROMMET (for Fixed Glass Type)
-
REMOVE REAR WIPER LINK CAP (for Glass Hatch Type)
-
REMOVE REAR WIPER LINK PIVOT WITH WASHER PACKING (for Glass Hatch Type)
-
REMOVE REAR WIPER MOTOR ASSEMBLY (for Fixed Glass Type)
-
REMOVE REAR WIPER MOTOR ASSEMBLY (for Glass Hatch Type)
-
REMOVE BACK DOOR GLASS GUIDE BRACKET SUB-ASSEMBLY (for Fixed Glass Type)
-
Disconnect the 2 connectors.
-
Disengage the 2 clamps to disconnect the wire harness.
-
Remove the 4 bolts.
-
Disengage the clip to remove the back door glass guide bracket sub-assembly.
-
-
REMOVE BACK WINDOW LOCK ASSEMBLY (for Glass Hatch Type)
-
REMOVE REAR SIDE SPOILER SUB-ASSEMBLY LH
-
REMOVE REAR SIDE SPOILER SUB-ASSEMBLY RH
Tech Tips
Use the same procedure as for the LH side.
-
REMOVE REAR SPOILER SUB-ASSEMBLY
-
REMOVE BACK WINDOW STAY ASSEMBLY LH (for Glass Hatch Type)
-
REMOVE BACK WINDOW STAY ASSEMBLY RH (for Glass Hatch Type)
Tech Tips
Use the same procedure as for the LH side.
-
REMOVE BACK WINDOW STAY BOLT (for Glass Hatch Type)
for LH Side: Click here
for RH Side:
Tech Tips
Use the same procedure as for the LH side.
-
REMOVE BACK DOOR GLASS
-
REMOVE NO. 2 BACK DOOR WEATHERSTRIP
-
Remove the No. 2 back door weatherstrip.
-
Remove any remaining No. 2 back door weatherstrip sealant from the vehicle body using cleaner.
-
-
REMOVE REAR LIGHT ASSEMBLY LH
-
REMOVE REAR LIGHT ASSEMBLY RH
Tech Tips
Use the same procedure as for the LH side.
-
REMOVE BACK DOOR OUTSIDE GARNISH SUB-ASSEMBLY
-
REMOVE TELEVISION CAMERA ASSEMBLY (w/ Rear Monitor)
-
REMOVE LICENSE PLATE LIGHT ASSEMBLY (for LH Side)
-
REMOVE LICENSE PLATE LIGHT ASSEMBLY (for RH Side)
Tech Tips
Use the same procedure as for the LH side.
-
REMOVE BACK DOOR LOWER STOPPER CUSHION
-
Disengage the 2 claws to remove the 2 back door lower stopper cushions.
-
-
REMOVE CUSHION (for Glass Hatch Type)
-
Disengage the 4 claws to remove the 4 cushions.
-
-
REMOVE DOOR DUST PROOF SEAL
-
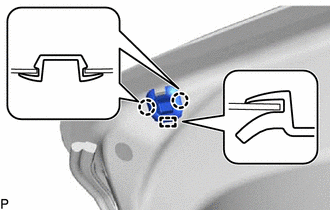
Disengage the 2 claws and guide to remove the door dust proof seal.
Tech Tips
Use the same procedure for the RH side and LH side.
-
-
REMOVE BACK DOOR STAY ASSEMBLY LH (w/o Power Back Door)
-
REMOVE BACK DOOR STAY ASSEMBLY RH (w/o Power Back Door)
Tech Tips
Use the same procedure as for the LH side.
-
REMOVE BACK DOOR DAMPER STAY LOWER BRACKET LH (w/o Power Back Door)
-
REMOVE BACK DOOR DAMPER STAY LOWER BRACKET RH (w/o Power Back Door)
Tech Tips
Use the same procedure as for the LH side.
-
REMOVE POWER BACK DOOR UNIT SET ASSEMBLY LH (w/ Power Back Door)
-
REMOVE POWER BACK DOOR UNIT SET ASSEMBLY RH (w/ Power Back Door)
Tech Tips
Use the same procedure as for the LH side.