BACK DOOR REASSEMBLY
PROCEDURE
-
PRECAUTION (for Glass Hatch Type)
-
INSTALL POWER BACK DOOR UNIT SET ASSEMBLY LH (w/ Power Back Door)
-
INSTALL POWER BACK DOOR UNIT SET ASSEMBLY RH (w/ Power Back Door)
Tech Tips
Use the same procedure as for the LH side.
-
INSTALL BACK DOOR DAMPER STAY LOWER BRACKET LH (w/o Power Back Door)
-
INSTALL BACK DOOR DAMPER STAY LOWER BRACKET RH (w/o Power Back Door)
Tech Tips
Use the same procedure as for the LH side.
-
INSTALL BACK DOOR STAY ASSEMBLY LH (w/o Power Back Door)
-
INSTALL BACK DOOR STAY ASSEMBLY RH (w/o Power Back Door)
Tech Tips
Use the same procedure as for the LH side.
-
INSTALL DOOR DUST PROOF SEAL
-
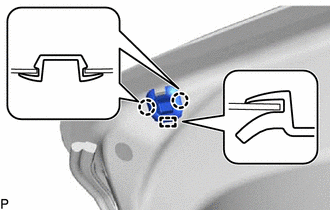
Engage the guide and 2 claws to install the door dust proof seal.
Tech Tips
Use the same procedure for the RH side and LH side.
-
-
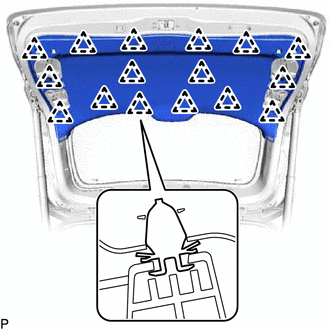
INSTALL CUSHION (for Glass Hatch Type)
-
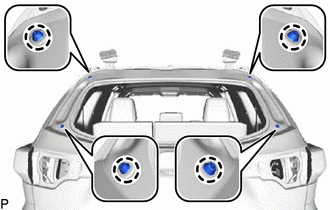
Engage the 4 claws to install 4 new cushions.
-
-
INSTALL BACK DOOR LOWER STOPPER CUSHION
-
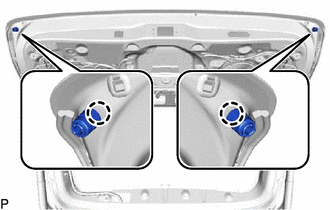
Engage the 2 claws to install 2 new back door lower stopper cushions.
-
-
INSTALL LICENSE PLATE LIGHT ASSEMBLY (for LH Side)
-
INSTALL LICENSE PLATE LIGHT ASSEMBLY (for RH Side)
Tech Tips
Use the same procedure as for the LH side.
-
INSTALL TELEVISION CAMERA ASSEMBLY (w/ Rear Monitor)
-
INSTALL BACK DOOR OUTSIDE GARNISH SUB-ASSEMBLY
-
INSTALL REAR LIGHT ASSEMBLY LH
-
INSTALL REAR LIGHT ASSEMBLY RH
Tech Tips
Use the same procedure as for the LH side.
-
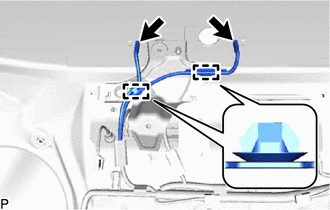
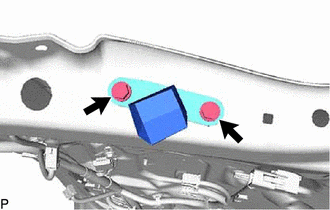
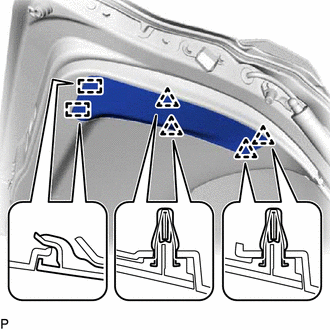
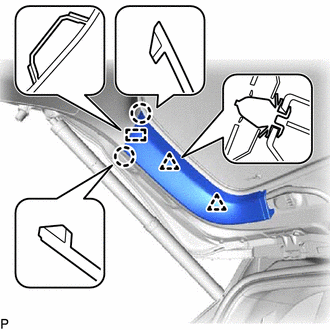
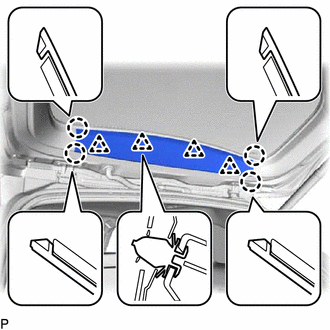
INSTALL NO. 2 BACK DOOR WEATHERSTRIP
-

*a Joint *b Alignment mark (Pink) *c Alignment mark (Yellow) Install a new No. 2 back door weatherstrip so that the alignment marks, joint and areas indicated by the arrows, are aligned as shown in the illustration.
Note
After installation, check that the corners fit correctly.
-
-
INSTALL BACK DOOR GLASS
-
INSTALL BACK WINDOW STAY BOLT (for Glass Hatch Type)
for LH Side: Click here
for RH Side:
Tech Tips
Use the same procedure as for the LH side.
-
INSTALL BACK WINDOW STAY ASSEMBLY LH (for Glass Hatch Type)
-
INSTALL BACK WINDOW STAY ASSEMBLY RH (for Glass Hatch Type)
Tech Tips
Use the same procedure as for the LH side.
-
INSTALL REAR SPOILER SUB-ASSEMBLY
-
INSTALL REAR SIDE SPOILER SUB-ASSEMBLY LH
-
INSTALL REAR SIDE SPOILER SUB-ASSEMBLY RH
Tech Tips
Use the same procedure as for the LH side.
-
INSTALL BACK WINDOW LOCK ASSEMBLY (for Glass Hatch Type)
-
INSTALL BACK DOOR GLASS GUIDE BRACKET SUB-ASSEMBLY (for Fixed Glass Type)
-
Engage the clip.
-
Install the back door glass guide bracket sub-assembly with the 4 bolts.
Tech Tips
Tighten the bolts in the order shown in the illustration.
- Torque:
- 8.0 N*m { 82 kgf*cm, 71 in.*lbf }
-
Engage the 2 clamps to connect the wire harness.
-
Connect the 2 connectors.
-
-
INSTALL REAR WIPER MOTOR GROMMET (for Fixed Glass Type)
-
INSTALL REAR WIPER MOTOR ASSEMBLY (for Fixed Glass Type)
-
INSTALL REAR WIPER MOTOR ASSEMBLY (for Glass Hatch Type)
-
INSTALL REAR WIPER LINK PIVOT WITH WASHER PACKING (for Glass Hatch Type)
-
INSTALL REAR WIPER LINK CAP (for Glass Hatch Type)
-
INSTALL REAR WIPER ARM AND BLADE ASSEMBLY
-
INSTALL REAR WIPER ARM HEAD CAP
-
INSTALL REAR WIPER SHAFT COVER (for Glass Hatch Type)
-
INSTALL BACK DOOR LOWER STOPPER LH
-
Install the back door lower stopper LH with the 2 bolts.
- Torque:
- 7.5 N*m { 76 kgf*cm, 66 in.*lbf }
-
-
INSTALL BACK DOOR LOWER STOPPER RH
Tech Tips
Use the same procedure as for the LH side.
-
INSTALL MULTIPLEX NETWORK DOOR ECU (w/ Power Back Door)
-
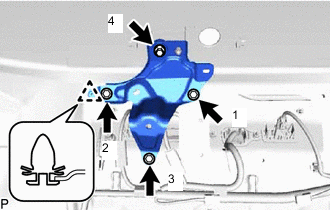
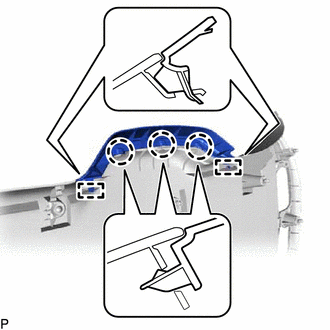
INSTALL BACK DOOR WEIGHT (w/ Weight)
-
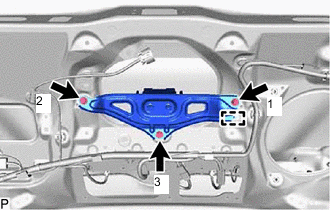
Engage the guide.
-
Install the back door weight with the 3 bolts.
Tech Tips
Tighten the bolts in the order shown in the illustration.
- Torque:
- 12.5 N*m { 127 kgf*cm, 9 ft.*lbf }
-
-
INSTALL POWER BACK DOOR SENSOR ASSEMBLY LH (w/ Power Back Door)
-
INSTALL POWER BACK DOOR SENSOR ASSEMBLY RH (w/ Power Back Door)
Tech Tips
Use the same procedure as for the LH side.
-
INSTALL REAR NO. 2 SPEAKER ASSEMBLY (w/ Back Door Speaker)
-
INSTALL REAR NO. 3 SPEAKER ASSEMBLY (w/ Back Door Speaker)
-
INSTALL BACK DOOR CONTROL SWITCH (w/ Power Back Door)
-
INSTALL BACK DOOR LOCK ASSEMBLY (w/o Power Back Door)
-
INSTALL BACK DOOR LOCK ASSEMBLY (w/ Power Back Door)
-
INSTALL DOOR PULL HANDLE
-
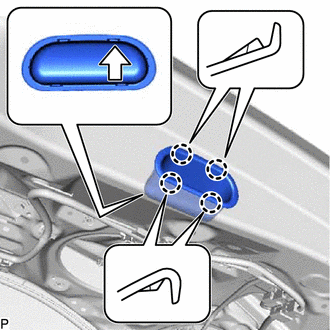
Engage the 4 claws to install the door pull handle.
Tech Tips
With the back door fully open, install the door pull handle so that the arrow on the backside of door pull handle points up.
-
-
INSTALL BACK DOOR LOCK COVER (for Fixed Glass Type)
-
Engage the 2 guides and 3 claws to install the back door lock cover.
-
-
INSTALL BACK DOOR TRIM PANEL ASSEMBLY
-
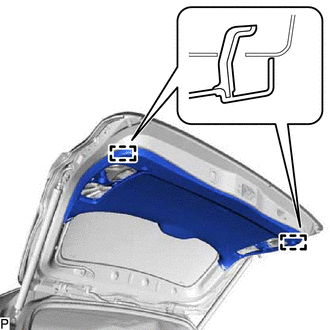
Engage the 2 guides.
-
Engage the 16 clips to install the back door trim panel assembly.
-
-
INSTALL NO. 2 BACK DOOR SERVICE HOLE COVER
-
Engage the 2 guides and 4 clips to install the No. 2 back door service hole cover.
-
-
INSTALL NO. 1 BACK DOOR SERVICE HOLE COVER
-
Engage the 2 guides and 4 clips to install the No. 1 back door service hole cover.
-
-
INSTALL BACK DOOR LOCK COVER (for Glass Hatch Type)
-

Engage the 2 guides and 3 claws to install the back door lock cover.
-
-
INSTALL BACK DOOR TRIM COVER LH
-
Engage the guide, 2 claws and 2 clips to install the back door trim cover LH.
-
-
INSTALL BACK DOOR TRIM COVER RH
Tech Tips
Use the same procedure as for the LH side.
-
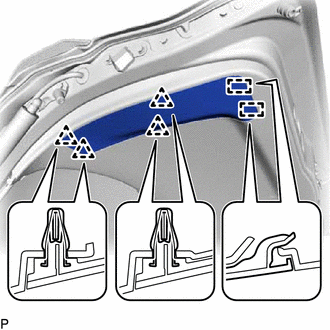
INSTALL BACK WINDOW UPPER TRIM PANEL
-
Engage the 4 clips and 4 claws to install the back window upper trim panel.
-
-
INITIALIZE POWER BACK DOOR SYSTEM (w/ Power Back Door)
-
INSPECT POWER BACK DOOR SYSTEM (w/ Power Back Door)
-
INSPECT BACK DOOR CLOSER SYSTEM (w/ Power Back Door)
-
ADJUST TELEVISION CAMERA ASSEMBLY (w/ Parking Assist Monitor System)
-
ADJUST TELEVISION CAMERA ASSEMBLY (w/ Panoramic View Monitor System)