CONDENSER REMOVAL
PROCEDURE
-
RECOVER REFRIGERANT FROM REFRIGERATION SYSTEM
-
REMOVE RADIATOR GRILLE
-
REMOVE INLET AIR CLEANER ASSEMBLY
for 1AR-FE:
for 2GR-FKS:
-
REMOVE BATTERY
for 1AR-FE:
for 2GR-FKS:
-
REMOVE HOOD LOCK ASSEMBLY
for LHD:
for RHD:
-
REMOVE UPPER RADIATOR SUPPORT SUB-ASSEMBLY
-
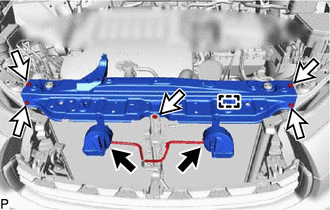
Disconnect the 2 connectors.
-
Disengage the clamp.
-
Remove the 5 bolts and upper radiator support sub-assembly.
-
-
DISCONNECT DISCHARGE HOSE SUB-ASSEMBLY
-
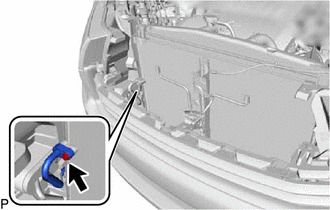
Remove the bolt and disconnect the discharge hose sub-assembly from the cooler condenser assembly.
-
Remove the O-ring from the discharge hose sub-assembly.
Note
Seal the openings of the disconnected parts using vinyl tape to prevent entry of moisture and foreign matter.
-
-
DISCONNECT AIR CONDITIONER TUBE AND ACCESSORY ASSEMBLY
-
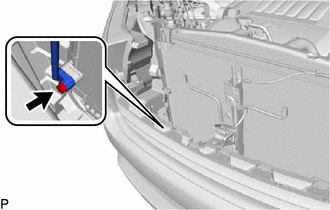
Remove the bolt and disconnect the air conditioner tube and accessory assembly from the cooler condenser assembly.
-
Remove the O-ring from the air conditioner tube and accessory assembly.
Note
Seal the openings of the disconnected parts using vinyl tape to prevent entry of moisture and foreign matter.
-
-
REMOVE COOLER CONDENSER ASSEMBLY
-
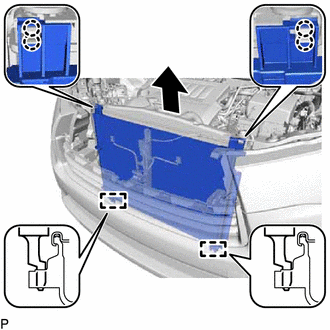
Disengage the 4 claws.
-
Disengage the 2 guides and remove the cooler condenser assembly as shown in the illustration.
Note
Do not damage the condenser or radiator when removing the cooler condenser assembly.
-