COOLER EXPANSION VALVE(for Front) INSTALLATION
CAUTION / NOTICE / HINT
Note
When removing the cooler expansion valve by itself, be sure to install a new cooler expansion valve and new bolt for the suction hose sub-assembly.
PROCEDURE
-
INSTALL COOLER EXPANSION VALVE
-
Apply sufficient compressor oil to 2 new O-rings and the fitting surfaces of a new cooler expansion valve.
Compressor Oil ND-OIL 8 or equivalent -
Install the 2 O-rings to the No. 1 cooler evaporator sub-assembly.
Note
Keep the O-rings and O-ring fitting surfaces free from dirt and foreign matter.
-
Using a 4 mm hexagon wrench, install a new cooler expansion valve with the 2 hexagon bolts.
- Torque:
- 3.5 N*m { 36 kgf*cm, 31 in.*lbf }
-
-
CONNECT AIR CONDITIONER TUBE AND ACCESSORY ASSEMBLY
-
CONNECT SUCTION HOSE SUB-ASSEMBLY
-
Remove the vinyl tape from the suction hose sub-assembly.
-
Sufficiently apply compressor oil to a new O-ring and the fitting surface of the suction hose sub-assembly.
Compressor Oil ND-OIL 8 or equivalent -
Install the O-ring to the suction hose sub-assembly.
Note
Keep the O-ring and O-ring fitting surface free from dirt and foreign matter.
-
Connect the suction hose sub-assembly.
-
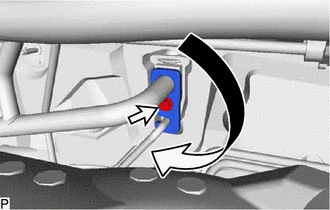
Rotate the hook connector as shown in the illustration.
-
Insert the hose joint into the fitting hole securely and install a new bolt.
- Torque:
- 9.8 N*m { 100 kgf*cm, 87 in.*lbf }
-
-
INSTALL OUTER COWL TOP PANEL SUB-ASSEMBLY (for 2GR-FE)
for LHD:
for RHD:
-
INSTALL WINDSHIELD WIPER MOTOR AND LINK ASSEMBLY (for 2GR-FE)
-
CHARGE AIR CONDITIONING SYSTEM WITH REFRIGERANT
-
WARM UP ENGINE
-
INSPECT FOR REFRIGERANT LEAK