REAR NO. 2 SEAT ASSEMBLY REASSEMBLY
CAUTION / NOTICE / HINT
CAUTION:
Wear protective gloves. Sharp areas on the seat frame may injure your hands.
PROCEDURE
-
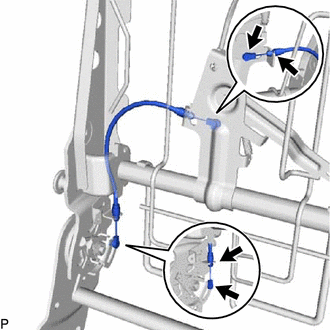
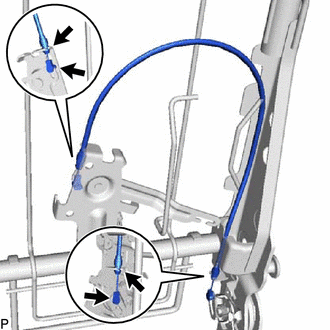
INSTALL REAR NO. 2 SEAT CUSHION LOCK CABLE ASSEMBLY (for RH Side)
-
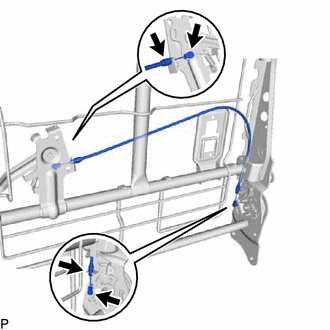
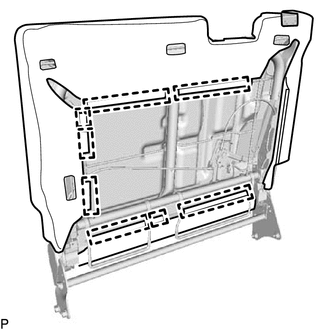
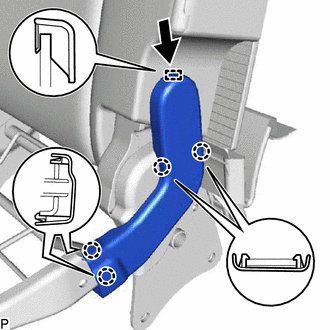
Engage the 4 cable clamps to install the rear No. 2 seat cushion lock cable assembly.
-
-
INSTALL REAR NO. 2 SEAT CUSHION LOCK CABLE ASSEMBLY RH
-
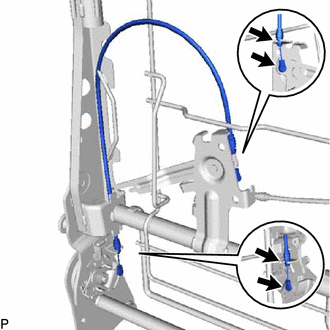
Engage the 4 cable clamps to install the rear No. 2 seat cushion lock cable assembly RH.
-
-
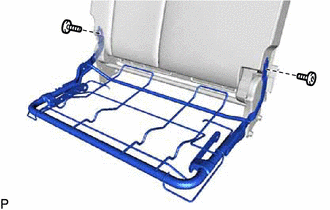
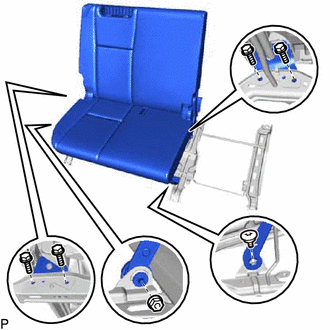
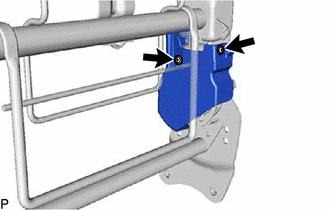
INSTALL REAR NO. 2 SEAT RECLINING COVER RH (for RH Side)
-
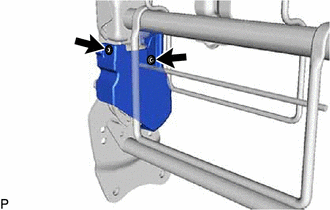
Install the rear No. 2 seat reclining cover RH with the 2 screws.
-
-
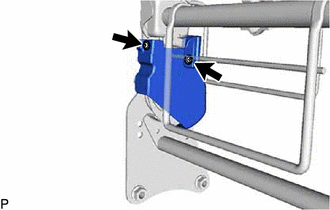
INSTALL REAR NO. 2 SEAT RECLINING COVER LH (for RH Side)
-
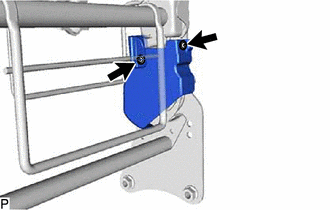
Install the rear No. 2 seat reclining cover LH with the 2 screws.
-
-
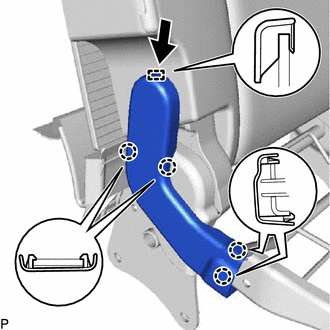
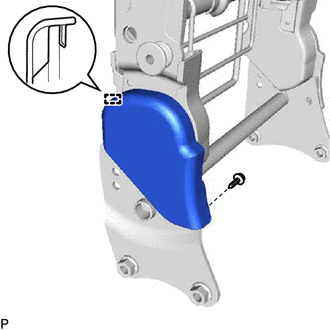
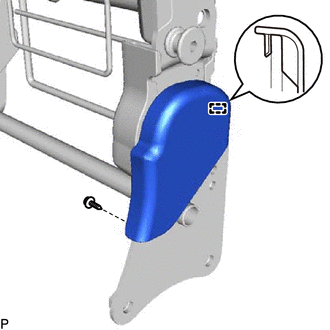
INSTALL NO. 2 SEAT NO. 2 HINGE COVER
-
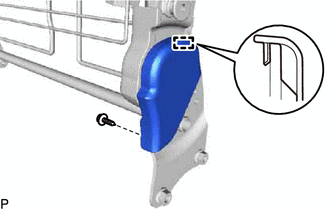
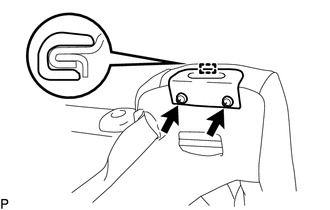
Engage the guide.
-
Install the No. 2 seat No. 2 hinge cover with the screw.
-
-
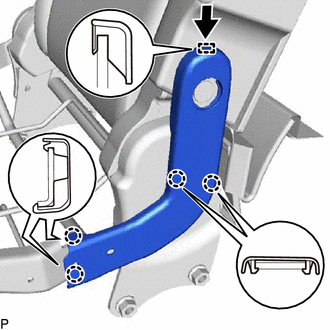
INSTALL NO. 2 SEAT NO. 4 HINGE COVER
-
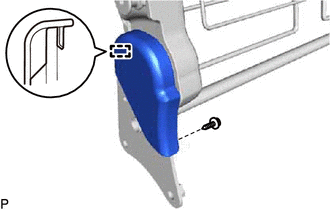
Engage the guide.
-
Install the No. 2 seat No. 4 hinge cover with the screw.
-
-
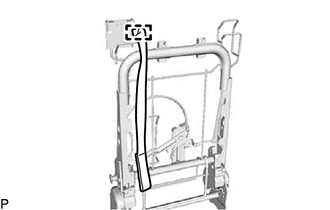
INSTALL NO. 2 REAR SIDE SEAT BAND SUB-ASSEMBLY (for RH Side)
-
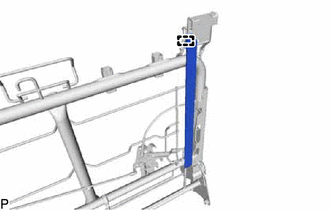
Engage the hook to install the No. 2 rear side seat band sub-assembly.
-
-
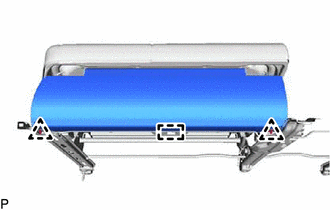
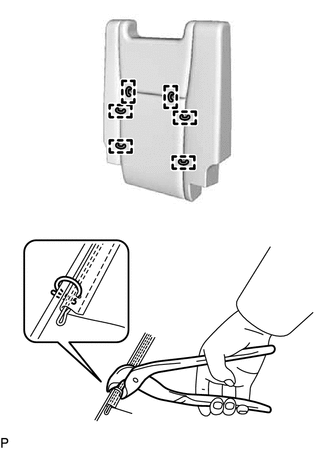
INSTALL NO. 2 SEATBACK COVER SUB-ASSEMBLY RH
-
Temporarily install the No. 2 seatback cover sub-assembly RH to the separate type rear seatback pad.
-
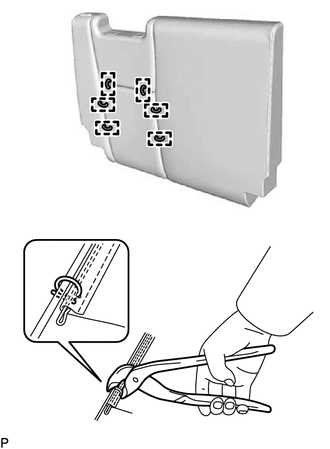
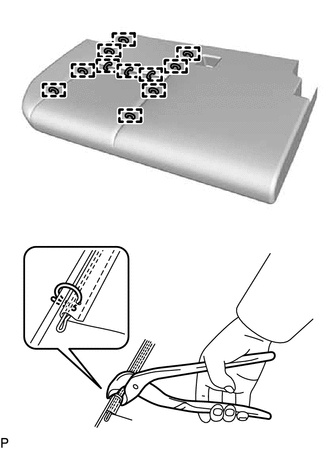
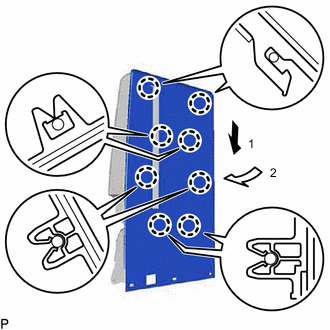
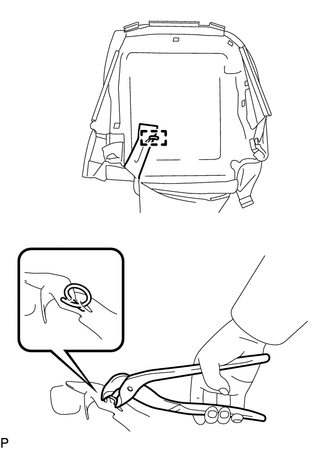
Using hog ring pliers, install the No. 2 seatback cover sub-assembly RH to the separate type rear seatback pad with 6 new hog rings.
Note
-
Be careful not to damage the No. 2 seatback cover sub-assembly RH.
-
Be sure to securely install the hog rings as shown in the illustration while preventing wrinkles from forming on the No. 2 seatback cover sub-assembly RH.
-
-
-
INSTALL NO. 2 SEATBACK COVER WITH PAD RH
-
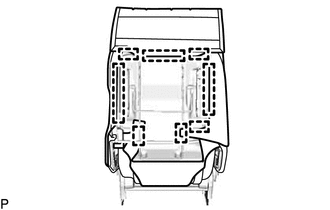
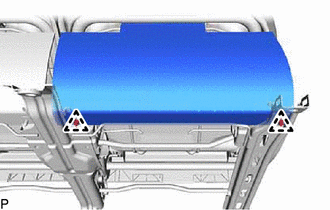
Engage the 8 hooks to install the No. 2 seatback cover with pad RH.
-
-
INSTALL REAR NO. 2 SEAT HEADREST SUPPORT ASSEMBLY
-

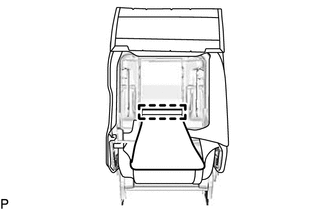
Engage the 4 claws to install the 2 rear No. 2 seat headrest support assemblies.
-
-
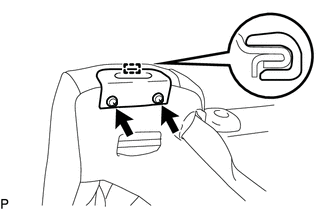
INSTALL NO. 2 REAR SEAT COVER BEZEL (for RH Side)
-
Engage the guide.
-
Install the No. 2 rear seat cover bezel with the 2 screws.
-
-
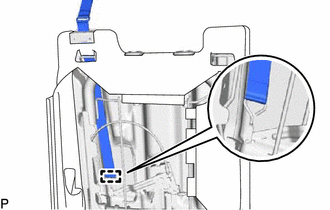
INSTALL REAR SIDE SEAT BAND SUB-ASSEMBLY (for RH Side)
-
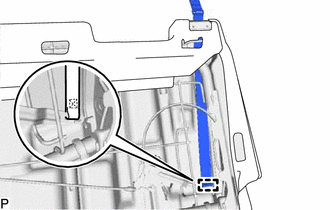
Engage the hook to install the rear side seat band sub-assembly.
-
-
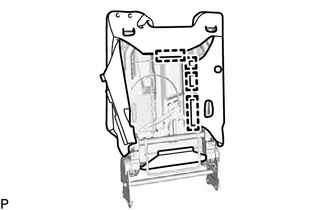
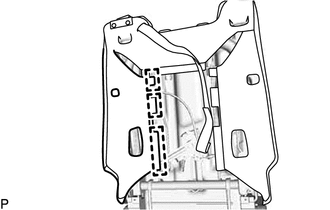
INSTALL NO. 2 SEATBACK BOARD SUB-ASSEMBLY RH
-
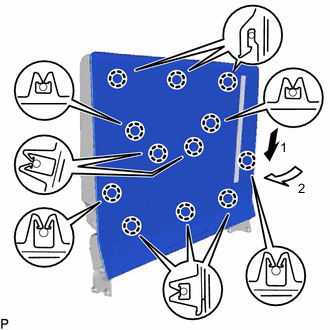
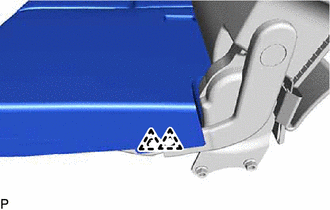
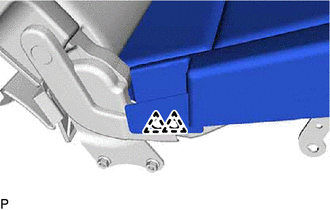
Engage the 12 claws as indicated by the arrows, in the order shown in the illustration to install the No. 2 seatback board sub-assembly RH.
-
-
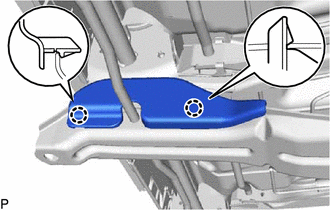
INSTALL NO. 2 SEAT CUSHION FRAME SUB-ASSEMBLY RH
-
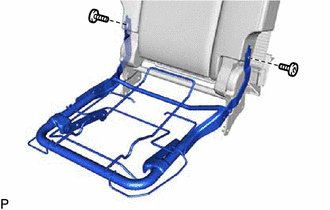
Using a T45 "TORX" socket wrench, install the No. 2 seat cushion frame sub-assembly RH with the 2 bolts.
- Torque:
- 21 N*m { 214 kgf*cm, 15 ft.*lbf }
-
-
INSTALL NO. 1 REAR SEAT CUSHION HINGE COVER
-
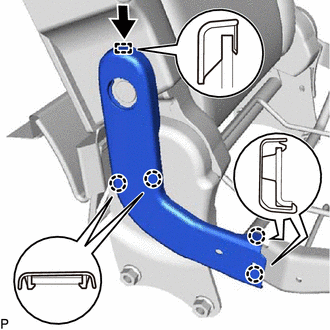
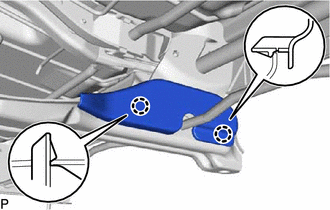
Engage the guide and 4 claws to install the No. 1 rear seat cushion hinge cover as shown in the illustration.
-
-
INSTALL NO. 2 REAR SEAT CUSHION HINGE COVER
-
Engage the guide and 4 claws to install the No. 2 rear seat cushion hinge cover as shown in the illustration.
-
-
INSTALL REAR SEAT CUSHION HINGE COVER CAP
-
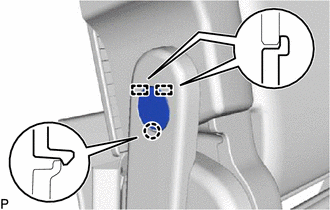
Engage the 2 guides and claw to install the rear seat cushion hinge cover cap.
-
-
INSTALL NO. 2 SEAT CUSHION COVER SUB-ASSEMBLY RH
-
Temporarily install the No. 2 seat cushion cover sub-assembly RH to the No. 2 rear cushion pad RH.
-
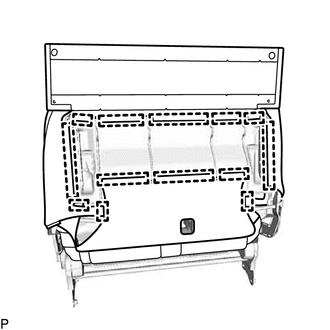
Using hog ring pliers, install 11 new hog rings.
Note
-
Be careful not to damage the No. 2 seat cushion cover sub-assembly RH.
-
Be sure to securely install the hog rings as shown in the illustration while preventing wrinkles from forming on the No. 2 seat cushion cover sub-assembly RH.
-
-
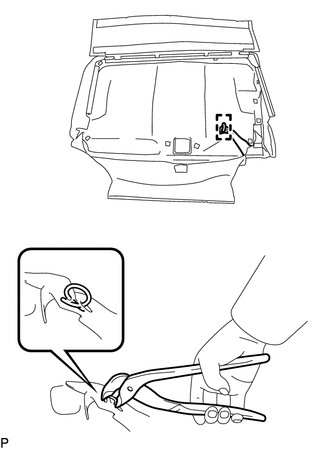
Using hog ring pliers, install the No. 2 seat cushion cover sub-assembly RH to the rear seat cushion pad RH with a new hog ring.
Note
-
Be careful not to damage the No. 2 seat cushion cover sub-assembly RH.
-
Be sure to securely install the hog rings as shown in the illustration while preventing wrinkles from forming on the No. 2 seat cushion cover sub-assembly RH.
-
-
-
INSTALL NO. 2 SEAT CUSHION COVER WITH PAD RH
-
Engage the 13 hooks.
-
Engagge the 2 clips to install the No. 2 seat cushion cover with pad RH.
-
-
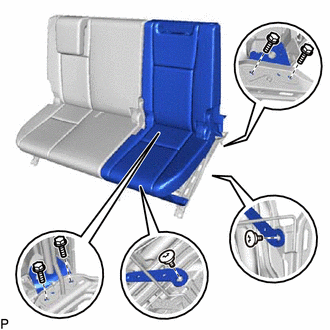
INSTALL NO. 2 SEAT ASSEMBLY RH
-
Install the 4 bolts.
- Torque:
- 42 N*m { 428 kgf*cm, 31 ft.*lbf }
-
Install the nut.
- Torque:
- 21 N*m { 214 kgf*cm, 15 ft.*lbf }
-
Using a T45 "TORX" socket wrench, install the bolt.
- Torque:
- 21 N*m { 214 kgf*cm, 15 ft.*lbf }
-
Engage the hook.
-
Install the No. 2 seat assembly RH with the 2 clips.
-
-
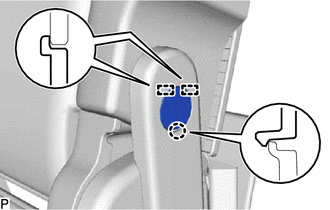
INSTALL REAR SEAT INNER BELT COVER RH
-
Engage the 2 claws to install the rear seat inner belt cover RH.
-
-
INSTALL REAR SEAT HEADREST ASSEMBLY
-
INSTALL REAR NO. 2 SEAT CUSHION LOCK CABLE ASSEMBLY LH
-
Engage the 4 cable clamps to install the rear No. 2 seat cushion lock cable assembly LH.
-
-
INSTALL REAR NO. 2 SEAT CUSHION LOCK CABLE ASSEMBLY (for LH Side)
-
Engage the 4 cable clamps to install the rear No. 2 seat cushion lock cable assembly.
-
-
INSTALL REAR NO. 2 SEAT RECLINING COVER RH (for LH Side)
-
Install the rear No. 2 seat reclining cover RH with the 2 screws.
-
-
INSTALL REAR NO. 2 SEAT RECLINING COVER LH (for LH Side)
-
Install the rear No. 2 seat reclining cover LH with the 2 screws.
-
-
INSTALL NO. 2 SEAT NO. 3 HINGE COVER
-
Engage the guide.
-
Install the No. 2 seat No. 3 hinge cover with the screw.
-
-
INSTALL NO. 2 SEAT HINGE COVER
-
Engage the guide.
-
Install the No. 2 seat hinge cover with the screw.
-
-
INSTALL NO. 2 REAR SIDE SEAT BAND SUB-ASSEMBLY (for LH Side)
-
Engage the hook to install the No. 2 rear side seat band sub-assembly.
-
-
INSTALL NO. 2 SEATBACK COVER SUB-ASSEMBLY LH
-
Temporarily install the No. 2 seatback cover sub-assembly LH to the separate type rear seatback pad.
-
Using hog ring pliers, install the No. 2 seatback cover sub-assembly LH to the separate type rear seatback pad with 6 new hog rings.
Note
-
Be careful not to damage the No. 2 seatback cover sub-assembly LH.
-
Be sure to securely install the hog rings as shown in the illustration while preventing wrinkles from forming on the No. 2 seatback cover sub-assembly LH.
-
-
-
INSTALL NO. 2 SEATBACK COVER WITH PAD LH
-
Engage the 4 hooks to install the No. 2 seatback cover with pad LH.
-
-
INSTALL REAR NO. 2 SEAT HEADREST SUPPORT ASSEMBLY
-
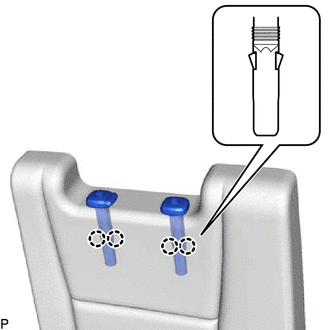
Engage the 4 claws to install the 2 rear No. 2 seat headrest support assemblies.
-
-
INSTALL NO. 2 REAR SEAT COVER BEZEL (for LH Side)
-
Engage the guide.
-
Install the No. 2 rear seat cover bezel with the 2 screws.
-
-
INSTALL REAR SIDE SEAT BAND SUB-ASSEMBLY (for LH Side)
-
Engage the hook to install the rear side seat band sub-assembly.
-
Engage the 3 hooks.
-
-
INSTALL NO. 2 SEATBACK BOARD SUB-ASSEMBLY LH
-
Engage the 8 claws as indicated by the arrows, in the order shown in the illustration to install the No. 2 seatback board sub-assembly LH.
-
-
INSTALL NO. 2 SEAT CUSHION FRAME SUB-ASSEMBLY LH
-
Using a T45 "TORX" socket wrench, install the No. 2 seat cushion frame sub-assembly LH with the 2 bolts.
- Torque:
- 21 N*m { 214 kgf*cm, 15 ft.*lbf }
-
-
INSTALL NO. 3 REAR SEAT CUSHION HINGE COVER
-
Engage the guide and 4 claws to install the No. 3 rear seat cushion hinge cover as shown in the illustration.
-
-
INSTALL REAR SEAT CUSHION HINGE COVER CAP
-
Engage the 2 guides and claw to install the rear seat cushion hinge cover cap.
-
-
INSTALL LOWER REAR SEAT CUSHION HINGE COVER LH
-
Engage the guide and 4 claws to install the lower rear seat cushion hinge cover LH as shown in the illustration.
-
-
INSTALL NO. 2 SEAT CUSHION COVER SUB-ASSEMBLY LH
-
Temporarily install the No. 2 seat cushion cover sub-assembly LH to the rear seat cushion pad LH.
-
Using hog ring pliers, install a new hog ring.
Note
-
Be careful not to damage the No. 2 seat cushion cover sub-assembly LH.
-
Be sure to securely install the hog ring as shown in the illustration while preventing wrinkles from forming on the No. 2 seat cushion cover sub-assembly LH.
-
-

Using hog ring pliers, install the No. 2 seat cushion cover sub-assembly LH to the rear seat cushion pad LH with 10 new hog rings.
Note
-
Be careful not to damage the No. 2 seat cushion cover sub-assembly LH.
-
Be sure to securely install the hog rings as shown in the illustration while preventing wrinkles from forming on the No. 2 seat cushion cover sub-assembly LH.
-
-
-
INSTALL NO. 2 SEAT CUSHION COVER WITH PAD LH
-
Engage the 8 hooks.
-
Engage the hook.
-
Engage the 2 clips to install the No. 2 seat cushion cover with pad LH.
-
-
INSTALL NO. 2 SEAT ASSEMBLY LH
-
Install the 4 bolts.
- Torque:
- 42 N*m { 428 kgf*cm, 31 ft.*lbf }
-
Using a T45 "TORX" socket wrench, install the 2 bolts.
- Torque:
- 21 N*m { 214 kgf*cm, 15 ft.*lbf }
-
Install the No. 2 seat assembly LH with the 2 clips.
-
-
INSTALL REAR SEAT INNER BELT COVER LH
-
Engage the 2 claws to install the rear seat inner belt cover LH.
-
-
INSTALL REAR SEAT HEADREST ASSEMBLY