CURTAIN SHIELD AIRBAG ASSEMBLY INSTALLATION

CAUTION / NOTICE / HINT
Tech Tips
-
Use the same procedure for the RH side and LH side.
-
The procedure listed below is for the LH side.
PROCEDURE
-
INSTALL CURTAIN SHIELD AIRBAG ASSEMBLY
Note
When installing a curtain shield airbag assembly, have assistants hold it to prevent it from bending.
-
Check that the ignition switch is off.
-
Check that the cable is disconnected from the negative (-) battery terminal.
CAUTION:
Wait at least 90 seconds after disconnecting the cable from the negative (-) battery terminal to disable the SRS system.
-
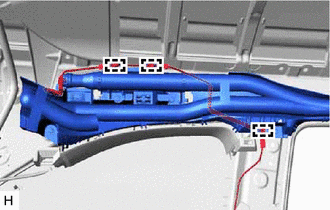
Engage the 3 clamps to connect the airbag wire harness.
-
Install the curtain shield airbag assembly with 5 new bolts, 9 new clips with pins and 2 new spacers, and engage the 2 hooks and 2 clips in the order shown in the illustration.
- Torque:
- 11 N*m { 112 kgf*cm, 8 ft.*lbf }
Note
Do not twist the curtain shield airbag assembly when installing it.
Tech Tips
Engage the 2 claws to install each new clip.
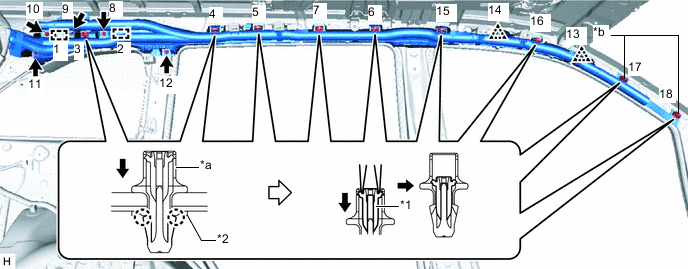
*1 Pin *2 Spacer *a Clip *b Spacer Location -
Using needle nose pliers, push the 9 pins into the 9 clips.
Note
-
Do not damage the pins.
-
Make sure that the pins of the clips are pushed in firmly.
-
-

*a Airbag Connector *b Airbag Connector Lock Connect the airbag connector.
Note
When connecting any airbag connector, take care not to damage the airbag wire harness.
-
Push in the airbag connector lock to install the airbag connector.
-
-
INSTALL NO. 1 ROOF SIDE AIR DUCT (for Normal Roof)
-
Engage the clip (B).
-
Install the No. 1 roof side air duct with the 2 clips (A).
-
-
INSTALL NO. 1 ROOF SIDE AIR DUCT (for Sliding Roof)
-
Engage the clip (B).
-
Install the No. 1 roof side air duct with the clip (A).
-
-
CONNECT SLIDING ROOF DRAIN HOSE (for Sliding Roof)
-
CONNECT CABLE TO NEGATIVE BATTERY TERMINAL
Note
When disconnecting the cable, some systems need to be initialized after the cable is reconnected.
-
INSTALL ROOF HEADLINING ASSEMBLY
-
PERFORM DIAGNOSTIC SYSTEM CHECK
-
INSPECT SRS WARNING LIGHT