CANISTER INSTALLATION
PROCEDURE
-
INSTALL CANISTER (CHARCOAL CANISTER ASSEMBLY)
-
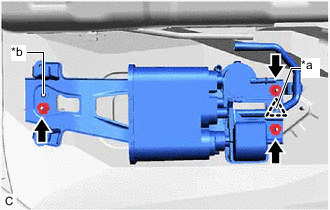
*a Clip *b Guide Engage the clip and install the canister (charcoal canister assembly) to the vehicle body and guide with the 3 nuts.
- Torque:
- 5.5 N*m { 56 kgf*cm, 49 in.*lbf }
-
Connect the outlet charcoal canister tube sub-assembly to the canister (charcoal canister assembly) and slide the clip to secure it.
Tech Tips
Engage the clip within the area shown in the illustration.
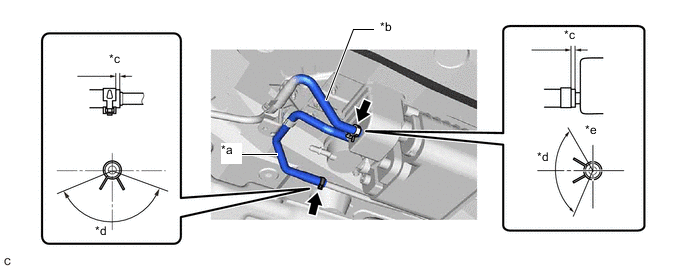
*a Charcoal Canister Hose *b Outlet Charcoal Canister Tube Sub-assembly *c 2 to 7 mm (0.0787 to 0.276 in.) *d 120° *e Upper - - -
Connect the charcoal canister hose to the fuel tube and slide the clip to secure it.
Tech Tips
Engage the clip within the area shown in the illustration.
-
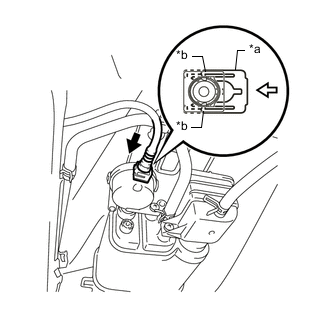
*a Retainer *b Claw 
Push 
Push in Push the fuel tank vent hose sub-assembly onto the canister (charcoal canister assembly) and push in the retainer to engage the 2 claws.
Note
-
Check that there are no scratches or foreign matter around the connecting parts of the fuel tank vent hose sub-assembly and pipe (canister (charcoal canister assembly)) before performing this work.
-
After connecting the fuel tank vent hose sub-assembly, check that the fuel tank vent hose sub-assembly is securely connected by pulling on the tube connector.
-
-
-
INSTALL CHARCOAL CANISTER PROTECTOR
-
Install the charcoal canister protector with the 3 bolts.
- Torque:
- 5.5 N*m { 56 kgf*cm, 49 in.*lbf }
-
-
INSTALL TAIL EXHAUST PIPE ASSEMBLY
-
INSPECT FOR EXHAUST GAS LEAK