REAR COMBINATION LIGHT ASSEMBLY REMOVAL
CAUTION / NOTICE / HINT
Tech Tips
-
Use the same procedure for the RH side and LH side.
-
The following procedure is for the LH side.
PROCEDURE
-
REMOVE REAR COMBINATION LIGHT COVER
-
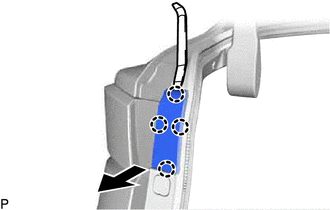
Using a moulding remover, disengage the 4 claws to remove the rear combination light cover as shown in the illustration.
-
-
REMOVE REAR COMBINATION LIGHT ASSEMBLY
-
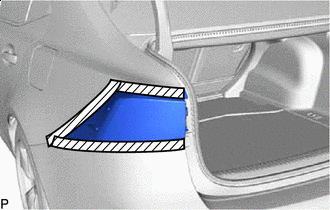

Protective Tape Apply protective tape around the rear combination light assembly as shown in the illustration.
-
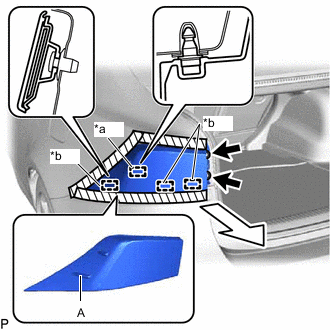
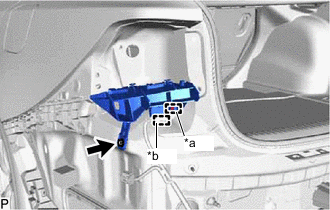
*a Pin *b Guide Remove the 2 screws.
-
Push the rear combination light assembly toward the rear of the vehicle to disengage the pin.
Note
To prevent the rear combination light assembly from springing out and falling when it is disengaged, place your hand on the rear combination light assembly and press down gently.
Tech Tips
Pushing on the portion A in the illustration toward the rear of the vehicle will make disengagement of the pin easier.
-
Disengage the 3 guides to separate the rear combination light assembly as shown in the illustration.
-
for Bulb Type Turn Signal Light:
-
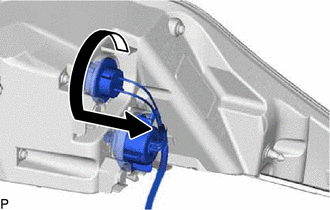
Turn the rear combination light socket and wire sub-assembly with the rear turn signal light bulb as shown in the illustration to disconnect them as a unit.
-
-
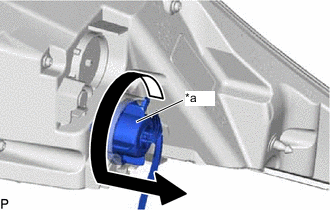
*a Cap Turn the cap as shown in the illustration to disconnect it.
-
Disconnect the connector to remove the rear combination light assembly.
-
-
REMOVE REAR TURN SIGNAL LIGHT BULB (for Bulb Type Turn Signal Light)
-
Remove the rear turn signal light bulb from the rear combination light socket and wire sub-assembly.
-
-
REMOVE REAR BUMPER ASSEMBLY
-
REMOVE REAR BUMPER UPPER RETAINER
-
*a Clamp *b Guide Disengage the clamp.
-
Remove the screw.
-
Disengage the guide to remove the rear bumper upper retainer.
-
-
REMOVE BATTERY SERVICE HOLE COVER LH (for LH Side)
-
REMOVE LUGGAGE COMPARTMENT FLOOR MAT (for RH Side)
-
REMOVE LUGGAGE COMPARTMENT TRIM BOX (for RH Side)
-
REMOVE REAR LUGGAGE COMPARTMENT TRIM COVER (for RH Side)
-
REMOVE FRONT LUGGAGE COMPARTMENT TRIM COVER (for RH Side)
for Fixed Seat Type: Click here
for Fold Down Seat Type: Click here
-
REMOVE REAR SEAT ASSEMBLY (for RH Side)
for Fixed Seat Type: Click here
-
REMOVE REAR SEAT ASSEMBLY (for RH Side)
for Fold Down Seat Type: Click here
-
REMOVE REAR SEAT SUB FLOOR PANEL (for RH Side)
for Fold Down Seat Type: Click here
-
REMOVE NO. 1 ROOM PARTITION COVER (for RH Side)
for Fold Down Seat Type: Click here
-
REMOVE LUGGAGE COMPARTMENT TRIM COVER RH (for RH Side)
-
REMOVE REAR COMBINATION LIGHT SOCKET AND WIRE SUB-ASSEMBLY
-
for LH Side:
-
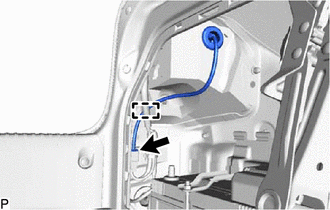
Disengage the clamp.
-
-
Disconnect the connector.
-
Disengage the grommet to remove the rear combination light socket and wire sub-assembly.
-