AUTOMATIC HEADLIGHT BEAM LEVEL CONTROL SYSTEM INITIALIZATION
Note
-
The necessary procedures (adjustment, calibration, initialization or registration) that must be performed after parts are removed and installed, or replaced during No. 1 headlight ECU sub-assembly LH removal/installation are shown below.
Performed Work or System Condition Necessary Procedures Proceed to Replacement of the No. 1 headlight ECU sub-assembly LH Synchronize the vehicle information SYNCHRONIZE VEHICLE INFORMATION Perform No. 1 headlight ECU sub-assembly LH initialization No. 1 HEADLIGHT ECU SUB-ASSEMBLY LH INITIALIZATION Replacement of the rear height control sensor sub-assembly LH, removal and reinstallation of the rear height control sensor sub-assembly LH, replacement of the suspension, etc. has been performed. Perform No. 1 headlight ECU sub-assembly LH initialization No. 1 HEADLIGHT ECU SUB-ASSEMBLY LH INITIALIZATION -
A new No. 1 headlight ECU sub-assembly LH cannot operate until the vehicle information has been synchronized.
-
After replacing the No. 1 headlight ECU sub-assembly LH, it is necessary to perform synchronize the vehicle information and initialization.
-
Even if the No. 1 headlight ECU sub-assembly RH is replaced with a new one, synchronize the vehicle information and initialization are not necessary.
-
Adjust the headlight aim after initializing the No. 1 headlight ECU sub-assembly LH.
-
When a malfunction is detected in the automatic headlight beam level control system, rear height control sensor sub-assembly LH signal initialization is impossible. Perform troubleshooting before initialization.
-
SYNCHRONIZE VEHICLE INFORMATION
-
When using the GTS:
-
Turn the power switch off.
-
Connect the GTS to the DLC3.
-
Turn the power switch on (IG) and check that the "Headlight System Uninitialized Visit Your Dealer" warning message is displayed on the multi-information display.
-
Enter the following menus: Body Electrical / HL AutoLeveling / Utility / ECU Information Sync.
Body Electrical > HL AutoLeveling > UtilityTester Display ECU Information Sync -
Check the display on the GTS and press "Next".
-
Check that the "Headlight System Malfunction Visit Your Dealer" warning message continuously blinks 6 times at 2 Hz on the multi-information display.
Tech Tips
-
If "Headlight System Malfunction Visit Your Dealer" warning message does not start blinking on the multi-information display after performing step (v), perform the procedure again.
-
If "Headlight System Malfunction Visit Your Dealer" warning message changes from blinking to displayed on the multi-information display, the rear height control sensor sub-assembly LH may be malfunctioning.
-
-
Press "Exit" and turn the power switch off.
Note
After synchronizing the vehicle information, initialize the No. 1 headlight ECU sub-assembly LH.
-
-
When not using the GTS:
-
Turn the power switch on (IG) and check that the "Headlight System Uninitialized Visit Your Dealer" warning message is displayed on the multi-information display.
-
Using the headlight dimmer switch, turn the low beam headlights on and off 8 times within 20 seconds after turning the power switch on (IG).
Tech Tips
If this step cannot be completed within 20 seconds, turn the power switch off. Then, turn the power switch on (IG) and restart the procedure.
-
Check that the "Headlight System Malfunction Visit Your Dealer" warning message continuously blinks 6 times at 2 Hz on the multi-information display.
Tech Tips
-
If the "Headlight System Malfunction Visit Your Dealer" warning message does not start blinking on the multi-information display after performing step (ii), perform the procedure again.
-
If the "Headlight System Malfunction Visit Your Dealer" warning message changes from blinking to displayed on the multi-information display, turn the power switch off and then on (IG). If the "Headlight System Malfunction Visit Your Dealer" warning message is displayed 5 seconds or more after the power switch was turned on (IG), the rear height control sensor sub-assembly LH may be malfunctioning.
-
-
Turn the power switch off.
Note
After synchronizing the vehicle information, initialize the No. 1 headlight ECU sub-assembly LH.
-
-
-
NO. 1 HEADLIGHT ECU SUB-ASSEMBLY LH INITIALIZATION
-
Prepare vehicle for initialization
-
Unload the vehicle, ensuring that the spare tire, tools and jack are in their original positions.
-
Check that there are no occupants in the vehicle.
-
Turn the light control switch to the off position.
-
Stop the vehicle on a level surface and keep the vehicle height unchanged.
-
-
Check the "Headlight System Malfunction Visit Your Dealer" warning message on the multi-information display.
-
Turn the power switch on (IG), and check the condition of the "Headlight System Malfunction Visit Your Dealer" warning message on the multi-information display.
-
-
Initialization (When using the GTS)
-
Turn the power switch off.
-
Connect the GTS to the DLC3.
-
Turn the power switch on (IG).
-
Enter the following menus: Body Electrical / HL AutoLeveling / Utility / Height Sensor Initialization.
Body Electrical > HL AutoLeveling > UtilityTester Display Height Sensor Initialization -
Check the display on the GTS and press "Next".
-
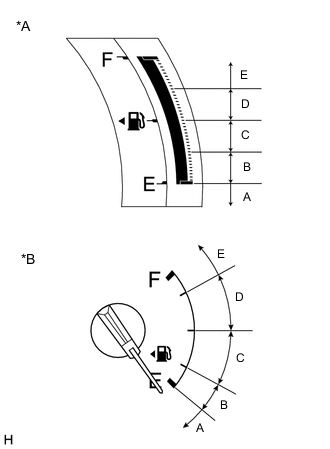
*A Fuel Receiver Gauge (for Sport Package) *B Fuel Receiver Gauge (for Standard) Check the proper "Position ID" by the fuel level according to the table below.
Tech Tips
The "Position ID" is determined by the present fuel level as shown below.
Fuel Level Position ID Number of Times Headlight Leveling Warning Blinks Within A range EMPTY 1 Within B range 1/4 to over EMPTY 2 Within C range 1/2 to over 1/4 3 Within D range 3/4 to over 1/2 4 Within E range FULL to over 3/4 5 -
Select the proper "Position ID" and press "Next".
-
Press "Exit".
-
Check the condition of the "Headlight System Malfunction Visit Your Dealer" warning message on the multi-information display.
Tech Tips
-
*: The number of times that the "Headlight System Malfunction Visit Your Dealer" warning message blinks is determined by the "Position ID" selected.
-
If initialization does not finish normally, restart the initialization procedure from step (i).
-
If the "Headlight System Malfunction Visit Your Dealer" warning message is displayed on the multi-information display, the No. 1 headlight ECU sub-assembly LH may be malfunctioning.
-
-
Check that initialization finishes normally and turn the power switch off.
-
-
Initialization (When not using the GTS)
-
Turn the power switch on (IG).
-
*A Fuel Receiver Gauge (for Sport Package) *B Fuel Receiver Gauge (for Standard) Check the specified number of times to turn the low beam headlights on and off.
Tech Tips
The number of times the low beam headlights need to be turned on and off is determined by the present fuel level as shown below.
Fuel Level Number of Times to Turn Low Beam Headlights On and Off Within A range 1 Within B range 2 Within C range 3 Within D range 4 Within E range 5 -
Enter initialization mode.
-
Turn the power switch and headlight dimmer switch off.
-
Cover the automatic light control sensor with a lightproof object.
-
Perform the following steps within 5 seconds.
-
-
Press the power switch 2 times.
Tech Tips
Turn the power switch on (IG).
-
While pulling the headlight dimmer switch, turn it from off to AUTO to off again 3 times or more.
Tech Tips
Check that the clearance lights turn from off to on and back off again.
-
Turn the headlight dimmer switch off.
-
Tech Tips
-
Perform the above operation within 5 seconds.
-
When initialization mode has been entered, the "Headlight System Malfunction Visit Your Dealer" warning message starts blinking at 1 Hz on the multi-information display .
-
-
After entering initialization mode, turn the low beam headlights from off to on and back off again N* times.
Tech Tips
-
*: The number of times to turn the headlight dimmer switch assembly on and off (N) is determined by the fuel level of the fuel receiver gauge.
-
Turn the headlight dimmer switch on and off within 20 seconds of entering initialization mode.
-
Turn the headlight dimmer switch on and off at intervals of approx. 3 seconds.
-
-
Check the condition of the "Headlight System Malfunction Visit Your Dealer" warning message on the multi-information display.
Tech Tips
-
*: The number of times that the "Headlight System Malfunction Visit Your Dealer" warning message blinks is determined by the number of times the low beam headlights are turned on and off.
-
If initialization does not finish normally, restart the initialization procedure from step (i).
-
If the "Headlight System Malfunction Visit Your Dealer" warning message is displayed on the multi-information display, the No. 1 headlight ECU sub-assembly LH may be malfunctioning.
-
-
Check that initialization finishes normally and turn the power switch off.
-
-