NOISE FILTER REMOVAL
CAUTION / NOTICE / HINT
PROCEDURE
-
PRECAUTION (w/ Rear Seat Side Airbag)
Note
After turning the power switch off, waiting time may be required before disconnecting the cable from the negative (-) auxiliary battery terminal. Therefore, make sure to read the disconnecting the cable from the negative (-) auxiliary battery terminal notice before proceeding with work.
-
REMOVE BATTERY SERVICE HOLE COVER LH (w/ Rear Seat Side Airbag)
-
DISCONNECT CABLE FROM NEGATIVE AUXILIARY BATTERY TERMINAL (w/ Rear Seat Side Airbag)
CAUTION:
Wait at least 90 seconds after disconnecting the cable from the negative (-) auxiliary battery terminal to disable the SRS system.
Note
When disconnecting the cable, some systems need to be initialized after the cable is reconnected.
-
REMOVE REAR SEAT CUSHION ASSEMBLY
-
REMOVE REAR SEAT CUSHION LOCK HOOK
-
REMOVE REAR SEAT HEADREST ASSEMBLY (for Fixed Seat Type)
-
REMOVE REAR SEAT CENTER HEADREST ASSEMBLY (for Fixed Seat Type)
-
REMOVE REAR SEATBACK ASSEMBLY (for Fixed Seat Type)
-
REMOVE REAR SIDE SEAT BACK ASSEMBLY LH (for Fold Down Seat Type)
-
REMOVE REAR DOOR SCUFF PLATE LH
-
REMOVE REAR SEAT SIDE GARNISH LH
-
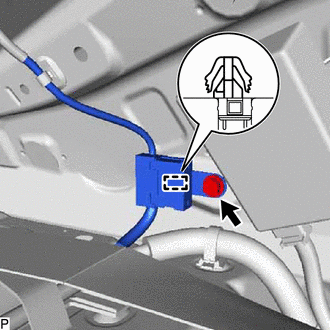
REMOVE RADIO SETTING CONDENSER (for High Mounted Stop Light)
Note
When a terminal cover is removed, the radio setting condenser must be replaced because the terminal covers and condenser are supplied as a set.
-
Remove the bolt.
-
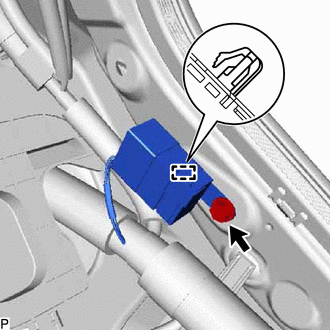
Disengage the clamp and disconnect the radio setting condenser with wire harness from the vehicle body.
-
Disengage the claw and pull out the cover as shown in the illustration.
-
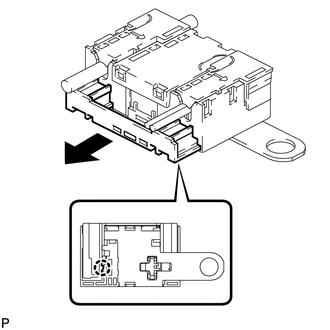
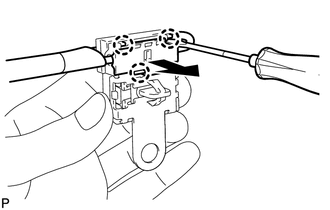
Using a screwdriver, disengage the 6 claws and remove the 2 terminal covers with wire harness from the condenser.
-
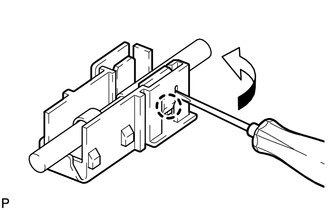
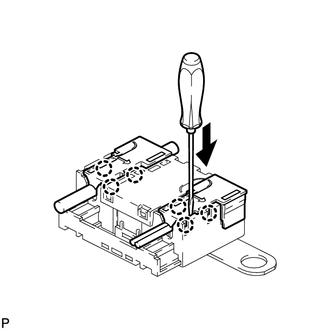
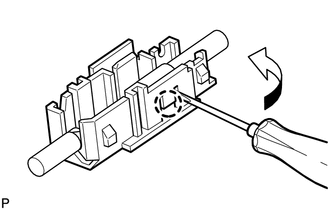
Using a screwdriver, bend back and break off the claw as shown in the illustration.
-
Remove the terminal cover from the wire harness.
Note
-
Make sure to hold the crimping side of the terminal when disconnecting the wire harness from the terminal cover.
-
Make sure not to bend the exposed wire when disconnecting the wire harness from the terminal cover.
-
Check for deformation of the terminal after the wire harness has been removed from the terminal cover.
-
-
-
REMOVE REAR SEAT ASSEMBLY (for Window Defogger)
for Fold Down Seat Type: Click here
-
REMOVE REAR DOOR SCUFF PLATE RH (for Window Defogger)
Tech Tips
Use the same procedure as for the LH side.
-
REMOVE REAR SEAT SIDE GARNISH RH (for Window Defogger)
Tech Tips
Use the same procedure as for the LH side.
-
REMOVE INNER ROOF SIDE GARNISH ASSEMBLY LH (for Window Defogger)
-
REMOVE INNER ROOF SIDE GARNISH ASSEMBLY RH (for Window Defogger)
Tech Tips
Use the same procedure as for the LH side.
-
REMOVE LUGGAGE COMPARTMENT FLOOR MAT (for Window Defogger)
for Fold Down Seat Type: Click here
-
REMOVE FRONT LUGGAGE COMPARTMENT TRIM COVER (for Window Defogger)
for Fold Down Seat Type: Click here
-
REMOVE REAR SEAT SUB FLOOR PANEL (for Window Defogger)
for Fold Down Seat Type: Click here
-
REMOVE NO. 2 ROOM PARTITION COVER (for Window Defogger)
for Fold Down Seat Type: Click here
-
REMOVE NO. 1 ROOM PARTITION COVER (for Window Defogger)
for Fold Down Seat Type:
Tech Tips
Use the same procedure as for the No. 2 room partition cover.
-
REMOVE NO. 3 ROOM PARTITION COVER (for Window Defogger)
for Fold Down Seat Type: Click here
-
DISCONNECT REAR SEAT 3 POINT TYPE OUTER BELT ASSEMBLY LH (for Window Defogger)
-
DISCONNECT REAR SEAT 3 POINT TYPE OUTER BELT ASSEMBLY RH (for Window Defogger)
Tech Tips
Use the same procedure as for the LH side.
-
DISCONNECT REAR SEAT INNER WITH CENTER BELT ASSEMBLY LH (for Window Defogger)
for Fixed Seat Type: Click here
-
REMOVE REAR SEAT SHOULDER BELT HOLE COVER (for Window Defogger)
-
REMOVE CENTER STOP LIGHT ASSEMBLY WITH COVER (for Window Defogger)
w/o Rear Sunshade: Click here
-
REMOVE PACKAGE TRAY TRIM PANEL ASSEMBLY (for Window Defogger)
w/o Rear Sunshade: Click here
-
REMOVE PACKAGE TRAY TRIM PANEL ASSEMBLY (for Window Defogger)
w/ Rear Sunshade: Click here
-
REMOVE RADIO SETTING CONDENSER (for Window Defogger)
Note
When the terminal cover is removed, the radio setting condenser must be replaced because the terminal cover and condenser are supplied as a set.
-
Remove the bolt.
-
Disengage the clamp and disconnect the radio setting condenser with wire harness from the vehicle body.
-
Using a screwdriver, disengage the 3 claws and remove the terminal cover with wire harness from the condenser.
-
Using a screwdriver, bend back and break off the claw as shown in the illustration.
-
Remove the terminal cover from the wire harness.
Note
-
Make sure to hold the crimping side of the terminal when disconnecting the wire harness from the terminal cover.
-
Make sure not to bend the exposed wire when disconnecting the wire harness from the terminal cover.
-
Check for deformation of the terminal after the wire harness has been removed from the terminal cover.
-
-