STEREO COMPONENT AMPLIFIER REMOVAL
PROCEDURE
-
REMOVE LUGGAGE COMPARTMENT FLOOR MAT
-
REMOVE LUGGAGE COMPARTMENT TRIM BOX
-
REMOVE FRONT LUGGAGE COMPARTMENT TRIM COVER (for Fixed Seat Type)
-
REMOVE FRONT LUGGAGE COMPARTMENT TRIM COVER (for Fold Down Seat Type)
-
REMOVE REAR LUGGAGE COMPARTMENT TRIM COVER
-
REMOVE REAR SEAT ASSEMBLY
for Fixed Seat Type: Click here
for Fold Down Seat Type: Click here
-
REMOVE REAR SEAT SUB FLOOR PANEL (for Fold Down Seat Type)
-
REMOVE NO. 1 ROOM PARTITION COVER (for Fold Down Seat Type)
-
REMOVE LUGGAGE COMPARTMENT TRIM COVER RH
-
REMOVE STEREO COMPONENT AMPLIFIER ASSEMBLY WITH BRACKET
-
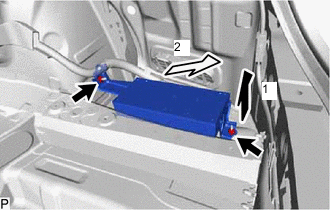
Remove the 2 nuts.
-
Pull the stereo component amplifier assembly with bracket in the direction indicated by the arrow (1).
-
Pull the stereo component amplifier assembly with bracket in the direction indicated by the arrow (2).
-
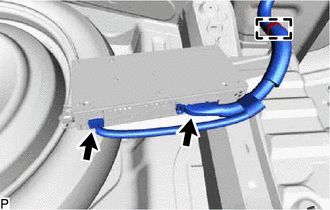
Disconnect each connector.
-
Disengage the clamp to remove the stereo component amplifier assembly with bracket.
-
-
REMOVE NO. 2 AMPLIFIER BRACKET
-
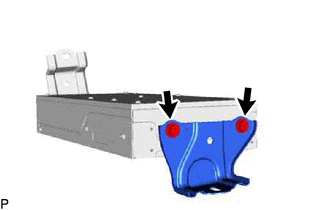
Remove the 2 screws and No. 2 amplifier bracket.
-
-
REMOVE NO. 1 AMPLIFIER BRACKET
-
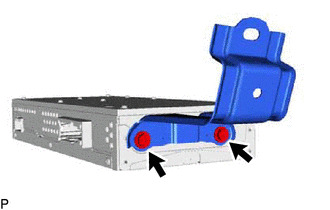
Remove the 2 screws and No. 1 amplifier bracket.
-
-
REMOVE STEREO COMPONENT AMPLIFIER ASSEMBLY