CAUTION / NOTICE / HINT
-
Use the same procedure for the RH side and LH side.
-
The procedure listed below is for the LH side.
PROCEDURE
- Click here
REMOVE FRONT WHEEL
-
Click here
SEPARATE SKID CONTROL SENSOR WIRE
-
Disconnect the skid control sensor wire connector from the front axle hub sub-assembly.
-
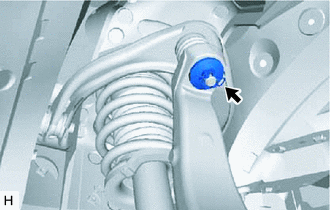
Remove the 2 bolts and separate the skid control sensor wire from the front shock absorber with coil spring and vehicle body.
Note:Be careful not to deform the bracket of the front shock absorber with coil spring when removing the bolt.
-
- Click here
REMOVE FRONT STABILIZER LINK ASSEMBLY
- Click here
SEPARATE FRONT UPPER SUSPENSION ARM ASSEMBLY
-
Remove the clip and nut.
-
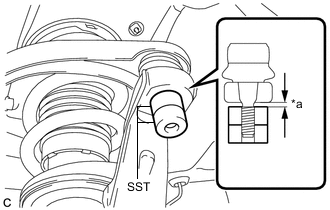
*a 1 mm (0.0394 in.) Install SST to the front upper suspension arm assembly as shown in the illustration.
09960-20010 09961-02060 Note:Check that the clearance measurement between SST and the steering knuckle is 1 mm (0.0394 in.).
-
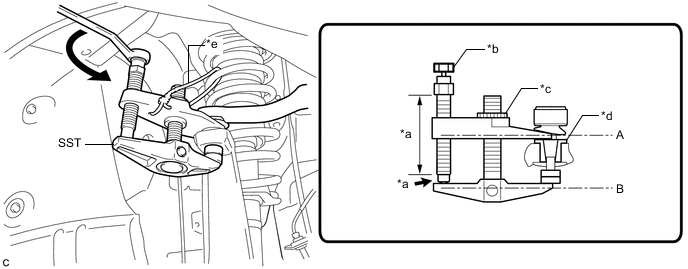
*a Molybdenum grease application area *b Place wrench here *c Center Nut *d Spacer *e String - - Using SST, separate the front upper suspension arm assembly from the steering knuckle.
09960-20010 09961-02010 CAUTION:Apply molybdenum grease to the threads and end of the SST bolt.
Note:
-
Install SST with the center nut so that (A) and (B) shown in the illustration are parallel. Otherwise, the front upper suspension arm dust cover may be damaged.
-
Be sure to place a wrench on the part indicated in the illustration.
-
Do not damage the ball joint dust cover.
-
Do not damage the steering knuckle.
-
Make sure that SST is securely positioned on the spacer.
-
Be sure to tighten the string firmly to secure SST to the front upper suspension arm assembly to prevent SST from falling off.
Tip:If the steering knuckle spacer has come off, replace the steering knuckle with a new one.
-
-
- Click here
REMOVE UPPER SHOCK ABSORBER CAP (w/ AVS)
- Click here
REMOVE ABSORBER CONTROL ACTUATOR (w/ AVS)
- Click here
REMOVE FRONT SHOCK ABSORBER WITH COIL SPRING
-
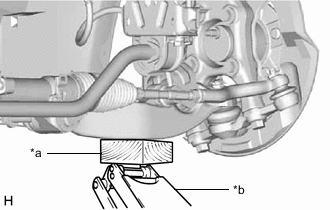
*a Wooden Block *b Jack Support the front lower suspension arm assembly using a jack and wooden block.
-
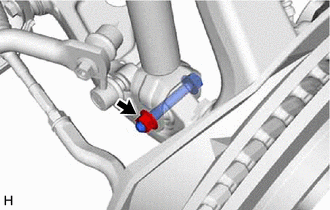
Remove the nut.
Note:
-
Because the nut has its own stopper, do not turn the nut. Loosen the bolt with the nut secured.
-
Do not remove the bolt.
-
-
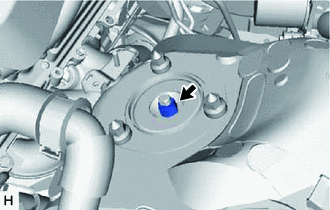
Loosen the lock nut.
Note:
-
Do not remove the lock nut.
-
Loosen the lock nut only when the front shock absorber with coil spring needs to be disassembled.
-
-
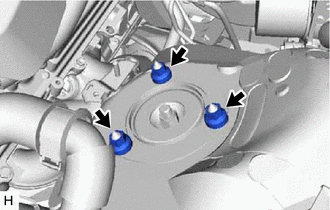
Remove the 3 nuts from the front shock absorber with coil spring (upper side).
-
Remove the front No. 3 spring support reinforcement.
-
Remove the bolt from the front shock absorber with coil spring (lower side).
-
Slowly lower the jack and remove the front shock absorber with coil spring.
-
- Click here
REMOVE FRONT SHOCK ABSORBER ASSEMBLY
-
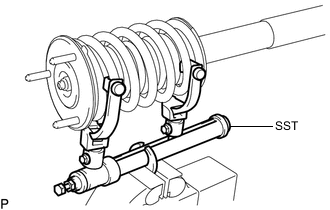
Secure SST in a vise.
09727-30021 09727-00010 09727-00021 09727-00031 -

*a Correct *b Incorrect Attach the arms of SST to the diameter of the front coil spring.
CAUTION:
-
Make sure that the front coil spring is installed so that the distance between the upper and lower arms of SST is at the maximum.
-
Make sure that the claws of the arms are securely attached.
-
-
Using SST, compress the front coil spring.
CAUTION:
-
If the front coil spring bends during compression, immediately stop compression and reinstall SST.
-
Do not excessively compress the front coil spring so that the coils contact each other.
-
Do not use an impact wrench. It will damage SST.
-
-
Confirm that the front coil spring becomes free and remove the lock nut.
CAUTION:Do not remove the lock nut when the front coil spring is not free.
-
w/ AVS:
-
Remove the front actuator support bracket from the front shock absorber assembly.
-
-
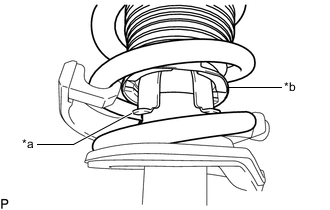
*a Front Shock Absorber Assembly Claw *b End of Front Upper Coil Spring Insulator Remove the front suspension support assembly from the front shock absorber assembly.
Note:Turn the front suspension support assembly to disengage the end of the front upper coil spring insulator from the front shock absorber assembly claws.
-
Remove the front upper coil spring insulator from the front suspension support assembly.
-
Remove the front spring bumper from the front suspension support assembly.
-
Remove the front coil spring and SST.
Note:Do not use an impact wrench. It will damage SST.
-
Remove the front lower coil spring insulator from the front shock absorber assembly.
-