DIFFERENTIAL MOUNT CUSHION INSTALLATION

PROCEDURE
-
INSTALL REAR NO. 1 DIFFERENTIAL MOUNT CUSHION
-
Using SST, install a new rear No. 1 differential mount cushion.
- SST
- 09527-17011
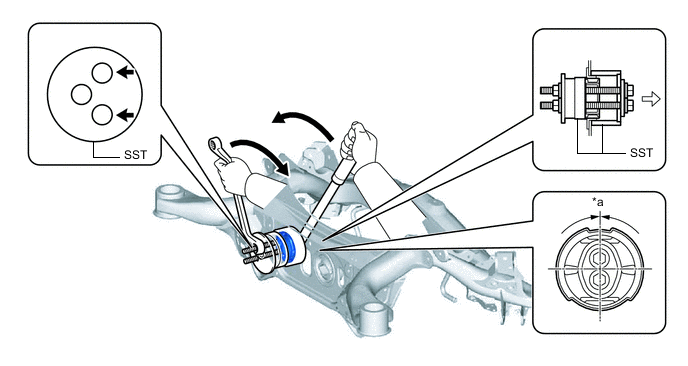
*a 0° +/- 3° - - 
SST bolt location 
Front of the Vehicle Note
-
Make sure that the rear No. 1 differential mount cushion is aligned within 3° from the center.
-
Temporarily install the rear No. 1 differential mount cushion to the rear suspension member sub-assembly in order to prevent it from tilting, and then install SST.
-
Before using SST, apply grease to the SST bolts.
-
Be sure to use the correct combination of SST.
-
Make sure that SST (09527-17011) contacts the entire circumference of the rear No. 1 differential mount cushion.
-
Do not tilt the bolts of SST.
-
Tighten the 2 bolts of SST so that they enter the 2 holes of the rear No. 1 differential mount cushion by an equal amount.
Tech Tips
Install the 2 SST bolts to the 2 SST holes as shown in the illustration.
-
-
INSTALL REAR NO. 2 DIFFERENTIAL MOUNT CUSHION
-
Using SST, install a new rear No. 2 differential mount cushion.
- SST
- 09527-17011
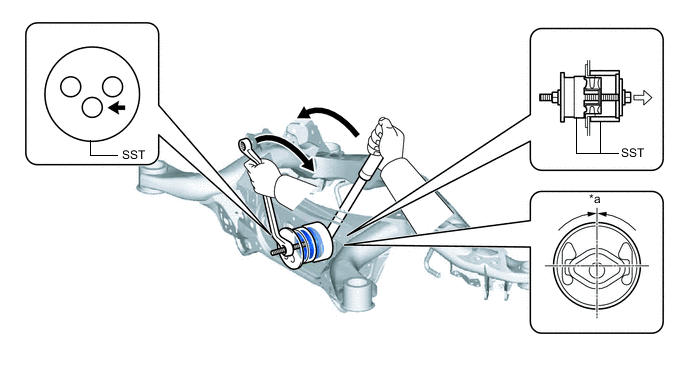
*a 0° +/- 3° - - SST bolt location Front of the Vehicle Note
-
Make sure that the rear No. 2 differential mount cushion is aligned within 3° from the center.
-
Temporarily install the rear No. 2 differential mount cushion to the rear suspension member sub-assembly in order to prevent it from tilting, and then install SST.
-
Before using SST, apply grease to the SST bolt.
-
Be sure to use the correct combination of SST.
-
Make sure that SST (09527-17011) contacts the entire circumference of the rear No. 2 differential mount cushion.
-
Do not tilt the bolt of SST.
Tech Tips
Install the SST bolt to the SST hole as shown in the illustration.
-
-
INSTALL REAR SUSPENSION MEMBER SUB-ASSEMBLY