INJECTOR DRIVER REMOVAL
PROCEDURE
-
PRECAUTION
Note
After turning the power switch off, waiting time maybe required before disconnecting the cable from the negative (-) auxiliary battery terminal. Therefore, make sure to read the disconnecting the cable from the negative (-) auxiliary battery terminal notice before proceeding with work.
-
REMOVE BATTERY SERVICE HOLE COVER LH
-
DISCONNECT CABLE FROM NEGATIVE AUXILIARY BATTERY TERMINAL
Note
When disconnecting the cable, some systems need to be initialized after the cable is reconnected.
-
REMOVE COOL AIR INTAKE DUCT SEAL
-
REMOVE INLET NO. 1 AIR CLEANER
-
REMOVE NO. 1 ENGINE COVER SUB-ASSEMBLY
-
REMOVE AIR CLEANER CAP WITH NO. 2 AIR CLEANER HOSE
-
REMOVE AIR CLEANER HOSE ASSEMBLY
-
REMOVE INJECTOR DRIVER
-
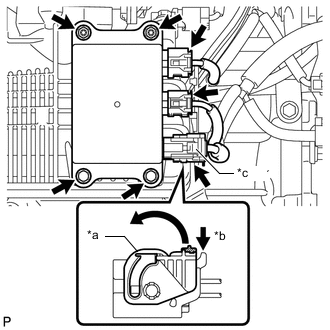
*a Lock Lever *b Lock *c Connector (with Lock) Push the lock and move each lock lever in the direction indicated by the arrow to disconnect the connector (with lock) from the injector driver.
-
Disconnect the 2 injector driver connectors.
-
Remove the 2 bolts, 2 nuts and injector driver from the intake manifold.
Note
Be careful not to drop or strike the injector driver.
-