HV BATTERY REMOVAL

CAUTION / NOTICE / HINT
CAUTION:
-
When disposing of an HV battery, make sure to return it through an authorized collection agent who is capable of handling it safely. If the HV battery is returned via the manufacturer specified route, it will be returned properly and in a safe manner by an authorized collection agent.
-
Accidents such as electric shock may result if the HV battery is disposed of improperly or abandoned. Therefore, make sure to return all HV batteries through an authorized collection agent.
-
After removing the HV battery, keep it away from water. Exposure to water may cause the HV battery to produce heat, resulting in a fire.
PROCEDURE
-
PRECAUTION
-
CHECK FOR DTC
-
Check for DTC.
Note
Confirm that P0AA6 (Hybrid Battery Voltage System Isolation Fault) is not output before removing or installing the HV battery. If this DTC is output, perform troubleshooting for this DTC first.
-
-
REMOVE SERVICE PLUG GRIP
-
REMOVE CONNECTOR COVER ASSEMBLY
-
CHECK TERMINAL VOLTAGE
-
INSTALL CONNECTOR COVER ASSEMBLY
-
REMOVE FRONT LUGGAGE COMPARTMENT TRIM COVER (for Fixed Seat Type)
-
REMOVE FRONT LUGGAGE COMPARTMENT TRIM COVER (for Fold Down Seat Type)
-
REMOVE REAR LUGGAGE COMPARTMENT TRIM COVER
-
REMOVE REAR SEAT ASSEMBLY (for Fixed Seat Type)
-
REMOVE REAR SEAT ASSEMBLY (for Fold Down Seat Type)
-
REMOVE REAR SEAT SUB FLOOR PANEL (for Fold Down Seat Type)
-
REMOVE NO. 2 ROOM PARTITION COVER (for Fold Down Seat Type)
-
REMOVE NO. 1 ROOM PARTITION COVER (for Fold Down Seat Type)
Tech Tips
Use the same procedure as for the No. 2 room partition cover.
-
REMOVE LUGGAGE COMPARTMENT TRIM COVER LH
-
REMOVE LUGGAGE COMPARTMENT TRIM COVER RH
-
REMOVE REAR NO. 1 FLOOR CROSSMEMBER BRACE RH
-
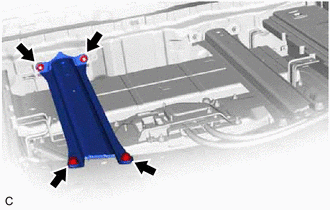
Remove the 2 bolts, 2 nuts and rear No. 1 floor crossmember brace RH.
-
-
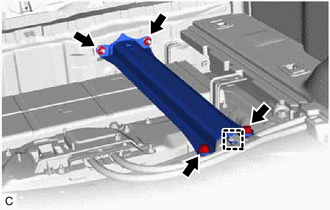
REMOVE REAR NO. 1 FLOOR CROSSMEMBER BRACE LH
-
Disengage the clamp from the rear No. 1 floor crossmember brace LH.
-
Remove the 2 bolts, 2 nuts and rear No. 1 floor crossmember brace LH.
-
-
REMOVE NO. 4 HYBRID BATTERY SHIELD PANEL
CAUTION:
Wear insulated gloves.
-
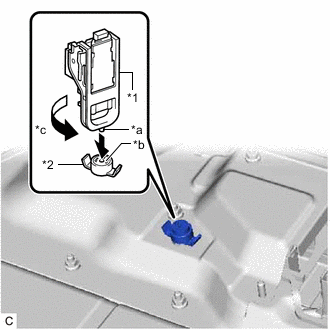
*1 Service Plug Grip *2 Battery Cover Lock Striker *a Projection *b Button *c Turn Using the service plug grip, remove the battery cover lock striker from the No. 4 hybrid battery shield panel.
Tech Tips
Insert the projection of the service plug grip, turn the button of the battery cover lock striker counterclockwise, and release the lock.
-
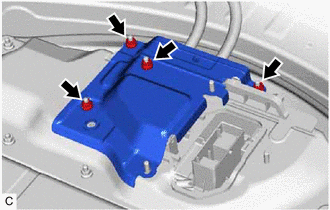
Remove the 4 nuts and No. 4 hybrid battery shield panel.
-
-
DISCONNECT FRAME WIRE
CAUTION:
Wear insulated gloves.
-
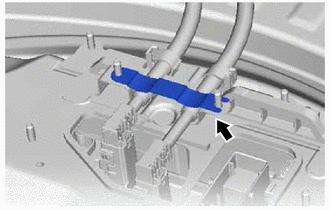
Remove the earth terminal from the upper hybrid battery cover sub-assembly.
-
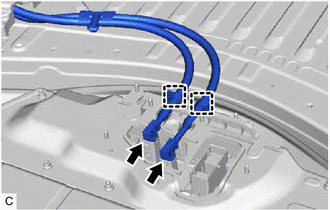
Disengage the 2 clamps from the upper hybrid battery cover sub-assembly.
-
Disconnect the 2 frame wire connectors from the hybrid battery terminal block.
Note
Insulate the disconnected connectors with insulating tape.
-
-
SEPARATE NO. 3 HYBRID BATTERY INTAKE DUCT
-
REMOVE NO. 4 HYBRID BATTERY INTAKE DUCT
CAUTION:
Wear insulated gloves.
-
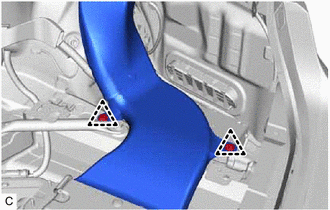
Remove the 2 clips, No. 4 hybrid battery intake duct and No. 3 hybrid battery intake duct from the HV battery.
-
-
REMOVE NO. 3 HYBRID BATTERY INTAKE DUCT
-
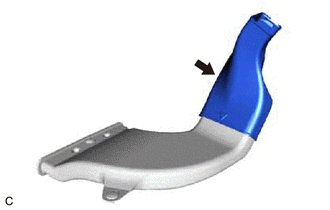
Remove the No. 3 hybrid battery intake duct from the No. 4 hybrid battery intake duct.
-
-
REMOVE NO. 1 FLOOR UNDER COVER ASSEMBLY
-
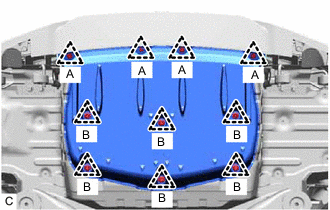
Remove the 4 clips (A) from the No. 1 floor under cover assembly.
-
Disengage the 6 clips (B) and remove the No. 1 floor under cover assembly.
-
-
REMOVE HV BATTERY
CAUTION:
Wear insulated gloves.
-
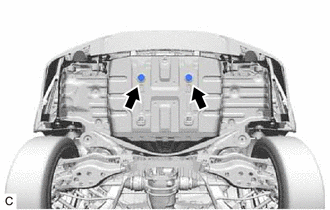
Remove the 2 grommets.
-
Remove the 2 battery drain plugs as indicated by the arrows, in the order shown in the illustration.
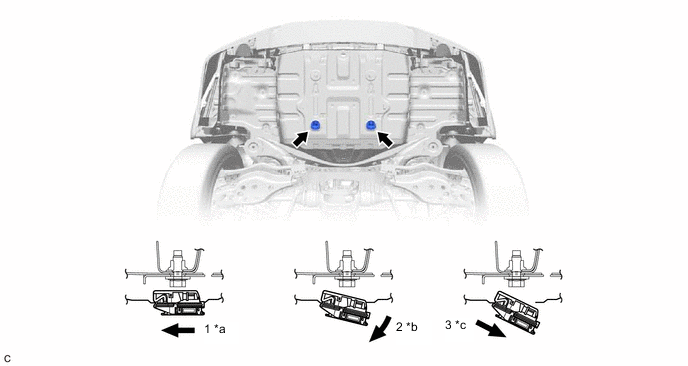
*a Push the battery drain plug toward the front of the vehicle. *b While pushing the battery drain plug, disengage the rear claw. *c Remove the battery drain plug. - - Note
-
If a claw or the waterproofing rubber is damaged, replace the battery drain plug with a new one.
-
If the drain valve is clogged, replace the battery drain plug with a new one.
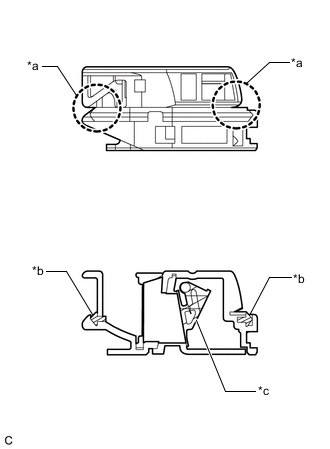
*a Claw *b Waterproofing Rubber *c Drain Valve -
-
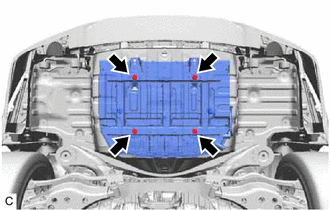
Remove the 4 bolts.
-
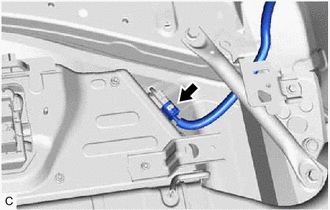
Disconnect the HV battery connector.
-
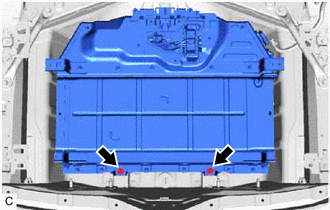
Remove the 2 bolts.
-
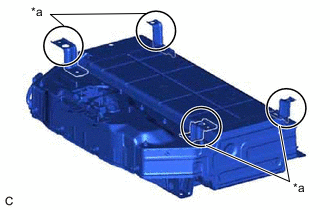
*a Areas to be Held Hold the areas shown in the illustration and remove the HV battery.
Note
-
To prevent the wire harness from being caught, make sure to bundle the wire harness using insulating tape or equivalent.
-
Use cardboard or other similar material to protect the HV battery and vehicle body from damage.
-
Since the HV battery is very heavy, 2 people are needed to remove the HV battery. When removing the HV battery, do not damage the parts around it.
-
When removing the HV battery from the vehicle, do not allow it to contact the vehicle.
-
When removing/installing/moving the HV battery, make sure not to tilt it more than 80°.
-
When moving the HV battery, make sure to use an engine lifter.
Tech Tips
Attach tape to the feet and edges of the HV battery to protect tools and the vehicle body.
-
-
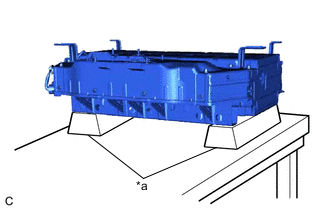
*a Attachment Place the HV battery on attachments.
-
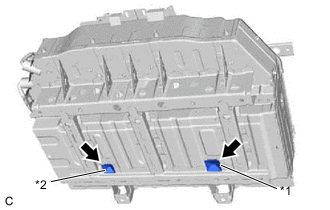
*1 Front Hybrid Battery Guide (Yellow) *2 Rear Hybrid Battery Guide (White) Remove the front hybrid battery guide and rear hybrid battery guide from the HV battery.
-
-
REMOVE UPPER HYBRID BATTERY COVER SUB-ASSEMBLY
CAUTION:
Wear insulated gloves.
-
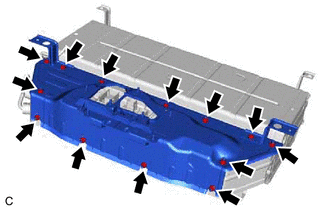
Remove the 13 nuts and upper hybrid battery cover sub-assembly from the HV battery.
-
-
REMOVE BATTERY VOLTAGE SENSOR
-
REMOVE UPPER NO. 5 HV BATTERY CARRIER BRACKET
CAUTION:
Wear insulated gloves.
-
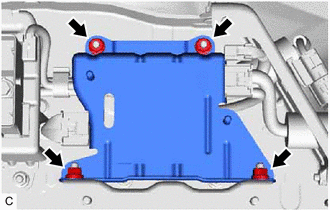
Remove the 4 nuts and upper No. 5 HV battery carrier bracket from the HV battery.
-
-
REMOVE HYBRID BATTERY JUNCTION BLOCK ASSEMBLY
-
REMOVE UPPER NO. 6 HV BATTERY CARRIER BRACKET
CAUTION:
Wear insulated gloves.
-
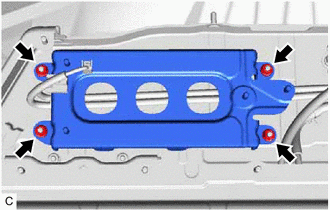
Remove the 4 nuts and upper No. 6 HV battery carrier bracket from the HV battery.
-
-
REMOVE UPPER NO. 3 HV BATTERY CARRIER BRACKET
CAUTION:
Wear insulated gloves.
-
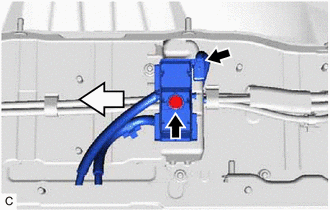
Disconnect the EV battery plug connector.
-
Remove the bolt and EV battery plug from the upper No. 3 HV battery carrier bracket as shown in the illustration.
-
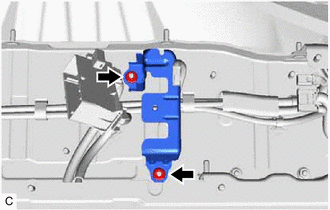
Remove the 2 nuts and upper No. 3 HV battery carrier bracket from the HV battery.
-