BATTERY VOLTAGE SENSOR INSTALLATION
PROCEDURE
-
INSTALL BATTERY VOLTAGE SENSOR
CAUTION:
Wear insulated gloves.
-
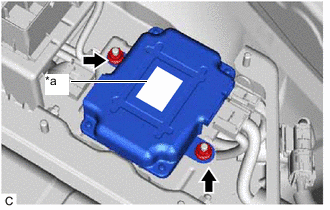
*a Red Label Install the battery voltage sensor to the upper No. 5 HV battery carrier bracket with the 2 nuts.
- Torque:
- 7.5 N*m { 76 kgf*cm, 66 in.*lbf }
Note
Check color of the label.
-
Connect the 3 battery voltage sensor connectors.
Note
The connectors should be connected securely.
-
-
INSTALL UPPER HYBRID BATTERY COVER SUB-ASSEMBLY
CAUTION:
Wear insulated gloves.
-
Install the upper hybrid battery cover sub-assembly to the HV battery with the 9 nuts.
- Torque:
- 7.5 N*m { 76 kgf*cm, 66 in.*lbf }
-
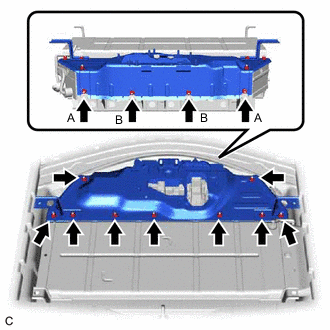
Tighten the 2 nuts (A) and 2 nuts (B).
- Torque:
- 7.5 N*m { 76 kgf*cm, 66 in.*lbf }
Note
Using a 10 mm union nut wrench, tighten the 2 nuts (A). Use the torque value compensation formula to calculate the torque value for use when a torque wrench is combined with a tool such as a union nut wrench.
-
-
CONNECT FRAME WIRE
-
INSTALL NO. 4 HYBRID BATTERY SHIELD PANEL
-
INSTALL REAR NO. 1 FLOOR CROSSMEMBER BRACE LH
-
INSTALL REAR NO. 1 FLOOR CROSSMEMBER BRACE RH
-
INSTALL REAR LUGGAGE COMPARTMENT TRIM COVER
-
INSTALL FRONT LUGGAGE COMPARTMENT TRIM COVER (for Fixed Seat Type)
-
INSTALL FRONT LUGGAGE COMPARTMENT TRIM COVER (for Fold Down Seat Type)
-
INSTALL SERVICE PLUG GRIP