ROOF HEADLINING REMOVAL
PROCEDURE
-
REMOVE FRONT SEAT ASSEMBLY LH (for Manual Seat)
-
REMOVE FRONT SEAT ASSEMBLY LH (for Power Seat)
-
REMOVE FRONT SEAT ASSEMBLY RH
Tech Tips
Use the same procedure as for the LH side.
-
REMOVE REAR SEAT ASSEMBLY (for Fixed Seat Type)
-
REMOVE REAR SEAT CUSHION ASSEMBLY (for Fold Down Seat Type)
-
REMOVE REAR SEAT CUSHION LOCK HOOK (for Fold Down Seat Type)
-
REMOVE REAR SIDE SEATBACK ASSEMBLY RH (for Fold Down Seat Type)
-
REMOVE REAR SIDE SEATBACK ASSEMBLY LH (for Fold Down Seat Type)
Tech Tips
Use the same procedure as for the RH side.
-
REMOVE FRONT DOOR SCUFF PLATE LH
-
Disengage the 10 claws and 2 guides to remove the front door scuff plate LH.
-
-
REMOVE FRONT DOOR OPENING TRIM COVER LH
-
Disengage the 3 claws (A).
Tech Tips
Disengage the claws from the lower side of the front door opening trim cover LH.
-
Disengage the claw (B) and guide to remove the front door opening trim cover LH.
-
-
REMOVE FRONT PILLAR GARNISH LH
-
*a Front Pillar Garnish Clip 
Protective Tape Apply protective tape around the front pillar garnish LH as shown in the illustration.
-
Pull the upper part of the garnish toward the inside of the cabin and disengage the garnish from the base of the 2 clips.
Tech Tips
Let the front pillar garnish LH hang from the front pillar garnish clip.
-
*a Protective Tape *b 90° Using needle-nose pliers with the tips wrapped with protective tape, rotate the front pillar garnish clip 90°in the direction indicated by the arrow (1) shown in the illustration.
-
Pull the front pillar garnish LH in the direction indicated by the arrow (2) shown in the illustration to disengage it from the front pillar garnish clip.
Note
-
If the front pillar garnish clip is not removed from the vehicle body and is not damaged, the front pillar garnish clip can be reused.
-
If the front pillar garnish clip is removed from the vehicle body, make sure to replace it with a new one.
-
-
Pull the front pillar garnish LH in the direction indicated by the arrow (3) shown in the illustration to disengage the 3 guides to remove the front pillar garnish LH.
-
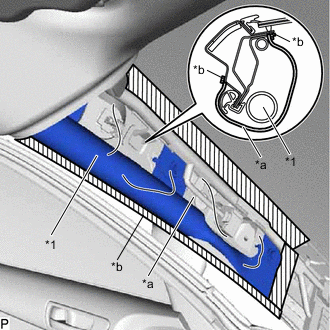
*1 Curtain Shield Airbag Assembly LH *a Protective Cover *b Adhesive Tape Protect the curtain shield airbag assembly LH.
-
Cover the airbag with a piece of cloth or nylon and secure the edges of the cover with tape as shown in the illustration.
Note
Cover the curtain shield airbag assembly LH with a protective cover as soon as the front pillar garnish LH is removed.
-
-
-
REMOVE REAR DOOR SCUFF PLATE LH
-
Disengage the 9 claws and 2 guides to remove the rear door scuff plate LH.
-
-
REMOVE LOWER CENTER PILLAR GARNISH LH
-
Disengage the 2 claws and 3 guides.
-
Disengage the 5 clips to remove the lower center pillar garnish LH.
-
-
REMOVE CENTER PILLER GARNISH ASSEMBLY LH
-
Remove the 2 screws.
-
Disengage the clip.
-
Pass the anchor of the front seat outer belt assembly LH through the center pillar garnish assembly LH and remove the center pillar garnish assembly LH.
-
-
REMOVE FRONT DOOR SCUFF PLATE RH
Tech Tips
Use the same procedure as for the LH side.
-
REMOVE FRONT DOOR OPENING TRIM COVER RH
Tech Tips
Use the same procedure as for the LH side.
-
REMOVE FRONT PILLAR GARNISH RH
Tech Tips
Use the same procedure as for the LH side.
-
REMOVE REAR DOOR SCUFF PLATE RH
Tech Tips
Use the same procedure as for the LH side.
-
REMOVE LOWER CENTER PILLAR GARNISH RH
Tech Tips
Use the same procedure as for the LH side.
-
REMOVE CENTER PILLAR GARNISH ASSEMBLY RH
Tech Tips
Use the same procedure as for the LH side.
-
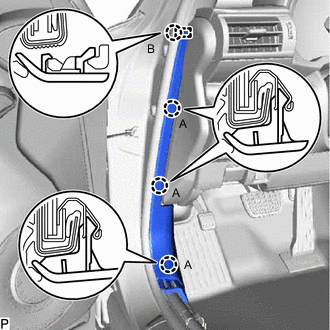
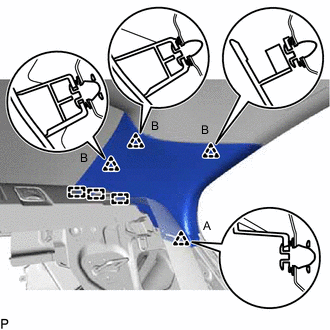
REMOVE REAR SEAT SIDE GARNISH LH
-
Pull the rear seat side garnish LH as shown in the illustration to disengage the claw (A) and guide.
-
Disengage the 3 claws (B) to remove the rear seat side garnish LH.
Tech Tips
Disengage the claws from the upper side of the rear seat side garnish LH.
-
-
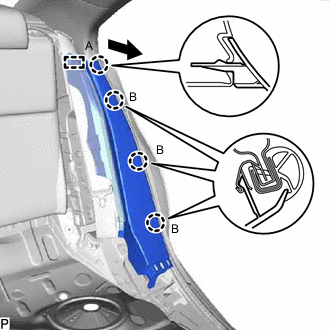
REMOVE INNER ROOF SIDE GARNISH ASSEMBLY LH
-
Using a clip remover, disengage the clip (A).
-
Disengage the 3 clips (B).
-
Disengage the 3 guides to remove the inner roof side garnish assembly LH.
-
-
REMOVE REAR SEAT SIDE GARNISH RH
Tech Tips
Use the same procedure as for the LH side.
-
REMOVE INNER ROOF SIDE GARNISH ASSEMBLY RH
Tech Tips
Use the same procedure as for the LH side.
-
REMOVE INSTRUMENT PANEL REINFORCEMENT ASSEMBLY WITH AIR CONDITIONING UNIT
-
REMOVE INNER REAR VIEW MIRROR STAY HOLDER COVER (w/ EC Mirror)
-
REMOVE RAIN SENSOR COVER (w/o Lane Departure Alert System)
w/ Rain Sensor:
-
REMOVE LANE DEPARTURE WARNING CAMERA COVER NO.1 (w/ Lane Departure Alert System)
for LHD:
for RHD:
-
REMOVE MAP LIGHT ASSEMBLY
-
REMOVE SPOT LIGHT ASSEMBLY
-
REMOVE ASSIST GRIP SUB-ASSEMBLY
Tech Tips
Use the same procedure for the LH side and RH side.
-
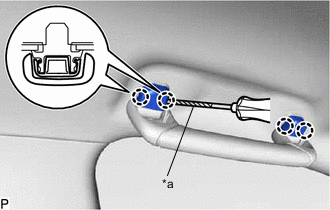
*a Protective Tape Using a screwdriver, disengage the 4 claws and remove the 2 assist grip covers.
Tech Tips
Tape the screwdriver tip before use.
-
Disengage the 2 clips and remove the assist grip.
-
Remove the 2 clips from the vehicle body.
-
-
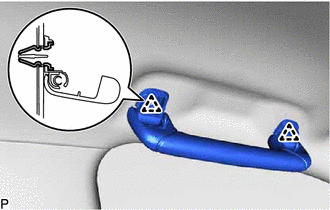
REMOVE REAR ASSIST GRIP ASSEMBLY LH
Tech Tips
Use the same procedure as for the front side.
-
REMOVE REAR ASSIST GRIP ASSEMBLY RH
Tech Tips
Use the same procedure as for the LH side.
-
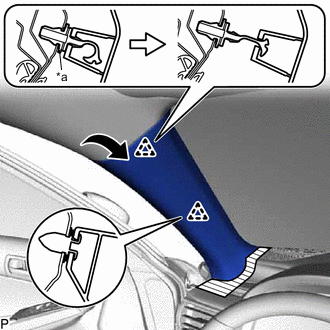
REMOVE VISOR BRACKET COVER LH
-

Using a moulding remover, disengage the 4 claws and remove the visor bracket cover LH.
-
-
REMOVE VISOR ASSEMBLY LH
-
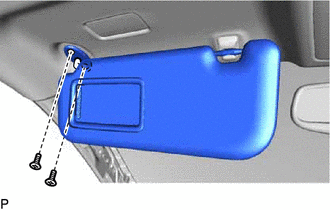
Remove the 2 screws and visor assembly LH.
-
-
REMOVE VISOR BRACKET COVER RH
Tech Tips
Use the same procedure as for the LH side.
-
REMOVE VISOR ASSEMBLY RH
Tech Tips
Use the same procedure as for the LH side.
-
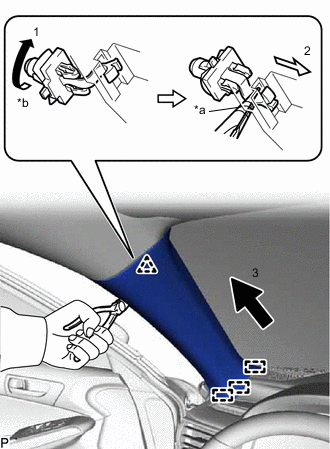
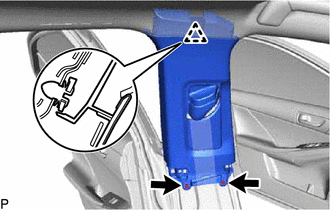
REMOVE VISOR HOLDER
Tech Tips
Use the same procedure for the LH side and RH side.
-
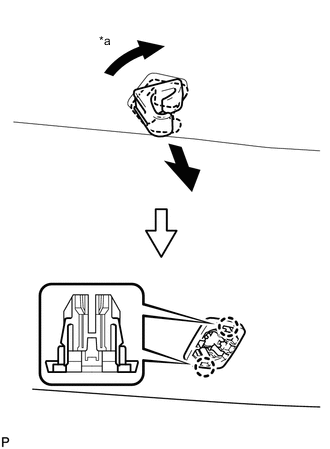
*a 45° Turn the visor holder approximately 45° and pull it out as shown in the illustration.
-
Disengage the 2 claws and remove the visor holder.
-
-
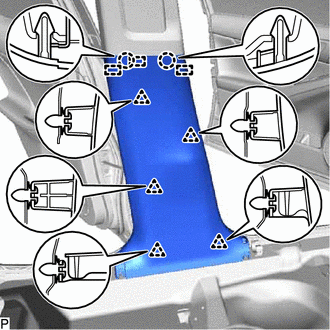
REMOVE ROOF HEADLINING ASSEMBLY
-
for Windshield Glass Side:
-
Disconnect each connector.
-
-
for Front Pillar LH Side:
-
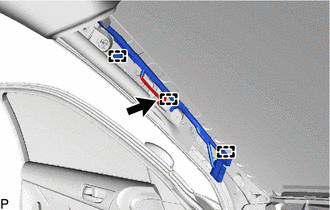
Disengage the 3 clamps.
-
Disconnect the connector.
-
-
for Roof Side (w/o Sliding Roof):
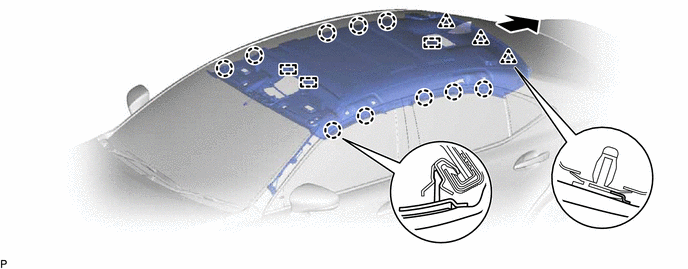
-
Disengage the 10 claws.
-
Slide the roof headlining assembly to disengage the 3 clips and 3 guides as shown in the illustration.
Tech Tips
Leave the 3 clips installed the vehicle body.
-
-
for Roof Side (w/ Sliding Roof):
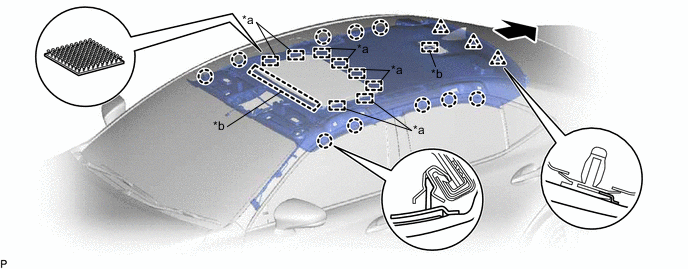
*a Fastener *b Guide
-
Disconnect the connector from the sliding roof drive gear sub-assembly.
-
Disengage the 10 claws and 8 fasteners.
-
Slide the roof headlining assembly to disengage the 3 clips and 2 guides as shown in the illustration.
Tech Tips
Leave the 3 clips installed the vehicle body.
-
-
Remove the roof headlining assembly from the vehicle through the front door LH as shown in the illustration.
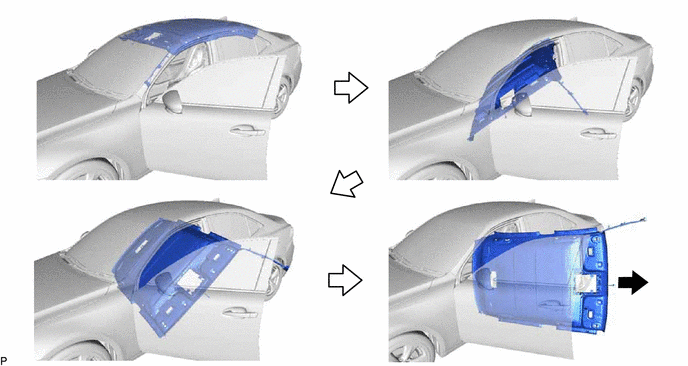
Note
Do not damage the roof headlining assembly or body interior.
-
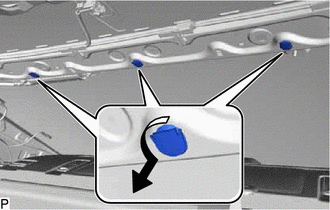
Remove the 3 clips from the vehicle body as shown in the illustration.
-
-
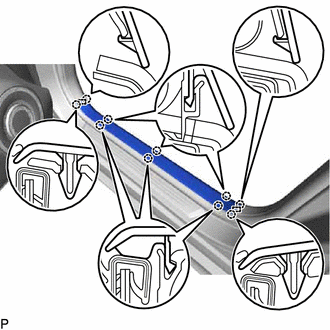
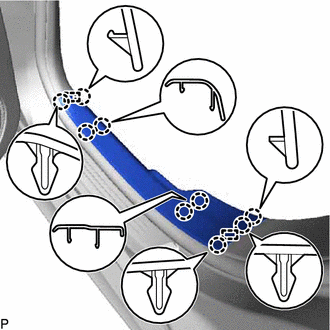
REMOVE FRONT DOOR OPENING TRIM WEATHERSTRIP LH
-
Remove the front door opening trim weatherstrip LH.
-
-
REMOVE REAR DOOR OPENING TRIM WEATHERSTRIP LH
-
Remove the rear door opening trim weatherstrip LH.
-
-
REMOVE FRONT DOOR OPENING TRIM WEATHERSTRIP RH
Tech Tips
Use the same procedure as for the LH side.
-
REMOVE REAR DOOR OPENING TRIM WEATHERSTRIP RH
Tech Tips
Use the same procedure as for the LH side.