REAR SUNSHADE ASSEMBLY INSTALLATION
PROCEDURE
-
INSTALL REAR SUNSHADE RELAY
Note
When reassembling the rear window shade assembly, eliminate static electricity by touching the vehicle body to prevent the components from being damaged.
-
Install the rear sunshade relay with the 2 screws.
-
Connect the connector.
-
Install the rear sunshade relay cover with the 8 screws.
-
Engage the 2 guides.
-
Connect the link with the 2 screws.
-
-
INSTALL REAR WINDOW SHADE ASSEMBLY
-
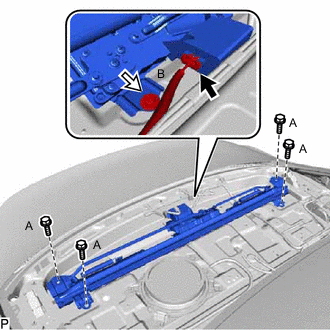
Install the rear window shade assembly, and temporarily tighten the 4 bolts (A) and bolt (B).
-
Fully tighten the 5 bolts.
-
Connect the connector.
-
-
INSTALL NO. 2 PACKAGE TRAY TRIM PANEL ASSEMBLY
-
Engage the 5 guides and 3 clips to install the No. 2 package tray trim panel assembly.
-
-
INSTALL CENTER STOP LIGHT ASSEMBLY WITH COVER
-
INSTALL PACKAGE TRAY TRIM PANEL ASSEMBLY
-
INSTALL REAR SEAT SHOULDER BELT HOLE COVER
-
CONNECT REAR SEAT 3 POINT TYPE OUTER BELT ASSEMBLY LH
-
CONNECT REAR SEAT 3 POINT TYPE OUTER BELT ASSEMBLY RH
Tech Tips
Use the same procedure as for the LH side.
-
INSTALL NO. 3 ROOM PARTITION COVER
-
INSTALL NO. 2 ROOM PARTITION COVER
-
INSTALL NO. 1 ROOM PARTITION COVER
Tech Tips
Use the same procedure as for the No. 2 room partition cover.
-
INSTALL REAR SEAT SUB FLOOR PANEL
-
INSTALL FRONT LUGGAGE COMPARTMENT TRIM COVER
-
INSTALL LUGGAGE COMPARTMENT FLOOR MAT
-
INSTALL INNER ROOF SIDE GARNISH ASSEMBLY LH
-
INSTALL INNER ROOF SIDE GARNISH ASSEMBLY RH
Tech Tips
Use the same procedure as for the LH side.
-
INSTALL REAR SEAT SIDE GARNISH LH
-
INSTALL REAR SEAT SIDE GARNISH RH
Tech Tips
Use the same procedure as for the LH side.
-
INSTALL REAR DOOR SCUFF PLATE LH
-
INSTALL REAR DOOR SCUFF PLATE RH
Tech Tips
Use the same procedure as for the LH side.
-
INSTALL REAR SEAT ASSEMBLY