ROCKER PANEL MOULDING REASSEMBLY
CAUTION / NOTICE / HINT
Tech Tips
-
Use the same procedure for the LH side and RH side.
-
The following procedure is for the LH side.
PROCEDURE
-
INSTALL NO. 1 SIDE MUDGUARD PROTECTOR
-
Clean the vehicle body surface.
-
Using a heat light, heat the vehicle body surface.
-
Remove the double-sided tape from the vehicle body.
-
Wipe off any tape adhesive residue with cleaner.
-
-
Clean the No. 1 side mudguard protector (if reusing the No. 1 side mudguard protector).
-
Using a heat light, heat the No. 1 side mudguard protector.
-
Remove the double-sided tape from the No. 1 side mudguard protector.
-
Wipe off any tape adhesive residue with cleaner.
-
Apply new double-sided tape to the No. 1 side mudguard protector.
-
-
Remove the release paper from the face of the No. 1 side mudguard protector.
Tech Tips
After removing the release paper, keep the exposed adhesive free from foreign matter.
-
for Rear Side:
-
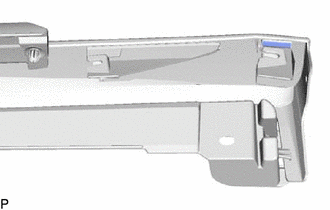
Install a new No. 1 side mudguard protector to the rocker panel moulding body as shown in the illustration.
Tech Tips
After removing the release paper, keep the exposed adhesive free from foreign matter.
-
-
for Front Side:
-
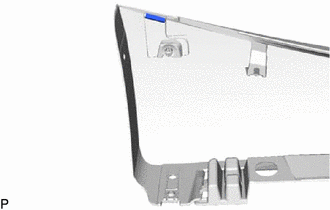
Install a new No. 1 side mudguard protector to the rocker panel moulding body as shown in the illustration.
Tech Tips
After removing the release paper, keep the exposed adhesive free from foreign matter.
-
-
-
INSTALL NO. 2 SIDE MUDGUARD PROTECTOR
-
Clean the vehicle body surface.
-
Using a heat light, heat the vehicle body surface.
-
Remove the double-sided tape from the vehicle body.
-
Wipe off any tape adhesive residue with cleaner.
-
-
Clean the No. 2 side mudguard protector (if reusing the side panel emblem).
-
Using a heat light, heat the No. 2 side mudguard protector.
-
Remove the double-sided tape from the No. 2 side mudguard protector.
-
Wipe off any tape adhesive residue with cleaner.
-
Apply new double-sided tape to the No. 2 side mudguard protector.
-
-
Install a new No. 2 side mudguard protector.
-
Remove the release paper from the face of the No. 2 side mudguard protector.
Tech Tips
After removing the release paper, keep the exposed adhesive free from foreign matter.
-
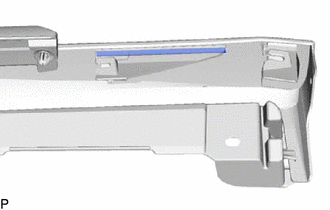
Install the No. 2 side mudguard protector as shown in the illustration.
-
-
-
INSTALL NO. 1 ROCKER PANEL MOULDING PROTECTOR
-
Clean the vehicle body surface.
-
Using a heat light, heat the vehicle body surface.
-
Remove the double-sided tape from the vehicle body.
-
Wipe off any tape adhesive residue with cleaner.
-
-
Clean the No. 1 rocker panel moulding protector (if reusing the No. 1 rocker panel moulding protector).
-
Using a heat light, heat the No. 1 rocker panel moulding protector.
-
Remove the double-sided tape from the No. 1 rocker panel moulding protector.
-
Wipe off any tape adhesive residue with cleaner.
-
Apply new double-sided tape to the No. 1 rocker panel moulding protector.
-
-
Install a new No. 1 rocker panel moulding protector.
-
Remove the release paper from the face of the No. 1 rocker panel moulding protector.
Tech Tips
After removing the release paper, keep the exposed adhesive free from foreign matter.
-
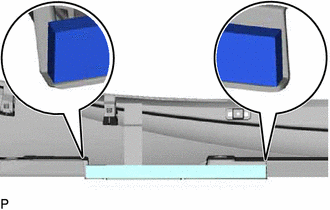
Install the 2 No. 1 rocker panel moulding protectors as shown in the illustration.
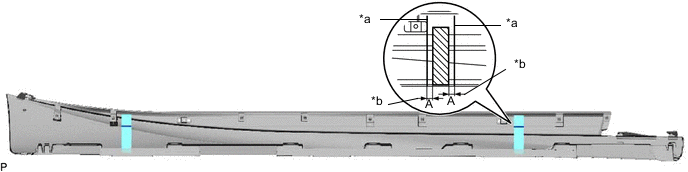
*a Marking *b Dimension Reference Measurement Dimension Measurement A 10.0 mm
-
-
-
INSTALL NO. 3 ROCKER PANEL MOULDING PROTECTOR
-
Clean the vehicle body surface.
-
Using a heat light, heat the vehicle body surface.
-
Remove the double-sided tape from the vehicle body.
-
Wipe off any tape adhesive residue with cleaner.
-
-
Clean the No. 3 rocker panel moulding protector (if reusing the No. 3 rocker panel moulding protector).
-
Using a heat light, heat the No. 3 rocker panel moulding protector.
-
Remove the double-sided tape from the No. 3 rocker panel moulding protector.
-
Wipe off any tape adhesive residue with cleaner.
-
Apply new double-sided tape to the No. 3 rocker panel moulding protector.
-
-
Install a new No. 3 rocker panel moulding protector.
-
Remove the release paper from the face of the No. 3 rocker panel moulding protector.
Tech Tips
After removing the release paper, keep the exposed adhesive free from foreign matter.
-
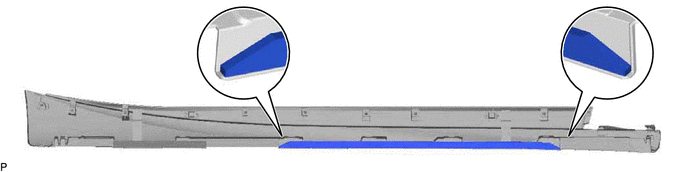
Install the No. 3 rocker panel moulding protector as shown in the illustration.
-
-
-
INSTALL NO. 2 ROCKER PANEL MOULDING PROTECTOR
-
Clean the vehicle body surface.
-
Using a heat light, heat the vehicle body surface.
-
Remove the double-sided tape from the vehicle body.
-
Wipe off any tape adhesive residue with cleaner.
-
-
Clean the No. 2 rocker panel moulding protector (if reusing the No. 2 rocker panel moulding protector).
-
Using a heat light, heat the No. 2 rocker panel moulding protector.
-
Remove the double-sided tape from the No. 2 rocker panel moulding protector.
-
Wipe off any tape adhesive residue with cleaner.
-
Apply new double-sided tape to the No. 2 rocker panel moulding protector.
-
-
Install a new No. 2 rocker panel moulding protector.
-
Remove the release paper from the face of the No. 2 rocker panel moulding protector.
Tech Tips
After removing the release paper, keep the exposed adhesive free from foreign matter.
-
Install the No. 2 rocker panel moulding protector as shown in the illustration.
-
-