HEADLIGHT LEVELING ECU REMOVAL
PROCEDURE
-
PRECAUTION (w/ AVS)
Note
After turning the engine switch off, waiting time may be required before disconnecting the cable from the negative (-) battery terminal. Therefore, make sure to read the disconnecting the cable from the negative (-) battery terminal notices before proceeding with work.
-
DISCONNECT CABLE FROM NEGATIVE BATTERY TERMINAL (w/ AVS)
Note
When disconnecting the cable, some systems need to be initialized after the cable is reconnected.
-
REMOVE INSTRUMENT PANEL FINISH PANEL END LH (for LHD)
-
REMOVE FRONT NO. 1 CONSOLE BOX INSERT (for LHD)
-
REMOVE FRONT DOOR SCUFF PLATE LH
-
REMOVE FRONT DOOR OPENING TRIM COVER LH
-
REMOVE FLOOR CARPET HOOK (for LHD)
-
REMOVE ACCELERATOR PEDAL PAD (for LHD)
-
REMOVE ACCELERATOR PEDAL ASSEMBLY (for LHD)
-
REMOVE NO. 2 INSTRUMENT PANEL UNDER COVER SUB-ASSEMBLY (for RHD)
-
REMOVE ACCELERATION SENSOR (w/ AVS)
-
REMOVE HEADLIGHT LEVELING ECU ASSEMBLY
-
for LHD:
-
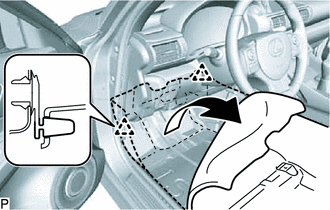
Using a clip remover, disengage the 2 clips.
-
Turn back the front floor mat as shown in the illustration.
-

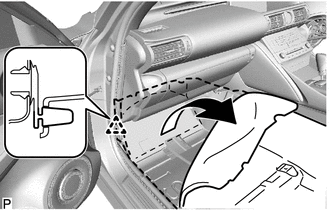
Disengage the 2 clamps to remove the No. 3 dash panel insulator pad.
-
-
for RHD:
-
Using a clip remover, disengage the clip.
-
Turn back the front floor mat as shown in the illustration.
-
-
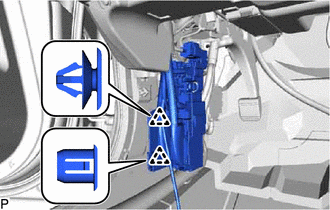
Using a clip remover, disengage the 2 clips to disconnect the connector holder.
-
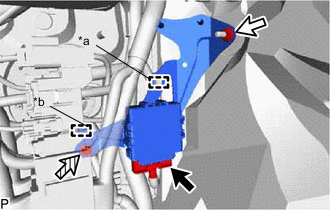
*a Clamp *b Guide 
Nut 
Bolt Disconnect the connector.
-
Disengage the clamp.
-
Remove the nut and bolt.
-
Disengage the guide to remove the headlight leveling ECU assembly.
-