FUEL PUMP(for High Pressure) REMOVAL
PROCEDURE
-
DISCHARGE FUEL SYSTEM PRESSURE
-
PRECAUTION
Note
After turning the engine switch off, waiting time maybe required before disconnecting the cable from the negative (-) battery terminal. Therefore, make sure to read the disconnecting the cable from the negative (-) battery terminal notice before proceeding with work.
-
DISCONNECT CABLE FROM NEGATIVE BATTERY TERMINAL
Note
When disconnecting the cable, some systems need to be initialized after the cable is reconnected.
-
REMOVE INTAKE MANIFOLD
-
REMOVE NO. 3 WATER BY-PASS PIPE
-
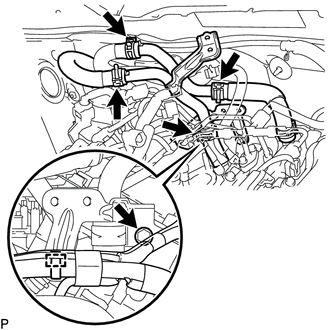
Slide the 2 clips and disconnect the inlet heater water hose A and outlet heater water hose A from the No. 3 water by-pass pipe.
-
Disengage the wire harness clamp from the No. 3 water by-pass pipe.
-
Remove the bolt.
-
Slide the 2 clips and disconnect the No. 8 water by-pass hose, No. 9 water by-pass hose and remove the No. 3 water by-pass pipe.
-
-
REMOVE FUEL PRESSURE PULSATION DAMPER ASSEMBLY
-
REMOVE NO. 1 FUEL PIPE SUB-ASSEMBLY
-
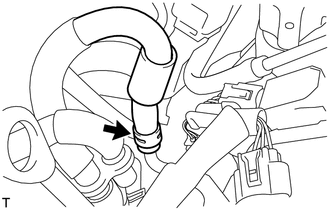
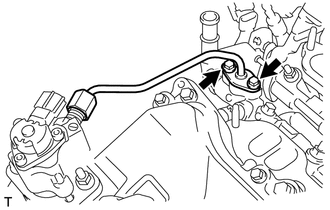
Slide the clip and disconnect the No. 3 fuel hose from the No. 1 fuel pipe sub-assembly.
-
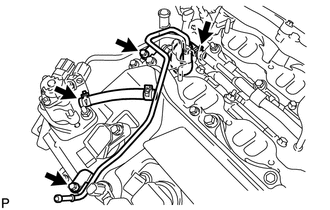
Slide the clip and disconnect the No. 1 fuel hose from the fuel relief valve assembly.
-
Slide the clip and disconnect the No. 2 fuel hose from the fuel pump assembly.
-
Remove the 2 bolts and No. 1 fuel pipe sub-assembly.
-
-
DISCONNECT NO. 2 FUEL PIPE SUB-ASSEMBLY
-
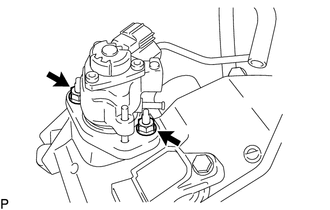
Disconnect the fuel pump connector.
-
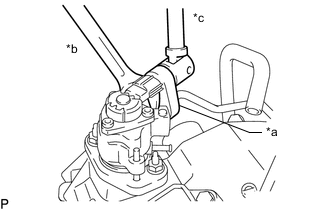
*a 19 mm Union Nut Wrench *b Hold *c Turn Using a 21 mm wrench, secure the union bolt on the fuel pump side in place. Using a 19 mm union nut wrench, loosen the union nut and remove the No. 2 fuel pipe sub-assembly.
Note
-
There must be absolutely no free play in the union bolt on the fuel pump assembly side.
-
If the union bolt on the fuel pump assembly side has free play, replace the fuel pump assembly.
-
-
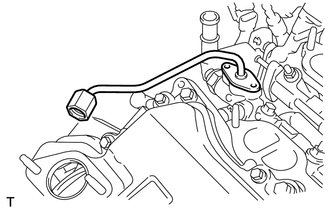
Remove the 2 bolts on the fuel delivery pipe sub-assembly side.
Note
-
Do not remove the No. 2 fuel pipe sub-assembly from the fuel delivery pipe sub-assembly. Only remove the 2 bolts.
-
If the No. 2 fuel pipe sub-assembly is accidentally removed, replace its O-ring, No. 1 back-up ring and No. 2 back-up ring.
-
-
-
REMOVE FUEL PUMP ASSEMBLY
-
Remove the 2 nuts, fuel pump assembly and fuel pump insulator from the cylinder head sub-assembly.
-
-
REMOVE NO. 2 FUEL PIPE SUB-ASSEMBLY
-
Remove the No. 2 fuel pipe sub-assembly from the fuel delivery pipe sub-assembly.
Note
Pull and remove the No. 2 fuel pipe sub-assembly in a straight line to avoid damage to the seal surface of the fuel delivery pipe sub-assembly O-ring.
-
Remove the O-ring, No. 1 back-up ring, No. 2 back-up ring, No. 3 back-up ring and E-ring from the No. 2 fuel pipe sub-assembly.
-