ТОПЛИВНАЯ СИСТЕМА МЕРЫ ПРЕДОСТОРОЖНОСТИ

-
IGNITION SWITCH EXPRESSION
Tech Tips
The type of ignition switch used on this model differs depending on the specifications of the vehicle. The expressions listed in the table below are used in this section.
Expression Ignition Switch (Position) Engine Switch (Condition) Ignition Switch off LOCK Off (Lock) Ignition Switch ACC ACC On (ACC) Ignition Switch ON ON On (IG) Engine Start START ON (Start) -
BEFORE WORKING ON FUEL SYSTEM
-
Do not work near an open flame.
-
Keep gasoline away from rubber and leather parts.
-
Discharge the fuel pressure before disconnecting the fuel line to prevent gasoline from spilling out. Refer to the following procedure.
-
-
DISCHARGE FUEL SYSTEM PRESSURE
CAUTION:
-
The Discharge Fuel System Pressure procedures must be performed before disconnecting any part of the fuel system.
-
After performing the Discharge Fuel System Pressure procedures, pressure will remain in the fuel line. When disconnecting the fuel line, place a cloth or equivalent over fittings to reduce the risk of fuel spray.
-
Remove the rear console box sub-assembly.
-
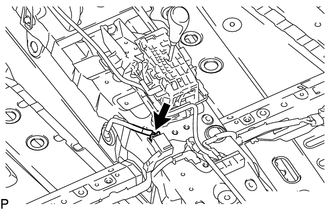
Disconnect the fuel pump and sender gauge connector.
-
Start the engine. After the engine has stopped, turn the ignition switch off.
-
Check that the engine does not start.
-
Remove the fuel tank cap and discharge the pressure in the fuel tank completely.
-
Connect the fuel pump and sender gauge connector.
-
Install the rear console box sub-assembly.
-
-
FUEL SYSTEM
-
When disconnecting the fuel pressure fuel line, a large amount of gasoline will spill out. Follow these procedures.
-
Disconnect the fuel pump tube.
-
Drain any fuel remaining inside the fuel pump tube.
-
To protect the disconnected fuel pump tube from damage and contamination, cover it with a plastic bag.
-
Put a container under the connection.
-
-
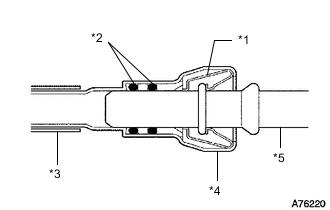
*1 Retainer *2 O-Ring *3 Nylon Tube *4 Fuel Tube Connector *5 Fuel Pipe Observe these precautions when disconnecting a fuel delivery pipe (metallic type).
Tech Tips
The structure of a fuel tube connector is as shown in the illustration.
-
Check if there is any damage or foreign matter on the fuel pipe connections.
-
*1 No. 2 Fuel Pipe Clamp Remove the No. 2 fuel pipe clamp.
Note
Do not reuse the No. 2 fuel pipe clamp.
-
Find the metallic connector of the fuel tube assembly.
-
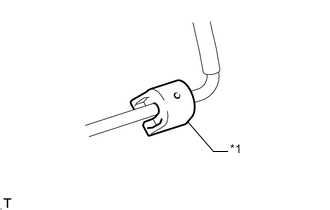
Install SST to the connector as shown in the illustration.
- SST
- 09268-21011
-
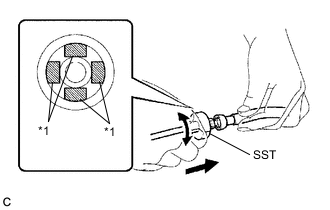
*1 Retainer Turn SST, align the retainers inside the fuel tube connector with the chamfers of SST and insert SST into the connector.
-
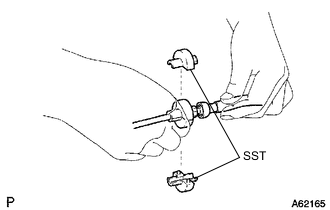
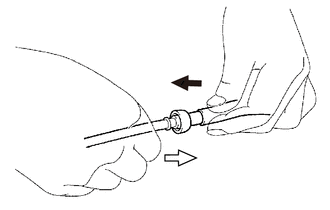
Slide SST and the fuel tube connector together towards the fuel tube assembly.
-
-
Observe these precautions when connecting a fuel tube connector (metallic type).
-
Check if there is any damage or foreign matter on the fuel pipe connection.
-
Match the axis of the fuel tube connector with the axis of the fuel pipe, and push the fuel pipe into the fuel tube connector until the fuel tube connector makes a "click" sound. If the fuel pipe is difficult to push into the fuel tube connector, apply a small amount of clean engine oil to the tip of the fuel pipe.
-

Push 
Pull After connecting, check if the fuel pipe and the fuel tube connector are securely connected by pulling on them.
-
Install a new No. 2 fuel pipe clamp.
-
Check that there is no fuel leakage.
-
-
Observe these precautions when disconnecting the fuel tube connector (for quick type A).
-
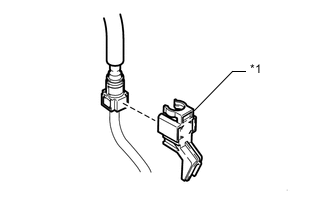
*1 No. 1 Fuel Pipe Clamp Remove the No. 1 fuel pipe clamp.
-
Check for dirt or mud on the pipe and around the connector before disconnection. Clean if necessary.
-
*1 Retainer *2 O-Ring Pinch Pull Out If the connector and pipe are stuck together, pinch the connector, and then push and pull the pipe to disconnect the pipe and pull it out.
Note
-
Check for any dirt and foreign matter contamination in the pipe and around the connector. Clean if necessary. Foreign matter may damage the O-ring or cause leaks in the seal between the pipe and connector.
-
Do not use any tools to separate the pipe and connector.
-
Check for any dirt and foreign matter on the pipe seal surface. Clean if necessary.
-
Do not forcibly bend, twist or turn the nylon tube.
-
Protect the disconnected part by covering it with a plastic bag and tape after disconnecting the main tube.
-
If the pipe and connector are stuck together, pinch the connector between your fingers and turn it carefully to free it. Then disconnect the main tube.
-
-
Check for dirt or mud on the seal surface of the disconnected pipe. Clean if necessary.
-
To protect the disconnected pipe and connector from damage and contamination, cover them with a plastic bag.
-
-
Observe these precautions when connecting the fuel tube connector (for quick type A)
-
Check that there is no damage or contamination in the connecting part of the pipe.
-

*a Push *b Pull Align the axis of the connector with the axis of the pipe. Push the pipe into the connector until the connector makes a "click" sound. If the connection is tight, apply a small amount of fresh engine oil to the tip of the pipe.
-
After connecting the pipe and the connector, check that the pipe and connector are securely connected by trying to pull them apart.
-
Install the No. 1 fuel pipe clamp.
-
Inspect for fuel leaks.
-
-
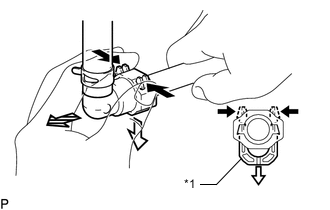
Observe these precautions when disconnecting the fuel tube connector (for quick type B).
-
Check that there is no damage or foreign matter on the part of the pipe that contacts the connector.
-
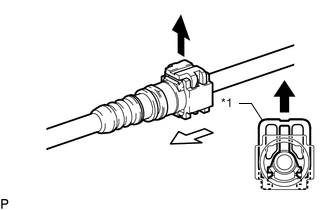
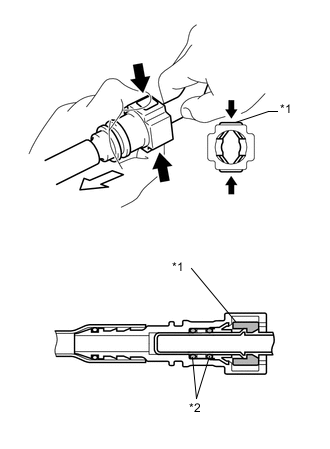
*1 Retainer Pull Pull out Pull the tabs of the fuel tube connector retainer as shown in the illustration to disconnect the fuel tube connector from the pipe.
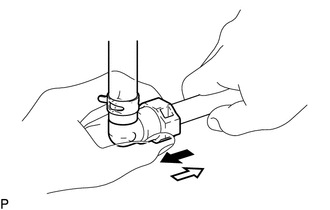
-
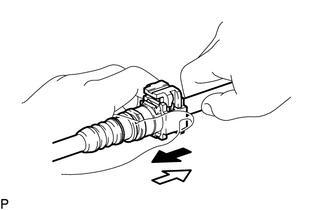
Pull Push If the connector and pipe are stuck together, hold the fuel pipe by hand and push and pull on the connector. Pull the two pipes apart to separate the connector
Note
-
Check for any dirt and foreign matter contamination in the pipe and around the connector. Clean if necessary. Foreign matter may damage the O-ring or cause leaks in the seal between the pipe and connector.
-
Do not use any tools to separate the pipe and connector.
-
Check for any dirt and foreign matter on the pipe seal surface. Clean if necessary.
-
Do not forcibly bend, twist or turn the nylon tube.
-
Protect the disconnected part by covering it with a plastic bag and tape after disconnecting the main tube.
-
If the pipe and connector are stuck together, pinch the connector between your fingers and turn it carefully to free it. Then disconnect the main tube.
-
-
Check the sealing surface of the disconnected parts, and clean them if necessary.
-
To protect the disconnected pipe and connector from damage and contamination, cover them with a plastic bag.
-
-
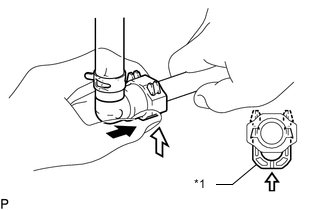
Observe these precautions when connecting the fuel tube connector (for quick type B).
-
Check that there is no damage or contamination in the connected part of the pipe.
-
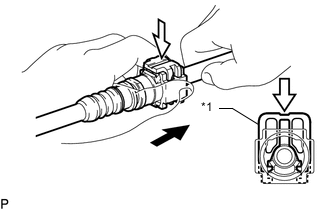
*1 Retainer Insert Push Line up the pipe and connector and push them together until a "click" sound is heard. If the connection is tight, apply a small amount of fresh engine oil to the tip of the pipe.
-
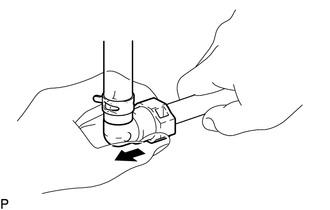
Push down the retainer.
-
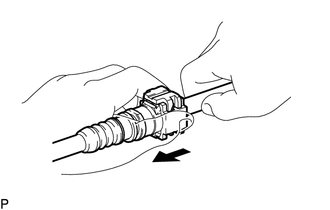
Pull After connecting the pipe and connector, check that the pipe and connector are securely connected by trying to pull them apart.
-
Inspect for fuel leaks.
-
-
Observe these precautions when disconnecting the fuel tube connector (for quick type C).
-
*1 Retainer Push Pull 
Pull Out Detach the 2 claws of the connector retainer. Push down on the connector and disconnect it from the pipe.
-
Pull Push If the connector and pipe are stuck together, pinch the pipe by hand and push and pull the connector to disconnect it.
Note
-
Check for any dirt and foreign matter contamination in the pipe and around the connector. Clean if necessary. Foreign matter may damage the O-ring or cause leaks in the seal between the pipe and connector.
-
Do not use any tools to separate the pipe and connector.
-
Check for any dirt and foreign matter on the pipe seal surface. Clean if necessary.
-
Do not forcibly bend, twist or turn the nylon tube.
-
Protect the disconnected part by covering it with a plastic bag and tape after disconnecting the main tube.
-
If the pipe and connector are stuck together, pinch the connector between your fingers and turn it carefully to free it. Then disconnect the main tube.
-
-
Check for foreign matter on the seal surface of the disconnected pipe. Clean if necessary.
-
To protect the disconnected pipe and connector from damage and foreign matter, cover them with a plastic bag.
-
-
Observe these precautions when connecting the fuel tube connector (for quick type C).
-
Check for foreign matter on the pipe and around the connector before connecting them. Clean if necessary.
-
*1 Retainer Insert Push Align the axis of the connector with the axis of the pipe. Push the pipe into the connector, and then push up on the retainer.
Note
-
Before connecting the tube connectors to the pipes, check if there is any damage or foreign matter in the connectors.
-
After connecting the pipe and connector, check that the pipe and connector are securely connected by trying to pull them apart.
Pull -
-
Inspect for fuel leaks.
-
-
-
FUEL SUCTION TUBE ASSEMBLY WITH PUMP
-
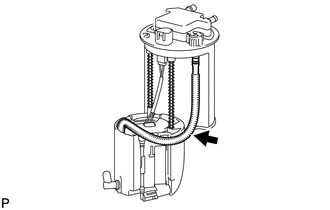
Do not disconnect the nylon tube shown in the illustration when disassembling the fuel suction tube assembly with pump. Doing so will cause reassembly of the fuel suction tube assembly with pump to be impossible as the tube is welded to the plate.
-