БЛОК ДВИГАТЕЛЯ УСТАНОВКА

CAUTION / NOTICE / HINT
Note
-
Always be sure to check the tightening torque.
-
If the pressure lines are leaking after installation, they must be replaced.
-
Do not overtighten the pressure lines.
-
All pressure lines may only be reused 3 times. After the 3rd time, they must be replaced.
PROCEDURE
-
INSTALL DRIVE SHAFT BEARING BRACKET
-
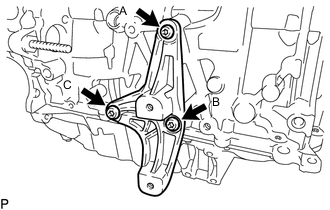
Using a T50 "TORX" socket wrench, install the drive shaft bearing bracket with the 3 bolts.
- Torque:
- 63.7 N*m { 650 kgf*cm, 47 ft.*lbf }
Note
-
Temporarily install the bolt (A), and then tighten the 3 bolts in the order of (B), (A) and (C).
-
Make sure that the bolts and bolt holes are free of oil. Clean them if necessary.
-
-
INSTALL VACUUM CONTROL VALVE BRACKET
-
INSTALL EGR BYPASS VALVE SWITCHING VALVE
-
INSTALL GLOW PLUG ASSEMBLY
-
INSTALL COMMON RAIL ASSEMBLY
-
INSTALL INJECTION PIPE SUB-ASSEMBLY
-
INSTALL FUEL INLET PIPE SUB-ASSEMBLY
-
INSTALL NO. 1 ENGINE HANGER
-
Install the No. 1 engine hanger to the cylinder head sub-assembly with the bolt.
Tech Tips
Refer to "SPECIFICATIONS - STANDARD BOLT" for the tightening torque.
-
-
INSTALL NO. 2 ENGINE HANGER
-
Install the No. 2 engine hanger to the cylinder head sub-assembly with the 2 bolts.
Tech Tips
Refer to "SPECIFICATIONS - STANDARD BOLT" for the tightening torque.
-
-
INSTALL EGR VALVE BRACKET
-
Install the EGR valve bracket to the cylinder head sub-assembly with the 2 bolts.
Tech Tips
Refer to "SPECIFICATIONS - STANDARD BOLT" for the tightening torque.
-
-
INSTALL TURBOCHARGER STAY
-
Install the turbocharger stay with the 2 bolts.
Tech Tips
Refer to "SPECIFICATIONS - STANDARD BOLT" for the tightening torque.
-
-
INSTALL NO. 2 TURBO INSULATOR
-
Install the No. 2 turbo insulator with the 3 bolts.
Tech Tips
Refer to "SPECIFICATIONS - STANDARD BOLT" for the tightening torque.
-
-
INSTALL NO. 1 TURBO OIL PIPE
-
Install the No. 1 turbo oil pipe, 2 nuts and 2 new gaskets with the union bolt.
- Torque:
- Union bolt
- 35 N*m { 357 kgf*cm, 26 ft.*lbf }
Tech Tips
Refer to "SPECIFICATIONS - STANDARD BOLT" for the tightening torque.
-
-
INSTALL EXHAUST MANIFOLD
-
INSTALL EGR COOLER ASSEMBLY WITH EGR VALVE ASSEMBLY
-
INSTALL TURBOCHARGER SUB-ASSEMBLY
-
CONNECT NO. 1 TURBO OIL PIPE
-
INSTALL TURBO OIL OUTLET PIPE
-
INSTALL EXHAUST MANIFOLD CONVERTER SUB-ASSEMBLY
-
INSTALL NO. 1 EXHAUST MANIFOLD HEAT INSULATOR
-
INSTALL FUEL FEED PIPE SUB-ASSEMBLY
-
Install the fuel feed pipe sub-assembly with the 2 bolts.
Tech Tips
Refer to "SPECIFICATIONS - STANDARD BOLT" for the tightening torque.
-
Connect the 2 fuel hoses to the fuel supply pump assembly, and tighten the 2 clamps to secure the 2 hoses.
-
Connect the fuel return tube to the common rail assembly.
-
Attach the fuel hose clamp.
-
Connect the nozzle leakage pipe assembly to the fuel feed pipe sub-assembly.
-
-
INSTALL INTAKE MANIFOLD
-
INSTALL NO. 1 VACUUM PIPE
-
INSTALL NO. 2 VACUUM HOSE ASSEMBLY
-
Install the No. 2 vacuum hose assembly to the No. 2 engine hanger with the bolt and nut.
- Torque:
- 8.5 N*m { 87 kgf*cm, 75 in.*lbf }
-
-
CONNECT NO. 2 VACUUM HOSE ASSEMBLY
-
INSTALL ENGINE OIL LEVEL DIPSTICK GUIDE
-
INSTALL DIESEL THROTTLE BODY ASSEMBLY
-
INSTALL V-RIBBED BELT TENSIONER ASSEMBLY
-
Install the V-ribbed belt tensioner assembly with the 2 bolts.
- Torque:
- 20 N*m { 204 kgf*cm, 15 ft.*lbf }
-
-
INSTALL ENGINE MOUNTING BRACKET
-
Install the 2 stud bolts to the engine mounting bracket.
- Torque:
- 10 N*m { 102 kgf*cm, 7 ft.*lbf }
-
Using an E12 "TORX" socket wrench, install the engine mounting bracket with the 3 bolts.
- Torque:
- 59 N*m { 602 kgf*cm, 44 ft.*lbf }
-
-
INSTALL IDLER PULLEY ASSEMBLY
-
Using a T50 "TORX" socket wrench, tighten the bolt to install the idler pulley assembly.
- Torque:
- 40 N*m { 408 kgf*cm, 30 ft.*lbf }
-
-
INSTALL GENERATOR ASSEMBLY
-
INSTALL COMPRESSOR ASSEMBLY WITH PULLEY (w/ Air Conditioning System)
-
INSTALL V-RIBBED BELT
-
INSTALL ENGINE WIRE
-
Install the engine wire to the engine assembly.
-
-
INSTALL ENGINE COVER