ROOF DRIP SIDE FINISH MOULDING REMOVAL
CAUTION / NOTICE / HINT
Tech Tips
-
Use the same procedure for the RH and LH sides.
-
The procedure listed below is for the LH side.
PROCEDURE
-
REMOVE ROOF RACK ASSEMBLY LH (w/ Roof Rack)
-
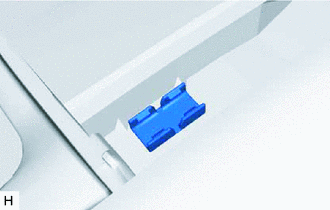
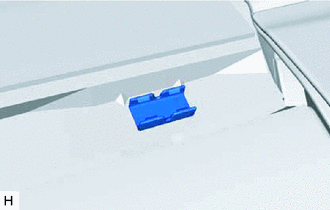
REMOVE ROOF DRIP SIDE FINISH MOULDING JOINT COVER LH (w/o Roof Rack)
Tech Tips
Use the same procedure for both roof drip side finish moulding joint covers.
-
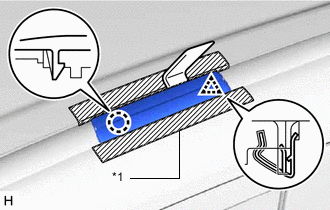
*1 Protective Tape Put protective tape around the roof drip side finish moulding joint cover LH.
-
Using moulding remover D, detach the clip and claw and remove the roof drip side finish moulding joint cover LH.
-
-
REMOVE ROOF DRIP SIDE FINISH MOULDING LH
Tech Tips
When removing the roof drip side finish moulding, heat the vehicle body and roof drip side finish moulding using a heat light.
Standard Item Temperature Vehicle Body 40 to 60°C (104 to 140°F) Roof Drip Side Finish Moulding 20 to 30°C (68 to 86°F) Note
Do not heat the vehicle body or roof drip side finish moulding excessively.
-
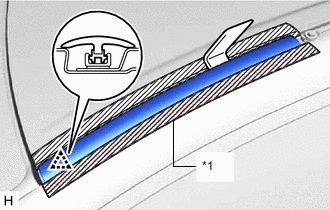
*1 Protective Tape Put protective tape around the roof drip side finish moulding LH.
-
Using moulding remover D, detach the clip and remove the roof drip side finish moulding LH.
Note
-
When removing the roof drip side finish moulding, be careful not to damage the roof drip side finish moulding clips.
-
If a roof drip side finish moulding clip is damaged or becomes detached from the vehicle, replace it with a new one.
-
-
-
REMOVE CENTER NO. 2 ROOF DRIP SIDE FINISH MOULDING LH
*1 Protective Tape
-
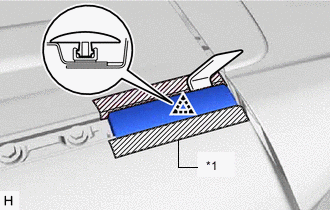
Put protective tape around the center No. 2 roof drip side finish moulding LH.
-
Using moulding remover D, remove the center No. 2 roof drip side finish moulding LH.
-
-
REMOVE REAR ROOF DRIP SIDE FINISH MOULDING LH
Tech Tips
When removing the rear roof drip side finish moulding, heat the vehicle body and rear roof drip side finish moulding using a heat light.
Standard Item Temperature Vehicle Body 40 to 60°C (104 to 140°F) Rear Roof Drip Side Finish Moulding 20 to 30°C (68 to 86°F) Note
Do not heat the vehicle body or rear roof drip side finish moulding excessively.
-
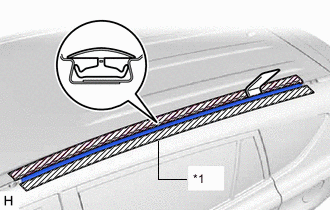
*1 Protective Tape Put protective tape around the rear roof drip side finish moulding LH.
-
Using moulding remover D, detach the clip and remove the rear roof drip side finish moulding LH.
Note
-
When removing the rear roof drip side finish moulding, be careful not to damage the roof drip side finish moulding clips.
-
If a roof drip side finish moulding clip is damaged or becomes detached from the vehicle, replace it with a new one.
-
-
-
REMOVE ROOF DRIP SIDE FINISH MOULDING CLIP (for Front Side)
Tech Tips
Perform the following procedures if replacing a roof drip side finish moulding clip.
-
Using a heat light, heat the clip and vehicle body.
Note
Do not heat the clip and vehicle body excessively.
-
Remove the roof drip side finish moulding clip.
-
-
REMOVE ROOF DRIP SIDE FINISH MOULDING CLIP (for Rear Side)
Tech Tips
Perform the following procedures if replacing a roof drip side finish moulding clip.
-
Using a heat light, heat the clip and vehicle body.
Note
Do not heat the clip and vehicle bodyexcessively.
-
Remove the roof drip side finish moulding clip.
-
-
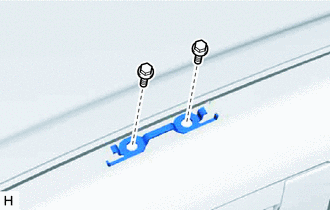
REMOVE FRONT ROOF RACK BRACKET (w/o Roof Rack)
-
Remove the 2 bolts and front roof rack bracket.
-
-
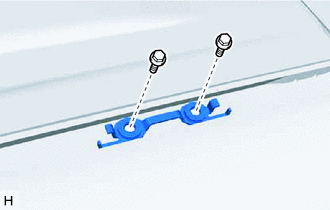
REMOVE REAR ROOF RACK BRACKET (w/o Roof Rack)
-
Remove the 2 bolts and rear roof rack bracket.
-